Do you have a question about the Bosch PTD 1 and is the answer not in the manual?
Essential safety precautions and warnings for using the measuring tool.
Specifies the correct applications and limitations of the measuring tool.
Identifies and explains the physical components of the measuring tool.
Details the meaning of symbols and readouts on the device's screen.
Provides detailed specifications, ranges, and accuracy of the tool.
Guide on inserting and replacing batteries.
Guide to first-time setup, including protection and acclimatization.
Instructions on how to power the device on and off.
Steps to prepare the tool for accurate measurements.
Covers single, continuous, surface, thermal bridge, and mould warning measurements.
Instructions for proper care and cleaning of the tool.
Solutions for errors and explanations of key terms.
Contact info for service, repairs, and disposal guidelines.
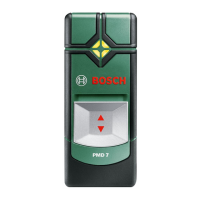
This document describes the Bosch PTD 1 thermal detector, a measuring tool designed for contact-free measurement of surface temperature, ambient temperature, and relative humidity. It also calculates the dew point temperature and can indicate thermal bridges and the risk of mould.
The PTD 1 is a versatile measuring tool that integrates multiple sensors to provide comprehensive environmental data. It features a humidity and temperature sensor (1) for ambient conditions, a reception lens (2) for infrared radiation to measure surface temperatures, and a laser beam exit opening (3) that projects a laser circle to define the measuring surface. The device calculates the dew point temperature based on the measured ambient temperature and relative humidity. It can then compare this dew point temperature with the measured surface temperature to assess the risk of mould formation. Additionally, by comparing surface and ambient temperatures, it can identify potential thermal bridges, which are areas of poor insulation.
The device operates through a measuring button (4) and various mode buttons: thermal-bridge-mode button (10), surface-temperature-mode button (11), and mould-warning-mode button (12). An On/Off button (13) controls the device's power. The display (9) shows all measured values, indicators for the selected mode, emissivity degree, unit of measure, and warnings such as low battery or errors. A signal LED (8) provides visual feedback on measurement results, particularly in thermal-bridge and mould-warning modes.
The PTD 1 is not intended for measuring body temperature, gases, or liquids, nor for commercial use. It cannot detect mould spores directly but indicates conditions conducive to mould growth.
Initial Operation: Before use, the measuring tool should be protected from moisture and direct sunlight. It should not be exposed to extreme temperatures or rapid temperature variations, as this can impair accuracy. If large temperature changes occur, allow the tool to acclimatize to the ambient temperature. Heavy impacts or falls should be avoided. It is crucial not to cover the humidity and temperature sensor (1), reception lens (2), or laser beam exit opening (3) during operation.
Switching On and Off: The device can be switched on using either the On/Off button (13) or the measuring button (4). If switched on with the On/Off button, it will enter a ready state with previously saved settings but without starting a measurement. If switched on with the measuring button, it will immediately begin a measurement using the last saved settings. To save energy, the display illumination dims after 30 seconds of inactivity and brightens again upon any button press. The tool automatically switches off after approximately 4 minutes of inactivity.
Laser Safety: The PTD 1 emits Class 2 laser radiation. Users must never direct the laser beam at persons or animals, nor stare into the laser beam directly, even from a distance, as this can cause blinding. Laser viewing glasses (15) are available to improve visualization of the laser beam but do not protect against laser radiation and should not be used as safety goggles, sunglasses, or in traffic.
Emissivity Degree Setting: For accurate surface temperature measurements, the emissivity degree of the object being measured must be set correctly. The PTD 1 offers three emissivity degrees: high (0.95), medium (0.85), and low (0.75), corresponding to different material types (e.g., concrete for high, granite for medium, porcelain for low). The emissivity degree can be adjusted using the emissivity degree button (14) and is indicated on the display (g). Incorrect emissivity settings will lead to inaccurate temperature readings and affect the reliability of thermal bridge and mould risk indications.
Measuring Surface: The laser circle defines the measuring surface for infrared temperature measurements, with the center laser point marking the center of this surface. For optimal results, the laser beam should impinge perpendicularly on the measuring surface. The size of the laser circle and measuring surface increases with distance; an optimal measuring distance is 0.5 m to 1 m. The tool should not be held directly against hot surfaces to prevent damage. The displayed surface temperature is the mean value within the laser circle.
Measuring Conditions: Highly reflective or transparent surfaces (e.g., shiny tiles, glass) can affect surface temperature measurements. Masking such surfaces with a dark, matt, heat-conductive tape can improve accuracy. Measurements through transparent materials are not possible. Environmental factors like dust, steam, or temperature variations can also lead to faulty results. It is recommended to ventilate rooms before measuring, especially if the air is contaminated or steamy, and allow the room to acclimatize. The humidity and temperature sensor (1) should not be covered or placed near interference sources like radiators or open liquids.
Measurement Modes:
Troubleshooting: The device provides error warnings (o) accompanied by a red signal LED (8).
Battery Management: The PTD 1 uses 2 x 1.5 V LR06 (AA) alkali-manganese batteries or 2 x 1.2 V HR06 (AA) rechargeable batteries. The battery low indicator (p) shows battery power levels: one segment for max. 30% and an empty segment for max. 10%. When the indicator flashes, batteries must be replaced, as measurements are no longer possible. Always replace all batteries/rechargeable batteries at the same time and avoid mixing different brands or types. Remove batteries if the tool will not be used for extended periods to prevent corrosion and discharge.
Cleaning and Storage: The measuring tool should always be stored and transported in its supplied protective pouch (16). Avoid storing it in plastic bags, as evaporation could damage the humidity and temperature sensor (1). Do not attach stickers near the sensor. Keep the measuring tool clean at all times. Wipe off debris with a moist, soft cloth; do not use cleaning agents or solvents. Ensure no fluids penetrate the measuring tool during cleaning. Exercise utmost caution when cleaning the humidity and temperature sensor (1), the reception lens (2), and the laser beam exit opening (3). Ensure no lint is present on these components. Do not attempt to remove debris with pointed objects. If necessary, debris can be carefully removed with oil-free compressed air.
Service: If the measuring tool malfunctions despite proper care, repairs should be performed by an authorized Bosch after-sales service center using original spare parts. Do not attempt to open the measuring tool yourself. For all correspondence and spare parts orders, always include the 10-digit article number found on the type plate. When sending the tool for repair, pack it in its protective pouch (16).
| Type | Infrared environment thermometer |
|---|---|
| Purpose | Indoor |
| Display type | Digital |
| Product color | Black, Green, Red |
| Display form factor | Rectangular |
| Accuracy | 1 °C |
| Temperature measurement range | -20 - 200 °C |
| Temperature measurement units | °C |
| Battery type | LR06 |
| Power source | Battery |
| Battery voltage | 1.5 V |
| Number of batteries supported | 2 |
| Batteries included | Yes |
| Weight | 300 g |
|---|