Do you have a question about the Bosch PMD 10 and is the answer not in the manual?
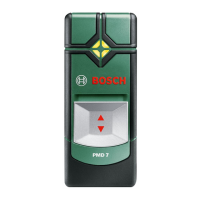
The measuring tool is intended for the detection of metals, joists and live wires in walls, ceilings and floors.
Lists and numbers the components shown in the illustration of the measuring tool.
Details the various indicators and symbols displayed on the device screen.
Instructions for opening the battery lid, inserting the battery, and checking the battery status indicator.
Procedures for protecting the tool, adjusting to ambient temperature, and switching the tool on and off.
How to switch the measuring tool on and off, and safety warnings regarding the laser beam.
How to turn the display illumination on and off using the designated button.
How to turn the audio signal on and off, and the indicator for the switched-off state.
Explains how the tool scans the base material and detects objects based on differences in material.
Details the different operating modes and their optimal use cases for best measurement results.
Describes the 'Drywall' mode for detecting wood, metal, and live conductors in drywall construction.
Notes on object detection in 'Drywall' mode, including non-metal objects and potential inaccuracies.
Describes the 'Metal' mode for detecting magnetic and non-magnetic objects and live conductors.
Explains how to detect live wires, including optimal detection conditions and potential limitations.
Instructions on how to mark detected objects using the marking hole.
Explains the temperature monitoring function and what to do if it indicates a temperature issue.
Describes the meaning of the warning indicator 'b' on the display and the required actions.
Procedure for manually recalibrating the tool if the scale shows a persistent high amplitude.
Guidelines for checking, cleaning, and maintaining the tool to ensure safe and proper working.
Information on how to contact customer service for repairs, maintenance, and spare parts.
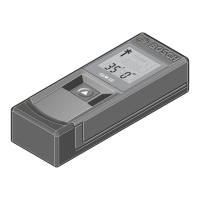
The measuring tool is intended for determining and indicating exact horizontal and vertical lines.
Details about the product's features and components.
Lists and numbers the components shown in the illustration of the measuring tool.
Note that illustrated or described accessories are not always included in the standard delivery.
Instructions for opening the battery lid, inserting batteries, and ensuring correct polarity.
Protecting the tool from moisture and sunlight, and avoiding impacts or falls.
How to switch the measuring tool on and off, and safety warnings regarding the laser beam.
Explains the importance of correct tool positioning for precise alignment using spirit levels.
Guidance on aligning the laser beam for accurate measurements.
Instructions for horizontally aligning the tool on a wall or magnetic surface using the spirit level.
Instructions for vertically aligning the tool on a wall or magnetic surface using the spirit level.
How to align the laser beam to reference points at any angle for hanging pictures or aligning elements.
Using the tool as a bubble level to check horizontal or vertical alignment, e.g., for appliances.
Methods for attaching the wall holder to various surfaces.
Using removable adhesive tape strips to attach the wall holder to sensitive surfaces without damage.
Using provided pins to attach the wall holder to drywall or wooden walls.
Instructions for attaching the wall holder to a wall using a screw.
Instructions for attaching the wall holder using commercially available adhesive tape.
Guidelines for checking and cleaning the tool to ensure safe and proper working.
Instructions for environmentally friendly disposal of measuring tools and electronic waste in EU countries.
Guidelines for recycling defective or used batteries in EU countries.
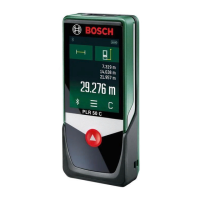
The measuring tool is intended for determining and indicating horizontal and vertical lines.
Lists and numbers the components shown in the illustration of the measuring tool.
Illustrated or described accessories are not included in the standard delivery.
Instructions for opening the battery compartment lid, inserting batteries, and checking polarity.
Protecting the tool from moisture and sunlight, and avoiding impacts or falls.
How to switch the measuring tool on and off, and safety warnings regarding the laser beam.
Explains the importance of correct tool positioning for precise alignment using spirit levels.
Guidance on aligning the laser beam for accurate measurements.
Instructions for horizontally aligning the tool on a wall or magnetic surface using the spirit level.
Instructions for vertically aligning the tool on a wall or magnetic surface using the spirit level.
How to align the laser beam to reference points at any angle for hanging pictures or aligning elements.
Using the tool as a bubble level to check horizontal or vertical alignment, e.g., for appliances.
Methods for attaching the wall holder to various surfaces.
Using removable adhesive tape strips to attach the wall holder to sensitive surfaces without damage.
Using provided pins to attach the wall holder to drywall or wooden walls.
Instructions for attaching the wall holder to a wall using a screw.
Instructions for attaching the wall holder using conventional tape (not included).
Instructions for checking and cleaning the tool to ensure safe and proper working.
Instructions for environmentally friendly disposal of measuring tools and electronic waste in EU countries.
Guidelines for recycling defective or used batteries in EU countries.
| Product color | Black, Green |
|---|---|
| Built-in display | Yes |
| Detectable materials | Ferrous metal, Live cable, Non-ferrous metal, Wood |
| Maximum detection depth (wood) | 25 mm |
| Maximum detection depth (steel) | 100 mm |
| Maximum detection depth (copper) | 80 mm |
| Maximum detection depth (live cable) | 50 mm |
| Battery life | 5 h |
| Battery type | 6LR61 |
| Battery voltage | 9 V |
| Auto power off after | 5 min |
| Number of batteries supported | 1 |
| Storage temperature (T-T) | -20 - 70 °C |
| Operating temperature (T-T) | -10 - 50 °C |
| Weight | 289 g |
|---|