Do you have a question about the BossWeld MST185 and is the answer not in the manual?
Register for warranty on the website.
Warranty claim must be made within 2 years from date of purchase.
Contact support or visit website for assistance with claims.
Avoid using the welding machine for unintended purposes.
Proper techniques for lifting, moving, and stable machine placement.
User responsibility for safety; need for trained operators.
Welding sparks require clearing inflammable materials and fire safety.
Use adequate insulation and avoid direct contact with the welding circuit.
Do not weld on coated, painted, or varnished surfaces.
Handle hot work pieces with caution after welding.
Avoid dangerous voltage accumulation when connecting multiple machines.
Store welder out of children's reach in a dry place, secured for transport.
Recycle packaging to reduce waste and pollution.
Dispose of welder environmentally, check local council for recycling.
Procedure to check for gas leaks using soapy water or bubbles.
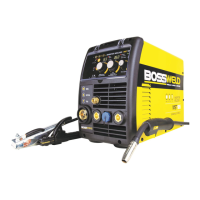
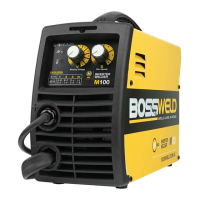
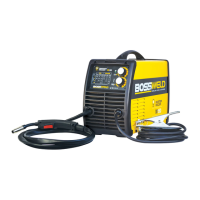
Overview of the main control panel interface.
Points for MIG/TIG torch and electrode connections.
Outlet for shielding gas used in TIG welding.
Mains power switch, gas input, and power cord connection.
Fan for cooling the machine during operation.
Select welding process (MIG/Stick/TIG) and mode (2T/4T).
Displays and adjustment knobs for current and wire feed speed.
Displays and adjustment knobs for voltage, arc force, and downslope.
Explains Power LED, welding status LEDs, and overload indicator.
Spool hub, drive roller, wire inlet, and tensioning parts for wire feeding.
Terminal for setting welding polarity (DCEN/DCEP).
Polarity setting for gasless welding.
Polarity setting for gas welding.
Open side panel, install wire spool, and secure it.
Select drive roller, feed wire through guide tube, and adjust tension.
Attach torch, install tip/nozzle, and feed wire.
Connect machine to power and switch it on.
Lay out torch, remove old liner and front parts.
Feed new liner, install retaining nut, and reattach tip/nozzle.
Explains duty cycle and thermal overload protection.
Shows example settings for MIG welding at different currents.
Explains the operational steps for 2-step and 4-step trigger control.
Products for maintaining torch and welding quality: anti-spatter, tip dip, pliers.
Connect power, earth, and electrode holder leads based on polarity.
Choosing the Stick/MMA welding output mode.
Ensure correct connections and switch the machine on.
Using knobs to set current/voltage and referring to selection guides.
Explains MMA welding, electrode compatibility, and arc force.
Guides for choosing electrode size and welding current.
Install gasless wire, select drive roller, and set up wire feed unit.
Connect MIG torch and earth clamp.
Set the machine to MIG welding mode.
Set DCEN polarity and connect earth lead to positive terminal.
Switch on machine, fine-tune wire speed and voltage.
Fine-tuning wire feed speed using the parameter knob.
Fine-tuning welding voltage using the parameter knob.
Fit gas regulator, hose, and connect to bottle and machine.
Connect MIG torch and earth clamp.
Set the machine to MIG welding mode.
Connect torch, install wire, select drive roller.
Set DCEP polarity and connect earth clamp.
Switch on machine and select MIG mode.
Adjust wire feed speed and welding voltage.
Adjust gas regulator to the correct flow rate.
Advisable to perform test welds to tune settings.
Explains interplay of voltage and wire speed controls.
Describes gun angles and nozzle-to-work piece distance.
How travel speed affects welds and factors for wire size choice.
Guide for selecting carbon steel wire based on thickness and type.
Guide for selecting stainless steel wire.
Guide for selecting aluminium wire.
Tables for setting current, voltage, wave control, and wire speed.
Explains MIG welding process, consumables, and productivity.
Details the functions and types of shielding gas used in MIG.
How shielding gas affects arc and weld pool; selection guide.
Visual representation of the MIG welding setup and arc.
Connect gas regulator, hose, TIG torch, and control socket.
Connect earth clamp and switch machine on.
Prepare torch, install electrode, and select TIG mode.
Connect earth lead, adjust welding current.
Adjust downslope setting and gas flow rate.
Advisable to perform test welds to tune settings.
Proper grinding for stable arc vs. incorrect grinding causing arc wander.
Explains TIG welding, advantages, and power source requirements.
Explains scratch start and HF start techniques.
Using lift arc and HF start for arc initiation and stabilization.
Guide for TIG shielding gas and discussion of applications.
Details of available MIG torch models.
Available nozzles, contact tips, and tip holders for MIG torches.
Available torch types, bodies, caps, and heads.
Parts for holding tungsten and managing gas flow, including cups.
Guidance on selecting MIG wire types and drive rollers.
Explains polarity modes and directs users to Bossweld TV.
Problems with power indicator, fan, and unstable output current.
Addressing excessive spatter, weld porosity, and base metal contamination.
Troubleshooting wire stubbing, porosity, and gas flow problems.
Addressing lack of fusion, excessive, or lack of penetration.
Resolving issues with wire feed, roller alignment, tension, and contamination.
Wire types including layer wound, gasless, aluminium, and stainless steel.
Multi-pack options for various tungsten electrode types.
Electrode packs for small welding jobs and repairs.
Table listing drive roller types and part numbers.
Steel and Teflon liners for MIG torch applications.
| Brand | BossWeld |
|---|---|
| Model | MST185 |
| Category | Welding System |
| Language | English |