operation
8 - Gemini R and Pro | Operation
operation
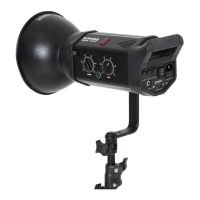
Modelling Lamp Control
The modelling lamp on the Gemini range has a soft on and off
feature to prolong the life of the bulb.
There are various options available on the Gemini R and Pro
range models to control the modelling output. These
functions can be set using the centre biased modelling lamp
function switch on the rear of the unit (page 4). To change the
lamp output option, simply cycle through, either up or down.
The various output control options on the R and Pro range
Gemini’s are:
1.) Relative (REL) - to control the modelling output in
proportion to the flash output - when the flash output is
altered, the modelling lamp will automatically adjust itself in
proportional to the desired flash power level.
2.) User (USR) - allows the user to manually set the modelling
to the desired output.
3.) Max (MAX) - sets the modelling output to maximum.
4.) Off - the modelling lamp will completely switch off.
The various modelling lamp control options are highlighted by
individual red LED’s on the side and rear of the unit (page 4.)
When the modelling lamp is set is set to ‘Off’, none of the red
LED’s will show.
The red LED’s on the side and rear of the unit will display the
various options as follows:
Relative - REL LED lit continuously.
User - USR LED lit continuously.
User set - USR LED flashes.
Max - MAX LED lit continuously.
Manually Setting the Modelling Output
The modelling lamp output can be adjusted manually.
To manually set the modelling output change the modelling
option to the User (USR) setting by using the modelling lamp
function switch. When the User option is active the USR LED
will flash quickly and then stay on continuously.
Once active the modelling output can then be adjusted by
using the modelling lamp function switch, pressing up to
increase and down to decrease the output setting.
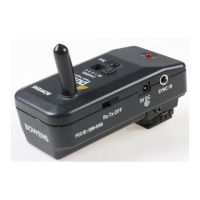
Setting the Modelling Output with IR Remote
The modelling output can also be set manually by using a
remote control. To set the modelling output option to User
(USR) using a remote control, press the ‘Lamp On/Off’ button
on the remote control. Once the User option is selected and
active, press the ‘Master + / -’ button on the remote control
to adjust the output.
When setting the modelling lamp output the 7-segment LED
display on the side of the unit (page 4) will show the current
or desired output level.
Lamp Saver Mode
The modelling lamp on the Gemini R and Pro range features
a ‘lamp saver’ function; this allows the modelling lamp to dim
if no adjustments are made or the unit hasn’t flashed for a
specified amount of time.
The length of time for the ‘lamp saver’ function to activate can
be set from 1 to 99 minutes in ‘user set-up’ mode (see page
5 for ‘user set-up’ mode and options).
Photocell
The Photocell is a built-in light sensitive trigger that allows the
unit to be fired from an external flash source.
The ‘CELL’ switch on the rear of the unit (see page 4) allows
the Photocell to be switched on or off.
If the switch is set to the ‘lower’ position the cell will be turned
‘on’, setting the switch to the ‘upper’ position will turn the
Photocell ‘off
’.
Triggering Using External Flash - To trigger the Gemini
using an external flash source the Photocell must be switch
on. If the photographer is using an external flash source that
uses pre-exposure flashes (like a small on-camera flash) the
Photocell must be set to the ‘Smartcell’ function in order to
sync with the camera.
Smartcell - the Photocell on the Gemini R and Pro range has
a ‘smartcell’ option to enable pre-exposure flashes to be
ignored. These can be used for exposure measurement
and/or red eye reduction. This option allows the Gemini to be
synchronised to the camera shutter on the 1st, 2nd, 3rd or 4th
flash selected by the user (this option is for those who wish to
trigger theIr flash heads without a radio or IR triggering
system or without a sync cable). A recognised 1st flash is the
normal ‘instant’ trigger, where only one flash is used
coincident with the shutter. To set the desired number of
recognised flashes to sync the unit with, the Gemini must be
in ‘User set-up’ mode (see page 5 for ‘user set-up’ mode and
options).
Smartcell ‘Learn’ mode
The ‘smartcell’ can also ‘learn’ the trigger sequence of the
external flash so the number of pre-flashes does not have to
be manually set. For the Gemini to learn the pre-flash
sequence the user must enter the ‘User set-up’ mode and
select the Photocell Trigger option. Once the Photocell Trigger
option is selected red LED’s on the side and rear of the unit
will flash continuously. The Photocell Trigger option on the
Gemini must then be set to the 1
st
flash to enter the learn
mode; when number 1 is highlighted / shown on the 7-
segment display, aim the external flash at the Photocell and
fire the flash. The Photocell will monitor the flash and learn the
sequence / number of flashes. The total number of flashes
detected will then be shown on the 7-segment LED display on
the side of the unit. After the number of flashes is displayed
press the flash test button to save the setting shown and to
enter normal operation.
Triggering Options
There are a number of ways to trigger the Gemini R and Pro
monolights:
Open Flash - For testing or multiple flash
applications the ‘Test Flash’ button can be used.
Sync Socket - The standard
1
⁄4” jack socket on
the rear panel of the unit may be used for direct
connection to a camera or trigger system (i.e.
radio or IR)
Photocell - The Gemini has a built-in switchable
(on/off) photocell enabling the unit to be triggered
by an external flash source.
Plug-in Radio Trigger - The Gemini R and Pro
range models feature an option to include a plug-
in radio trigger module.
Plug-in Radio Trigger Module
The Gemini R and Pro models feature a unique option to
include a plug-in radio trigger module. There are three
different plug-in modules available (sold separately) for
various professional radio triggering systems, depending on
which one the user may already have or wish to use. The
three different plug-in trigger modules that are available for
the Gemini R and Pro range are:
• Bowens Pulsar Radio Trigger System.
• PocketWizard Radio Trigger System (344Mhz and 433Mhz
modules available).
Radio Trigger Card Kits
These simple kits upgrade Bowens Gemini R and Pro (as well
as Gemini Classic monolights) to become compatible with the
Bowens Pulsar and PocketWizard radio trigger systems.
Kits include radio trigger card, plug-in antenna and simple
instructions. Sets up in minutes.
BW5170 - Pulsar Radio Card Kit
BW5180 - PocketWizard Radio Card Kit (433Mhz Euro)
BW5185 - PocketWizard Card Kit (344Mhz US)
9 - Gemini R and Pro | Operation
Plug in antenna into side of unit. Remove radio
module cover.
Insert radio trigger card into slot and replace
radio module cover.
 Loading...