Perla
IT
INSTALLAZIONE
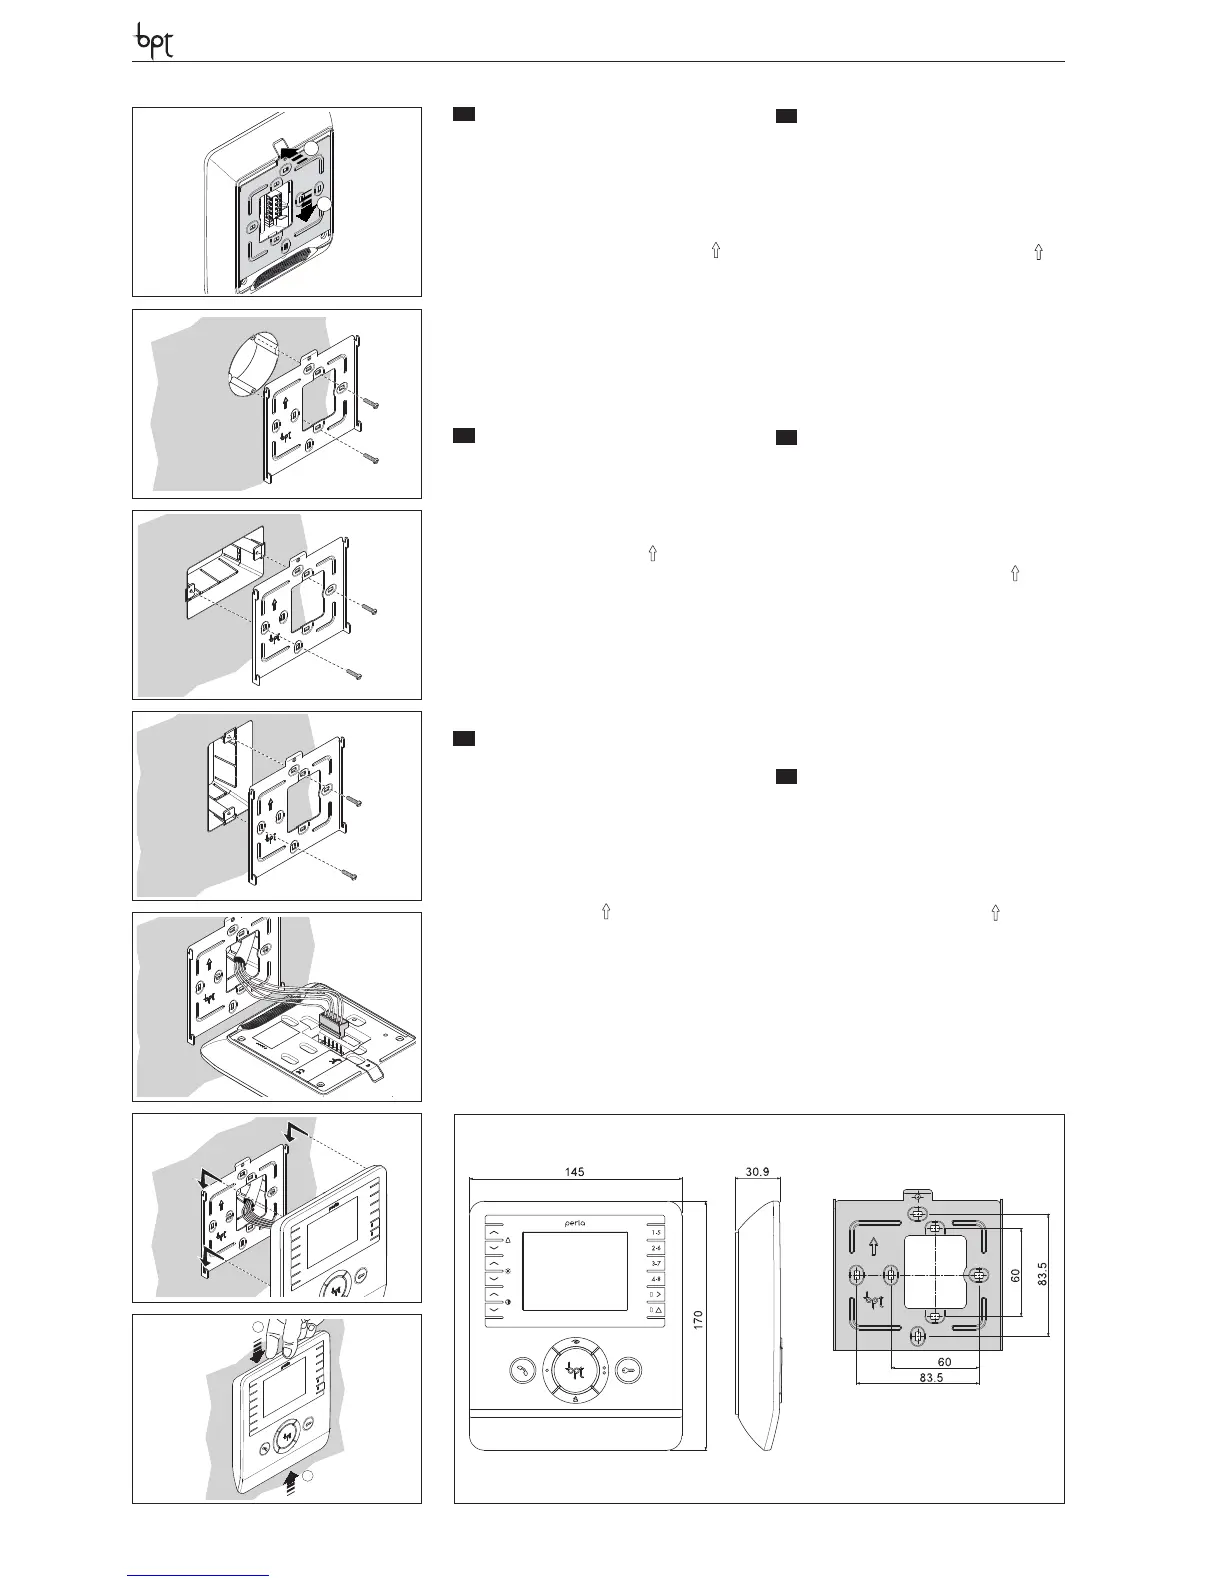
Sganciare l’apparecchio dal supporto metallico,
facendolo scorrere su di esso dopo aver premuto
il pulsante plastico (gura 1).
Fissare il supporto metallico alla scatola d’incas-
so tonda Ø 60 mm (gura 2) oppure alla scatola
rettangolare 503 (gura 3-4) utilizzando le viti in
dotazione e rispettando l’indicazione ALTO .
La scatola deve essere installata ad un’altezza
adeguata all’utente.
Evitare il serraggio eccessivo delle viti.
Eettuati i collegamenti, agganciare il videoter-
minale al supporto metallico (gura 5-6).
Per sganciare l’apparecchio dal supporto metalli-
co premere il gancio plastico e sollevare il termi-
nale (gura 7).
EN
INSTALLATION
Remove the unit from the metallic support by sli-
ding it after pressing the plastic button (gura 1).
Fasten the metallic support to the round built-in
box of Ø 60 mm (gure 2) or to the rectangular
box 503 (gure 3-4) using the provided screws
and observing the UP indication .
The recessed box must be tted at a suitable
height in relation to the user.
Avoid excessive tightening of the screws.
Once the connections have been made, hook
the video terminal to the metal support (gure
5-6). To release the unit from the metal support,
press the plastic hook and lift the terminal (gure
7).
DE
INSTALLATION
Das Gerät an der Metallhalterung aushängen,
dabei nach dem Drücken der Kunststotaste das
Gerät auf der Halterung verschieben (Abbildung
1).
Die Metallhalterung am runden Unterputzkasten
Ø 60 mm (Abbildung 2) oder am rechteckigen
Gehäuse 503 (Abbildung 3-4) befestigen, hierfür
die beiliegenden Schrauben benutzen und die
Angabe OBEN beachten .
Der Kasten muss auf für den Benutzer geeigneter
Höhe installiert werden.
Die Schrauben nicht zu stark anziehen.
Nach den Anschlüssen das Videoterminal an der
Metallhalterung einhängen (Abbildung 5-6).
Um das Gerät von der Metallhalterung auszuklin-
ken den Plastikhaken drücken, und das Terminal
anheben (Abbildung 7).
FR
INSTALLATION
Retirer l’appareil du support métallique, en le fai-
sant glisser sur lui-même après avoir appuyé sur
la touche plastique (gura 1).
Fixer le support métallique au boîtier d’encas-
trement rond Ø 60 mm (gure 2) ou au boîtier
rectangulaire 503 (gure 3-4), en utilisant les vis
fournies et en respectant l’indication HAUT .
Le boîtier doit être installé à une hauteur adé-
quate pour l’utilisateur.
Éviter de serrer excessivement les vis.
Une fois les raccordements eectués, xer le por-
tier vidéo au support métallique (gure 5-6).
Pour retirer l’appareil du support métallique, ap-
puyer sur le clip en plastique et soulever le ter-
minal (gure 7).
ES
INSTALACIÓN
Desenganche el aparato del soporte metálico,
pulsando el botón de plástico y haciendo que se
deslice (gura 1).
Fije el soporte metálico a la caja empotrable re-
donda Ø 60 mm (gura 2) o a la caja rectangular
503 (gura 3-4) utilizando los tornillos suminis-
trados y respetando la indicación ALTO .
La caja debe instalarse a una altura adecuada
para el usuario.
No apriete demasiado los tornillos.
Una vez realizadas las conexiones, enganche
el terminal de vídeo al soporte metálico (gura
5-6).
Para desenganchar el aparato del soporte me-
tálico, pulse el gancho de plástico y levante el
terminal (gura 7).
PT
INSTALAÇÃO
Solte o aparelho do suporte metálico, fazendo-o
deslizar sobre o mesmo após ter premido o bo-
tão de plástico (gura 1).
Fixar o suporte metálico à caixa de encastre re-
donda Ø 60 mm (gura 2) ou à caixa retangular
503 (gura 3-4) utilizando os parafusos forneci-
dos e respeitando a indicação ALTO .
A caixa deve ser instalada a uma altura adequada
para o utente.
Evite o aperto excessivo dos parafusos.
Após efectuar as ligações, enganche o terminal
de vídeo no suporte metálico (gura 5-6).
Para desprender o aparelho do suporte metálico
carregue o gancho plástico e levante o terminal
(gura 7).
4
3
2
1
7
6
1
2
1
2
5
3
 Loading...