EasyManua.ls Logo

Braeburn 5970 - User Manual

Braeburn 5970
2 pages
Print Icon
To Next Page IconTo Next Page
Loading...
Important Information
5970-100-03
Universal Thermostat Guard
• Read this manual thoroughly prior to installing thermostat guard.
Verify dimensions given in this manual and on the product to ensure product is suitable for your application.
• Prior to finishing installation, refer to applicable thermostat manual and test thermostat operation.
This thermostat guard should only be used as described in this manual. Any other use is not recommended
and will void the warranty.
• For a replacement key, please contact our Customer Service Department at 1-866-268-5599.
5970
Read All Instructions Before Proceeding
User Manual
Warning
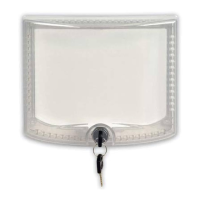
The Braeburn 5970 Thermostat Guard is a universal thermostat guard that covers and protects wall
thermostats by reducing the risk of damage, tampering and unauthorized adjustment of thermostat
settings. The 5970 thermostat guard includes a clear plastic guard cover and base, opaque plastic
wall plate, screws, anchors and tumbler lock with two keys. This thermostat guard is ideal for
offices, lobbies, hospitals, schools, supermarkets, restaurants, convenience stores and other public
areas to help prevent unauthorized personnel from adjusting the temperature. This thermostat
guard can be used in new and existing thermostat applications.
The Braeburn 5970 Thermostat Guard can be used in virtually all new or existing thermostat applications. The enclosed
wall plate can also be used with a wide range of commercial thermostat models.
For most existing thermostat applications, the thermostat guard can be installed without removing the thermostat from
the wall. In existing applications, only the cover and base will be used, NOT the wall plate. Some existing installations
may require the thermostat to be removed from sub-base to install base.
In new thermostat applications, the thermostat guard can be used with or without the wall plate. The wall plate is
usually used to cover scratches or marks from the old thermostat installation.
Installing Thermostat Guard with Existing Thermostat
1. Place the base over the existing thermostat on the wall with curved edge of the base facing down.
NOTE: Some thermostats will need to be removed from the sub-base before installing the base.
2. Align the base with the existing thermostat and level.
3. Mount the base on the wall using the four provided anchors and screws.
4. Mount the thermostat guard cover by placing the hinged edge of the thermostat guard cover over the top edge of
the base and lowering the cover to the base. NOTE: The key must be in the UNLOCKED position.
5. Lock the thermostat guard by turning the provided key counterclockwise. The key can ONLY be removed when it
is in the LOCKED position.
Installation
WALL
THERMOSTAT
BASE
MOUNTING
SCREWS (4)
MOUNTING
HOLES (4)
Question and Answer IconNeed help?

Do you have a question about the Braeburn 5970 and is the answer not in the manual?

Summary

Installing Thermostat Guard with Existing Thermostat

Installation

Installing Thermostat Guard with New Thermostat

Removing Thermostat Guard Cover

Limited Warranty

Summary

Installing Thermostat Guard with Existing Thermostat

Installation

Installing Thermostat Guard with New Thermostat

Removing Thermostat Guard Cover

Limited Warranty

Overview

The Braeburn 5970 Thermostat Guard is a universal protective enclosure designed to safeguard wall-mounted thermostats from damage, tampering, and unauthorized adjustment of settings. This device is particularly suitable for use in public and commercial environments such as offices, lobbies, hospitals, schools, supermarkets, restaurants, convenience stores, and other areas where controlling access to thermostat settings is crucial.

Function Description:

The primary function of the 5970 Thermostat Guard is to enclose a thermostat, preventing direct access to its controls. It achieves this by providing a physical barrier that can only be opened with a key. This helps maintain desired temperature settings, reduces energy waste due to unauthorized adjustments, and protects the thermostat itself from physical damage. The guard is designed to be compatible with a wide range of existing and new thermostat installations, including various commercial models.

Important Technical Specifications:

  • Components: The 5970 Thermostat Guard package includes a clear plastic guard cover, an opaque plastic wall plate, a base, mounting screws, anchors, a tumbler lock, and two keys.
  • Material: The guard cover is made of clear plastic, allowing visibility of the thermostat display and settings while it is enclosed. The base and wall plate are made of opaque plastic.
  • Locking Mechanism: A tumbler lock with two keys is provided to secure the guard cover to the base. The key can only be removed when the guard is in the LOCKED position, ensuring that the cover is properly secured.
  • Mounting: The guard is designed for wall mounting. It utilizes four mounting holes for screws and anchors to ensure a secure installation.
  • Compatibility: The guard is described as "universal," indicating broad compatibility with various wall thermostats. The enclosed wall plate can also be used with a wide range of commercial thermostat models.
  • Dimensions: While specific dimensions are not explicitly provided in the text, the manual emphasizes verifying dimensions to ensure suitability for the intended application.
  • Warranty: The product comes with a 1-year limited warranty when installed by a professional contractor. Limitations, terms, and conditions are available online or by contacting Braeburn Systems LLC.

Usage Features:

  • Protection: Reduces the risk of damage, tampering, and unauthorized adjustment of thermostat settings.
  • Visibility: The clear plastic cover allows users to view the thermostat display and current settings without unlocking or opening the guard.
  • Security: The tumbler lock ensures that only authorized personnel with a key can access the thermostat controls.
  • Versatility: Can be used in both new and existing thermostat installations.
    • Existing Installations: For most existing applications, the guard can be installed without removing the thermostat from the wall. Only the cover and base are typically used, not the wall plate. However, some installations may require the thermostat to be removed from its sub-base to install the guard's base.
    • New Installations: In new applications, the guard can be used with or without the wall plate. The wall plate is often used to cover scratches or marks from previous thermostat installations, providing a cleaner aesthetic.
  • Ease of Installation (with existing thermostat):
    1. Place the base over the existing thermostat, curved edge facing down. (Note: Some thermostats may need removal from their sub-base).
    2. Align and level the base with the existing thermostat.
    3. Mount the base to the wall using the four provided anchors and screws.
    4. Mount the guard cover by aligning its hinged edge with the top edge of the base and lowering it into place. (Note: Key must be in UNLOCKED position).
    5. Lock the guard by turning the key counterclockwise.
  • Ease of Installation (with new thermostat):
    1. Place the thermostat sub-base on the guard wall plate and use it as a guide.
    2. Mark and drill necessary 5/32 inch mounting holes, ensuring proper alignment of wire opening in both wall plate and sub-base. The curved edge of the wall plate should face down, and mounting position should allow clearance for doors and covers.
    3. Run system wires through the wiring hole in the guard wall plate.
    4. Mount the thermostat sub-base and the guard wall plate to the wall. (Note: If the thermostat is back-wired, wire it before mounting).
    5. Refer to the thermostat manual for wiring instructions.
    6. Mount the thermostat on its sub-base.
    7. Place the guard base over the mounted thermostat and wall plate, and mount using the four provided anchors and screws.
    8. Mount the guard cover by aligning its hinged edge with the top edge of the base and lowering it into place. (Note: Key must be in UNLOCKED position).
    9. Lock the guard by turning the key counterclockwise.
  • Removal of Cover: To remove the cover, unlock the guard by inserting the key and turning clockwise. Then, lift the cover away from the base and off its hinges.

Maintenance Features:

  • Key Replacement: In case of a lost or damaged key, replacement keys can be obtained by contacting the Braeburn Customer Service Department at 1-866-268-5599.
  • Durability: The product is designed to protect the thermostat, implying a certain level of durability for the guard itself.
  • Warranty Support: A 1-year limited warranty is provided, offering support for potential defects or issues when installed by a professional contractor. Warranty details and contact information are readily available.
  • Cleaning: While not explicitly stated, the clear plastic cover and opaque plastic components would likely require standard cleaning methods suitable for plastics to maintain visibility and appearance.
  • Installation Verification: The manual advises verifying dimensions and testing thermostat operation after installation, which contributes to proper maintenance and long-term functionality.
  • Proper Usage: The manual explicitly states that the thermostat guard should only be used as described, and any other use is not recommended and will void the warranty, emphasizing the importance of correct usage for product longevity and warranty validity.

Braeburn 5970 Specifications

General IconGeneral
BrandBraeburn
Model5970
CategoryThermostat
LanguageEnglish

Related product manuals