The service book IV / ALFA 14 03-9940.186
4. Connect the wiring harnesses and eventual distributions of heating air, insert the fuse
These procedures shall include a brief description of each step and serves as the basis for determining
the specific procedures for repairs.
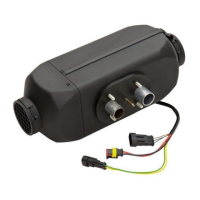
The heater WIND has added interposer which is between the motor with the impeller and the exchanger.
A fuel pipe for heater WIND is not recommended dismantled.
Sealant to seal the seating surfaces of the heat exchanger:
Sealant, that is used in production of BRANO a.s., is the Czech production and this is the type
LUKOPREN S 9780. It is a durable silicone sealant with a temperature resistance of 250 ° C.
Ateso ALFA
A. Replacement plug
1. Turn and download the grid on the fan side. Loosen 2 clips and to separate the top cover.
2. Disconnect the spark plug connector from the control unit.
3. Replace the plug
4. Connect the spark plug connector to the control unit.
5. Place the upper cover on the heater and a harness grommet placed into a circular hole between the
two covers. Top cover press down the bottom, so as to capture both clips. Fit the grid.
B. Removing the heater from the vehicle
6. Release and eject the exhaust pipe, the intake silencer and fuel pipe.
7. Unscrew the four nuts.
8. Remove fuse, disconnect the harnesses and possibly heating air pipes.
9. Remove the heater from the vehicle.
C. Complete disassembly of the heater
10. Dismount the heat exchanger seal.
11. Turn and download the girds.
12. Loosen 2 clips and to separate the top cover. Separate back cover from the bottom cover and remove
the bottom cover (the heater can be placed on the bottom cover which is turned upside down).
13. Disconnect the individual electrical harnesses from the control unit (sensor flame glow plug and
electric) and disconnect the connector of overheating fuse.
14. Unscrew the self-tapping screw securing the control unit and ejected UC from the supporting cross.
15. Use a screwdriver to loosen the impeller fan on the shaft and eject it from the shaft.
16. Loosen the clamp and download the supporting cross from the motor.
17. Slightly turn the overheating fuse so could lead to unlocking the locking washers and download
washers. Remove overheating fuse.
18. Unscrew the glow plug.
19. Unscrew the flame sensor.
20. Unscrew the four screws and separate the fan assembly from the exchanger and remove the blower
housing seal.
21. Unscrew the 3 screws into the exchanger end eject the combustion chamber together with the fuel
pipe seal. Remove the seal of a combustion chamber.
22. Pull the glow plug seal.
D. Refitting the heater in a vehicle
1. Insert the glow plug seal together with sealing ring into the opening in the exchanger so that the
groove on the seal grasps the pin on the exchanger.
2. Under the flange of the combustion chamber insert new seal of the combustion chamber and screw
the 3 screws. The glow plug seal must encircle the neck of the combustion chamber.
3. Insert the new seal between the subassembly fan and heat exchanger and tighten 4 screws.
4. Slide the impeller fan on the motor shaft so that the surface of the shaft was against the surface of the
impeller and make protrusions on the impeller fit into the recess on the shaft.
5. Slide crossing support and secure it by the clamp.
6. Insert the control unit into the slots of the crossing support and screw the self-tapping screw into the
blower housing.
7. Screw the flame sensor together with a copper washer.
8. Fit the overheating fuse and fix it with new locking washers. Slightly turn the flame sensor so that the
connectors perpendicularly to the axis of the heater.