English
Before use
Please read instructions carefully and completely
before using the appliance.
Caution
Caution: Hot surfaces! Electric
ironing stations combine high
temperatures and hot steam that could
lead to burns.
This appliance can be used by children
aged from 8 years and above and
Persons with reduced physical,
sensory or mental capabilities or lack
of experience and knowledge if they
have been given supervision or
instruction concerning use of the
appliance in a safe way and
understand the hazards involved.
Children shall not play with the
appliance.
Cleaning and user maintenance shall
not be made by children without
supervision.
During operation and cool-down the
appliance and its mains cord shall be
kept out of reach of children under 8
years.
If the supply cord is damaged, it must
be replaced by the manufacturer, its
service agent or similarly qualified
persons in order to avoid a hazard.
Always unplug the station/iron before
filling with water.
The appliance must be used and
rested on a stable surface.
During ironing pauses, place the iron
upright on its heel rest or on the iron
rest. Ensure that the heel rest is placed
on a stable surface.
The iron must not be left unattended
while it is connected to the supply
mains.
Do not open the boiler during ironing.
During use, the pressurised apertures
must not be opened for filling,
descaling, rinsing or inspection.
The appliance must not to be used if it
has dropped, if there are visible signs
of damage or if it is leaking. Regularly
check the cords for damages.
This appliance is designed for
household use only and for processing
normal household quantities.
Never immerse the iron and station in
water or other liquids.
The cords should never come in
contact with hot objects, the soleplate
or water
Before plugging into a socket, check
whether your voltage corresponds with
the voltage printed on the bottom of
the appliance.
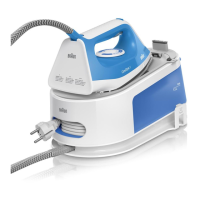
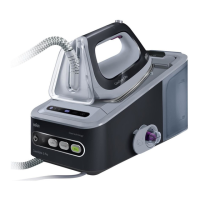
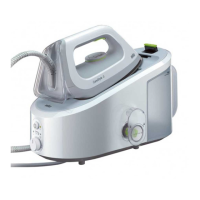
Description
I Base unit
1 On/Off button
2 On/Off LED
3 Calc clean system LED
4 Reset button
5 Eco button
6 Eco LED
7 Water tank empty LED
8 Iron rest
9a Removable water tank
9b Fixed water tank
10 Transparent cover
11 Power cord
12 Cleaning valve
13 Lock system (certain models only)
II Iron
14 Double cord
15 Steam button
16 Precision shot button (certain models only)
17 Temperature control LED
18 Heel rest
(A) Filling the water tank
• Make sure that the appliance is switched off and
the system is unplugged.
• Remove the water tank (9a) or open the water
tank (9b).
• Fill the water tank with tap water, taking care not
to exceed the “max” level.
• If you have extremely hard water, we recommend
that you use a mixture of 50 % tap water and 50
% distilled water.
• Never use distilled water exclusively. Do not add
any additives (e.g. starch). Do not use
condensation water from a tumble dryer.
• Insert the water tank (9a) or close the water tank
opening (9b).
• Place the appliance on a stable, level surface
(like a table or the floor).
Note:
If you use filtering devices, make absolutely sure
the water obtained is neutral ph.
Water tank empty LED
• When the water tank is empty, the LED (7) is
continuously on and the temperature control LED
(17) is flashing.
• If you want to continue steam ironing, refill the
water tank (A).
• Press the reset button (4).
(B) Start ironing
• Place the iron on the iron rest (8) or on its heel
rest (18), plug in the appliance and press the On/
Off button (1).
• The iron will start to heat up: While this is
happening, the temperature control LED (17) and
the On/Off LED (2) will flash.
• Once the heating phase has been completed
both LEDs will stay continuously on.
• For steam ironing press the steam button (15)
or the precision shot button (16).
• For dry ironing do not press the steam button
(15) or the precision shot button (16).
• Double trigger: Press the steam button (15) or
the precision shot button (16) twice in quick
succession within 1 second. There will be a
continuous steam emission for a few seconds.
Press the steam button (15) or the precision shot
button (16) once again to stop the function.
• Vertical steam: The iron can also be used for
steaming hanging clothes (B).
• The unique round shape of the eloxal 3D
soleplate ensures best gliding results on difficult
parts (e. g. buttons, pockets etc.)
Eco Function
Lower steam is suggested for most delicate
garments like silk, wool and synthetics.
• For ironing with lower steam press the ECO
button (5).
• The LED (6) turns continuously on.
• To return to the normal steam function press the
ECO button (5) again.
• The LED (6) turns off.
4
DLB271162_5712812081_Use_Instruction_IS_3044_CN_Update.indb 4 30.04.18 07:35
 Loading...