10 11
Using Your Z2
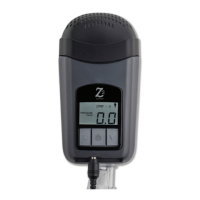
LCD Display
Treatment Pressure Display
The current treatment pressure is shown on the LCD display. Once set, the prescribed treatment
pressure will be retained in the Z2’s memory even during loss of power. For example, a treatment
pressure setting of 10.0 cm H
2
O is displayed in Figure 7.
Ramp Progress & Ramp Time Remaining Indicators
Ramp Mode allows you to gradually acclimate to the prescribed treatment pressure. Ramp Mode
gradually increases the pressure from a low initial starting pressure to the prescribed treatment
pressure over a programmed interval of time. See “Programming Ramp Mode”.
If you program the Z2 for Ramp Mode, the Ramp Progress and Ramp Time Remaining indicators
will appear on the LCD display. For example, Figure 7 indicates that the ramp is just over half
complete, with a ramp time remaining of 10 minutes.
Battery Status Display
This icon is displayed when the optional PowerShell and Battery are connected. The level of
charge remaining on the Battery is indicated by the number of solid bars in the icon. The bars
flash when the Battery is charging. For example, the icon shown in Figure 7 indicates that the
Battery has between 63-90% of charge remaining. Make sure the Battery is fully charged before
each use. The bars will stop flashing when the charging is complete.
Number of Solid Bars Charge Remaining
1 10-35%
2 35-63%
3 63-90%
4 90-100%
AC Power Indicator
This icon is displayed when the Z2 is connected to an AC power outlet via the Power Supply.
Tube Adapter, Q-lite, CPAP Tube, HME and Mask
1. Connect one end of the 8” CPAP Tube to the round end
of the Tube Adapter then insert the other end of the
Tube Adapter into the outlet of the Z2. (Figure 2)
2. Connect the other end of the 8” CPAP Tube to one end
of the Q-lite. Connect the other end of the Q-lite to the
4’ CPAP Tube. Connect the end of the 4’ CPAP Tube to
the HME and the HME to the mask. (Figure 3)
3. Ensure all connections are tight to avoid air leaks.
(Figure 4)
Power Supply
WARNING: The Z2 must only be used
with the Breas Medical Power Supply (or
the optional Breas Medical PowerShell and
Battery). DO NOT use any other power
source with the Z2.
CAUTION: Make sure the AC power
cord IS NOT plugged into a wall outlet
before continuing to the next step.
1. Plug the AC power cord into the AC Adapter.
2. Plug the power cord into a wall outlet.
3. Plug the AC Adapter into the Z2. (Figure 5)
4. The Z2 will power up and cycle through a series of
startup displays.
5. After about 10 seconds, the Z2 will enter standby
mode. The display will read 0.0. (Figure 6)
NOTE: The Z2 display will be active
whenever the device is receiving power.
Figure 2
Figure 5
Figure 6
Figure 4
Treatment Pressure
Display
Ramp Progress
Ramp Time
Remaining
AC Power Indicator
Battery Status Display (PowerShell Only)General Status Display
Fault
Figure 7
Figure 3
Z2
8” Tube
Q-lite
4’ Tube
HME
Mask