EasyManua.ls Logo

Briggs & Stratton 42 - User Manual

Briggs & Stratton 42
18 pages
Print Icon
To Next Page IconTo Next Page
Loading...
Not for
Reproduction
Mower Deck Manual
Stamped Steel - Frame Hung
Copyright © Briggs & Stratton Power Products Group, LLC
Milwaukee, WI USA
All rights reserved.
80012602_-_
Question and Answer IconNeed help?

Do you have a question about the Briggs & Stratton 42 and is the answer not in the manual?

Summary

Operator Safety

Safety Alert Symbol and Signal Words

Explains safety alert symbols and signal words used to identify hazards and potential injury severity.

General Safety Warnings

Provides essential safety precautions for operation, servicing, and storage to prevent serious injury or death.

Deck Safety Decal

Emphasizes the importance of maintaining legible safety decals on the mower deck.

Safety Interlock System Tests

Instructs users to check the tractor's safety interlock system as described in the Operator's Manual.

Preparation for Procedures

Pre-Service Procedures

Outlines essential steps to follow before performing any service work on the mower deck.

Blade Servicing

Blade Handling and Replacement Safety

Safety guidelines for handling sharp mower blades and replacing damaged ones to prevent severe injury.

Blade Sharpening and Balancing

Instructions for sharpening mower blades to the correct angle and ensuring they are properly balanced.

Lubrication

Arbor and Idler Pulley Lubrication

Details on lubricating the mower deck arbors and notes that idler pulleys have sealed bearings.

Belt Replacement

Removing the Mower Deck Belt

Step-by-step guide on how to safely remove the drive belt from the mower deck.

Installing the Mower Deck Belt

Procedures for correctly installing a new drive belt, including checking the belt guide gap.

Deck Removal

Disconnecting Lift Brackets and Hitch

Instructions for disconnecting the mower deck's lift brackets and hitch assembly.

Removing the Mower Deck

Final steps for safely removing the mower deck from the tractor, including pin removal.

Deck Installation

Positioning and Hitching the Deck

Steps for maneuvering the mower deck under the tractor and securing the hitch assembly.

Connecting Deck Brackets and Belt

Guidance on attaching the deck brackets to the tractor and installing the drive belt.

Deck Leveling

Initial Setup and Side-to-Side Adjustment

Procedures for setting tire pressure, deck height, and adjusting side-to-side levelness.

Front-to-Back Adjustment

Instructions for measuring and adjusting the mower deck for proper front-to-back levelness.

Overview

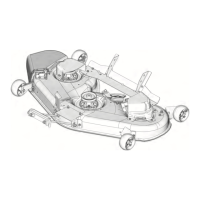
This document is a Mower Deck Manual for stamped steel, frame-hung mower decks, covering both 42-inch, and 46-inch/52-inch models. It provides essential information for safe operation, maintenance, and servicing of the mower deck.

Function Description

The mower deck is an attachment for a tractor, designed to cut grass. It features rotating blades that are driven by the tractor's Power Take-Off (PTO) system via a belt. The deck's height can be adjusted to achieve different cutting heights, and it is equipped with safety features to prevent injury during operation and maintenance.

Important Technical Specifications

Mower Deck Sizes:

  • 42-inch
  • 46-inch
  • 52-inch

Blade Sharpening Angle:

  • 22 to 28 degrees

Blade Mounting Capscrew Torque:

  • 55 lb/ft (75 Nm)

Tire Pressures for Deck Leveling:

  • Front Tires: 10 psi (0.68 bar)
  • Rear Tires: 12-14 psi (0.82-0.96 bar)

Deck Leveling Tolerance:

  • Side-to-Side: Difference between outside blade tips and ground should be less than 1/8 inch (3 mm).
  • Front-to-Back: Difference between outside blade tips and ground should be less than 1/8 inch (3 mm).

Belt Guide Gap:

  • Approximately 1/8 inch (3.3 mm) away from the belt.

Usage Features

Operator Safety:

  • The manual emphasizes reading and following all safety warnings and instructions to prevent death, serious injury, or property damage.
  • It highlights the importance of the safety alert symbol (triangle with exclamation mark) and signal words (DANGER, WARNING, CAUTION, NOTICE) to indicate hazard levels.
  • Thrown Objects Hazard: Operators must ensure the discharge deflector or grass catcher assembly is properly installed before operating. Regular checks for damage or wear of these components are recommended.
  • Stored Energy Hazard: Hands should be kept away from tension springs when working with belts.
  • Amputation or Laceration Hazard: Adjustments or repairs should not be made while the engine is running or blades are rotating. Hands and feet must be kept away from rotating parts and under the deck. Mower blades are sharp, requiring heavy gloves for handling. On multi-bladed mowers, rotating one blade can cause others to rotate.
  • Deck Safety Decal: Replacement decals should be ordered if existing ones become worn or unreadable.
  • Safety Interlock System: The tractor is equipped with a safety interlock system, which should not be bypassed or tampered with. Regular tests of this system are outlined in the Operator's Manual.

Preparation for Procedures: Before any service work, the following steps must be performed:

  1. Park the tractor on a hard, level surface.
  2. Set the parking brake.
  3. Disengage the PTO.
  4. Remove the ignition or safety key.
  5. Disconnect the spark plug wires.

Deck Removal and Installation: Detailed steps are provided for both removing and installing the mower deck, including lowering the deck, moving the idler arm, removing/installing belts, and disconnecting/connecting lift brackets. Specific instructions are given for turning the wheels and sliding the deck under the tractor during installation.

Deck Leveling: The manual provides a step-by-step guide for leveling the mower deck, both side-to-side and front-to-back, to ensure an even cut. This involves:

  1. Turning wheels straight ahead.
  2. Placing the deck at mid-height.
  3. Setting tire pressures.
  4. Arranging blades side-to-side or front-to-back.
  5. Measuring distances from blade tips to the ground.
  6. Adjusting nuts on the right or left side to correct leveling, ensuring the difference is less than 1/8 inch (3 mm).

Maintenance Features

Blade Servicing:

  • Removal: Blades are removed by using a block of wood to prevent rotation while loosening the capscrew. The deck must be removed from the tractor for blade servicing.
  • Sharpening: Blades should be sharpened at a 22 to 28-degree angle, but not beyond the existing cutting edge.
  • Balancing: After sharpening, blades must be balanced. This is checked by placing the center hole of the blade on an oiled nail; a balanced blade will remain level. Grinding the heavy end corrects imbalance.
  • Installation: Blades are reinstalled with airlifts pointing up towards the mower deck. Blade mounting capscrews must be installed with a spring washer and tightened to 55 lb/ft (75 Nm).
  • Replacement: Damaged blades must be replaced for safety.

Belt Replacement: Instructions are provided for both removing and installing the mower deck belt. This involves lowering the deck, removing belt covers, manipulating the idler arm to release/apply tension, and routing the belt around pulleys. A critical check after installation is ensuring the belt guide gap is approximately 1/8 inch (3.3 mm) from the belt.

Lubrication:

  • Arbors: A grease fitting is provided on the arbors (A) for lubrication.
  • Idler Pulleys: The idler pulleys (B) are equipped with sealed bearings and do not require lubrication.

Briggs & Stratton 42 Specifications

General IconGeneral
BrandBriggs & Stratton
Model42
CategoryLawn Mower
LanguageEnglish

Related product manuals