EasyManua.ls Logo

Brinkmann Heavy-Duty Gas Grill - User Manual

Brinkmann Heavy-Duty Gas Grill
32 pages
Print Icon
To Next Page IconTo Next Page
Loading...
100
200
300
400
500
600
Sear Burner Lighting Instructions:
1. Open lid during lighting.
2. Push and turn control knob to “HIGH” and continue to push in.
3. Press electronic igniter and hold for 3 to 5 seconds.
4. Continue to push in control knob for 30 seconds after sear burner is lit.
5. If ignition does not occur in 5 seconds, turn control knob to “OFF,” wait 5
minutes and repeat lighting procedure.
Instrucciones de Iluminación para la Hornilla
para Dorar:
1. Abra la tapa durante el encendimiento.
2. Empuje la perilla de control y gire a la posición “ALTO” y continúe
empujando hacia adentro.
3. Presione el encendedor electrónico y sosténgase por 3 a 5 segundos.
4. Continúe empujando la perilla de control hacia adentro por
30 segundos después de que la hornilla para dorar se enciende.
5. Si la hornilla NO se enciende en 5 segundos, gire la perilla de control a la
posición "APAGADO", espere 5 minutos y repita el procedimiento de
encendido.
SEAR BURNER
HORNILLA PARA
DORAR
MAXIMUM SEAR BURNER
WEIGHT = 15 lbs.
PESO MÁXIMO DE LA HORNILLA
PARA DORAR = 6.8 kg
FOR OUTDOOR
USE ONLY
SOLAMENTE PARA
USO EN EXTERIORES
800-527-0717
For Accessories, Parts or Assistance, Call
or Visit our Website
Para Accesorios, Partes o Asistencia,
Llame o Visite Nuestro Sitio de Internet
Read Instructions
Before Lighting:
1. Open lid during lighting.
2. Select a burner to be lit. Push
and turn control knob of that
burner to “HIGH.” Press
electronic igniter and hold for
3-5 seconds.
3. If ignition does not occur in
5 seconds, turn control knob
to “OFF,” wait 5 minutes and
repeat lighting procedure.
Lea las Instrucciones
Antes de Iluminación:
1. Abra la tapa durante el
encendimiento.
2. Seleccione la hornilla que va a
encender. Empuje y gire la
perilla de control de esa
hornilla a la posición “ALTO”.
Oprima el encendedor
electrónico
y manténgalo oprimido
3 a 5 segundos.
3. Si la hornilla NO se enciende
en 5 segundos, gire la perilla
de control a la posición
"APAGADO"espere 5 minutos y
repita el procedimiento de
encendido.
Scan with a Smart Phone
for More Information
Escanear con un
Teléfono Inteligente
para Más Información
ELECTRONIC
IGNITER
ENCENDEDOR
ELECTRÓNICO
LIGHTS
LUCES
NG Conversion
Kit Required
Kit de la Conversión
del NG Requerido
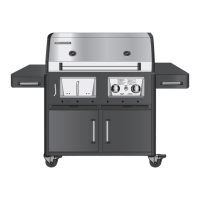
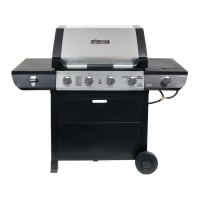
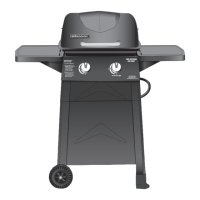
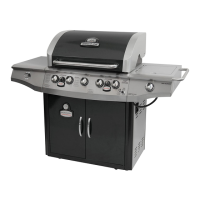
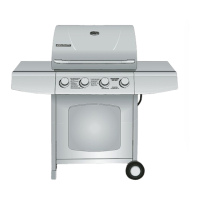
OWNER’S MANUAL / MANUAL DEL PROPIETARIO
WARNING/ADVERTENCIA
HAZARDOUS EXPLOSION MAY RESULT IF THESE WARNINGS AND INSTRUCTIONS
ARE IGNORED. READ AND FOLLOW ALL WARNINGS AND INSTRUCTIONS IN THIS
MANUAL TO AVOID PERSONAL INJURY, INCLUDING DEATH OR PROPERTY DAMAGE.
SE PUEDE PRODUCIR UNA EXPLOSIÓN PELIGROSA SI SE HACE CASO OMISO A
ESTAS ADVERTENCIAS E INSTRUCCIONES. LEA Y SIGA TODAS LAS ADVERTENCIAS
E INSTRUCCIONES EN ESTE MANUAL PARA EVITAR LESIONES PERSONALES,
INCLUSO LA MUERTE, O LOS DA—OS MATERIALES.
ASSEMBLY AND OPERATING IN STRUC TIONS
INSTRUCCIONES DE ARMADO Y OPERACIÓN
SAVE THIS MANUAL FOR FUTURE REFERENCE
GUARDE ESTE MANUAL PARA REFERENCIA FUTURA
NOTICE TO INSTALLER:
LEAVE THESE INSTRUCTIONS
WITH THE GRILL OWNER FOR
FUTURE REFERENCE .
AVISO PARA EL
INSTALADOR:
ENTREGUE ESTAS
INSTRUCCIONES AL
PROPIETARIO DE LA PARRILLA
PARA REFERENCIA FUTURA.
Heavy-Duty Gas Grill
Parrilla de Gas de Alta Resistencia

Questions and Answers

  • P
    Paul CastroAug 18, 2025
    How to fix irregular flame pattern on Brinkmann Heavy-Duty Gas Grill?
    • R
      Ryan WellsAug 18, 2025
      An irregular flame pattern on your Brinkmann Grill, where the flame doesn't run the full length of the burner, is often caused by clogged or blocked burner ports. Clean the burner ports to resolve this issue. Additionally, the air shutter on the burner may need adjustment; refer to the “Burner Adjustment” section for guidance.
  • T
    Thomas ScottAug 21, 2025
    What causes flashback (fire in burner tubes) / knobs melting on Brinkmann Heavy-Duty Gas?
    • J
      Jack PhillipsAug 21, 2025
      Flashback, or fire in the burner tubes, along with melting knobs on your Brinkmann Grill, indicates that the burners and/or burner tubes are blocked. Clean the burners and/or burner assembly to resolve this issue.
  • C
    Carlos LutzAug 25, 2025
    Why my Brinkmann Grill does not get hot enough?
    • A
      Allison DeleonAug 25, 2025
      If your Brinkmann Grill isn't getting hot enough, the first thing to check is whether you are out of gas. If so, replace or refill the LP gas tank. Additionally, the flow limiting device might have been activated. Try a mini reset by turning the control knobs and LP gas tank valve to “OFF”, waiting one minute, and then relighting the grill per the “Lighting Instructions”. If the flames are still too low, perform a full reset: turn everything “OFF”, disconnect the regulator from the propane tank, inspect the LP cylinder rubber seal, wait 1 minute, reconnect the regulator, perform “Leak Testing” on all connections, and then light the grill per the “Lighting Instructions”.
  • M
    Matthew MosleyAug 27, 2025
    What to do if Brinkmann Grill has flare-up?
    • M
      Monica CooperAug 28, 2025
      A flare-up on your Brinkmann Grill is often due to grease buildup. Clean all grill parts following the “Proper Care and Maintenance” instructions. Excess fat in the meat can also cause flare-ups, so trim the fat before grilling. Finally, excessive cooking temperature might be the culprit, so adjust the cooking temperature to a lower setting.
  • D
    davidmorrisAug 31, 2025
    Why is the flame yellow or orange on my Brinkmann Heavy-Duty Gas Grill?
    • J
      jonesleslieAug 31, 2025
      If the flame on your Brinkmann Grill is yellow or orange, it could be due to a few reasons. If it's a new burner, it may have residual manufacturing oils; burn the grill for 15 minutes on “HIGH” with the lid closed. Another cause could be spider webs or insect nests in the venturi, so clean the venturi and burner assembly. Food residue or grease can also cause this issue, so clean the burner assembly. Finally, ensure the burner venturi is properly engaged with the valve; refer to the “Burner Adjustment” section for guidance.
  • K
    Kathryn BrooksSep 3, 2025
    What to do if Brinkmann Heavy-Duty Gas has grease fire?
    • T
      Tanya ThompsonSep 4, 2025
      If you experience a grease fire in your Brinkmann Grill, it's likely due to grease trapped by food buildup around the burner system. Immediately turn the control knobs and LP gas tank valve to “OFF”. Leave the lid either open or closed and let the fire burn out. If necessary, use a BC type fire extinguisher or baking soda, sand, or dirt to smother the fire. After the grill cools, remove and clean all parts per the “Proper Care and Maintenance” instructions.
  • D
    daniellejonesSep 7, 2025
    Why does the flame blow out on my Brinkmann Heavy-Duty Gas Grill?
    • B
      Becky SmithSep 7, 2025
      If the flame on your Brinkmann Grill blows out, it could be due to high or gusting winds; avoid using the grill in high winds. It might also be due to low LP gas, so replace or refill the LP gas tank. Obstructed burner holes can also cause this, so refer to the “Burner Assembly/Maintenance” instructions. Finally, the flow limiting device might have tripped; refer to the “Regulator Resetting Procedure”.
  • M
    mooremariahSep 10, 2025
    Why is the inside of my Brinkmann Grill lid peeling?
    • J
      Jean HughesSep 12, 2025
      If the inside of your Brinkmann Grill lid is peeling, resembling paint peeling, it's likely due to baked-on grease buildup that has turned into carbon and is flaking off. Clean the grill thoroughly per the “Proper Care and Maintenance” instructions.
  • C
    colejohnNov 13, 2025
    How to fix Brinkmann Heavy-Duty Gas Grill burner that will not light?
    • A
      Ann SanchezNov 13, 2025
      If the burner on your Brinkmann Grill won't light, start by ensuring the LP gas tank valve is open and the regulator is securely attached. Also, check if the LP gas tank is low or empty and replace or refill it if necessary. If there's a gas leak, turn the LP gas tank valve to “CLOSED”, wait 5 minutes, and follow the “Leak Testing” instructions in the owner’s manual. Make sure the coupling nut and regulator are fully connected, referring to the “Connecting Hose and Regulator” section. Check for obstructions in the gas flow by cleaning the burner assembly and inspecting for bent or kinked hoses. Reseat the burner and valve, following the “Burner Assembly/Maintenance” instructions. Clean the venturi and burner assembly to remove any spider webs or insect nests. Clean any clogged or blocked b...

Summary

IMPORTANT SAFETY WARNINGS

Gas Leak Danger Warnings

Critical hazards requiring immediate action when smelling gas.

General Usage Warnings

Potential hazards requiring caution and adherence to instructions for safe operation.

CALIFORNIA PROPOSITION 65 WARNING

GENERAL WARNINGS

LP GAS CYLINDER (TANK) SPECIFICATIONS AND INSTALLATION

LP Gas Cylinder Storage Dangers

Hazards and precautions for LP gas cylinder storage near the grill.

LP GAS CYLINDER (TANK) SPECIFICATIONS

Filling the LP Gas Cylinder

Guidelines and safety precautions for filling LP gas cylinders safely.

HOSE & REGULATOR SPECIFICATIONS AND INSTALLATION

Hose and Regulator Connection

Steps and precautions for connecting the hose and regulator assembly to the cylinder.

LEAK TESTING

Gas Leak Testing Procedure

Procedure and safety precautions for testing gas connections for leaks using soapy water.

REGULATOR RESETTING PROCEDURE

PRE-START CHECK LIST

LIGHTING INSTRUCTIONS

Lighting Main Burners

Step-by-step guide for lighting the primary grill burners.

Match Lighting the Main Burners

Alternative method for lighting main burners using a match.

Lighting the Sear Burner

Instructions for lighting the dedicated sear burner.

OPERATING THE GRILL

Controlling Flare-Ups;Grease Fires

Methods to manage and prevent grease fires and flare-ups during cooking.

ROTISSERIE COOKING

TURNING OFF THE GRILL

PROPER CARE & MAINTENANCE

Interior Grill Cleaning

Steps for cleaning the inside of the grill after use.

Burner Cleaning and Maintenance

How to clean and maintain the grill's burners for optimal performance.

BURNER ASSEMBLY;MAINTENANCE

BURNER ADJUSTMENT

TRANSPORTING AND STORAGE

Grill Storage Preparation

Preparations needed before storing the grill for extended periods.

TROUBLE SHOOTING

GRILL COOKING TIPS

Safe Food Grilling Temperatures

Recommended internal temperatures for various foods during grilling for safety.

ASSEMBLY INSTRUCTIONS

Parts Bag Contents

List of all components included in the parts bag for assembly.

Grill Parts List

Comprehensive list of all parts required for assembling the grill.

WARRANTY

Brinkmann Heavy-Duty Gas Grill Specifications

General IconGeneral
Warranty1 year limited
Fuel TypePropane
Grate MaterialCast Iron
BurnersStainless Steel
MaterialStainless Steel

Related product manuals