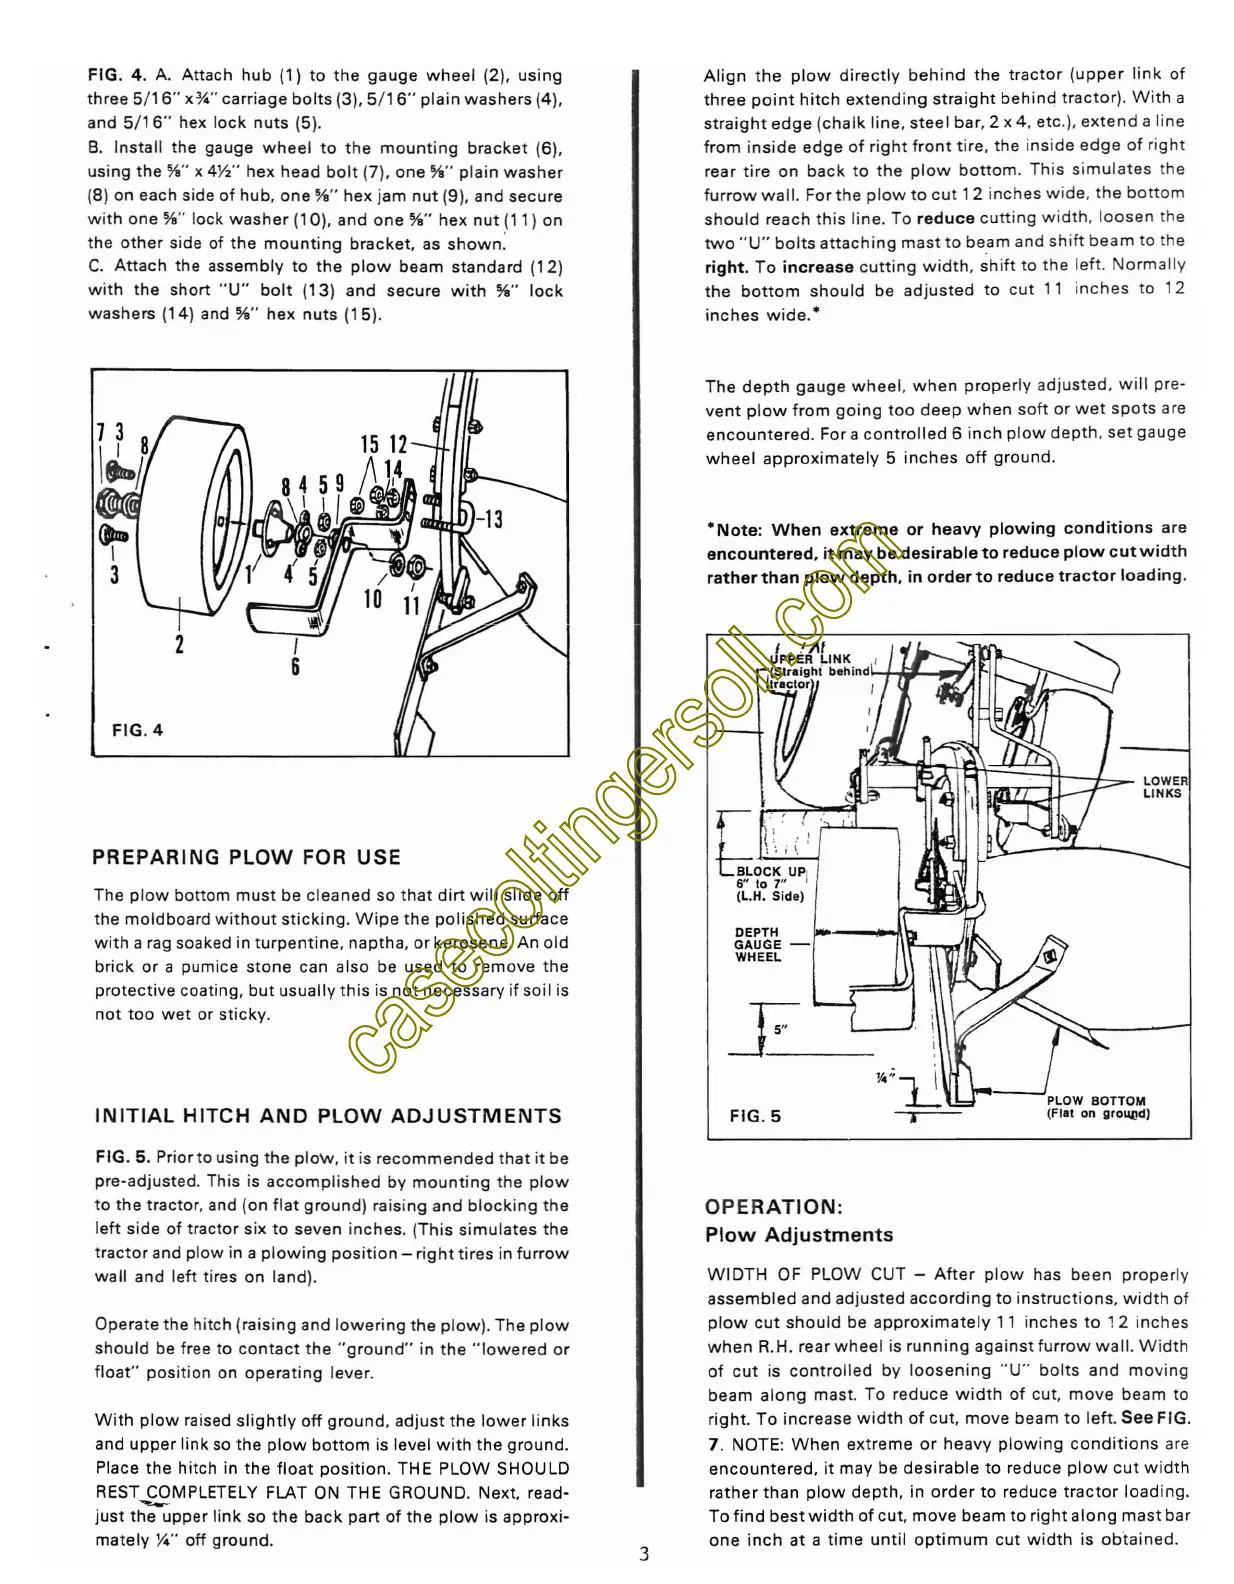
FIG . 4 . A.
Attach
hub
(1) to
the
gauge
wheel
(2), using
three 5
/16
"
x*
" carr
iage
bo
lts
(3), 5
/16
" plain
washers
(4),
and 5/ 16" hex lock n
uts
(5).
B. Insta ll the gauge w hee l to th e
mount
ing bracket (6),
usin g th e %" x
4W'
hex head bo lt (7).
one
%" plain
was
her
(8) on each side of
hub
,
one
%" hex jam nut (9). and se
cure
w it h one %" lock
was
her
(10). and
one
%"
hex nut (11) on
th e othe r side of the
mount
ing
bracket,
as
show
n:
C.
Attac
h the
assembly
to t he p
low
beam
s
tandard
(12)
w ith the s
hort
"
U"
bo lt (13)
and
secure
w
ith
%"
lock
washe rs (14) and
%"
hex
nuts (15).
PREPARING
PLOW
FOR
USE
The p
low
bottom m
ust
be cl eaned so t hat
dirt
w ill slide
off
the
moldboa
rd wi
thou
t st ick
ing.
W ipe
the
pol
ished
surface
w
it
h a rag soaked in
turpent
ine
, nap tha , or kerosene. An
old
b
rick
or a pumice
stone
can aIso be
used
to remove the
protective
coating,
but
us
ually
this is no t
necessary
if so il is
not
too
we t or st icky.
INITIAL
HITCH
AND
PLOW
ADJUSTMENTS
FIG.
5. Pr
ior
to using th e p
low
, it is rec
omm
ended th at it be
pre-ad justed. This is acco
mp
l
ished
by m
ount
ing
the
p
low
to th e tr actor, and (on flat ground) raisin g and bl o
ckin
g the
le
ft
side of tractor six to
seven
inches.
(Thi
s s
im
ulates the
trac
tor
and p
low
in a p
low
ing
pos
it
ion
- rig
ht
tires in furrow
wa ll and l
eft
tir
es on land).
Operate the
hitch
(raisin g and low ering the p
low
). Th e plow
s
hou
ld be free to
con
tac
t the " ground" in th e "
lowe
red or
fl oat" positio n on
operat
ing lever.
W
ith
plow
raised
slightly
off
ground
, ad
just
the
lower
links
and
upper
link so the
plow
bottom
is level w
ith
the
ground.
Place
the
hit
ch in
the
float
position
. THE
PLOW
SHOULD
REST.,.£9MPLETELY FLAT ON
THE
GROUND
. Next, read-
just
the
upper link so
the
back
part
of
the
plow
is
approxi
-
mately
Y4
" off
ground.
3
Al
ign
the
plow
d
irect
ly
behind
the
trac
tor
(upper li nk of
three
point
hitch
extend
ing
s
traight
behind
tract or). W ith a
straigh
t
edge
(chalk line, s
teel
bar
, 2 x 4. etc.).
extend
a line
from insi de
edge
of ri g
ht
fro
nt
tir
e. th e inside
edge
of rig ht
rear tire on bac k to
the
plo w b
ott
om. Th is s
imu
lates
th e
furrow
wa
ll. For the plow to cut 12 inches w ide .
the
bo
tto
m
sho uld reach
thi
s line. To reduc e
cutt
ing
w
idth
, loosen the
tw o " U" bo lts a
ttac
hing mast to be,am and sh ift
beam
to th e
right.
To
increase
cuttin
g w i
dt
h, shift to
the
left . Norm
ally
the bo t
tom
should
be ad
justed
to cu t 11 inches to 12
inch es w
ide.
*
The
dep
th
gauge
whee
l, w
hen
prope
rly adju
sted
, w ill pre-
vent
p
low
fro
m go
ing
too
deep
w he n soh or w et sp ots are
encountered
. For a co ntro
lled
6 inch p
low
depth. set
gauge
wheel
approx
imatel
y 5 inches
off
groun
d.
*Note
:
When
extreme
or
heavy
plowing
cond
it
ions
are
encountered
.
it
may
be
desirable
to
reduce
plow
cu
t w idt h
rather
than
plow
depth.
in
order
to
reduce
tractor
loa
din
g.
:
~
~~~
if9
rt
~
-!j
:t
f-=
"::::J
~
-
LOWER
~
LINKS
1 ,: ::
ho~~
'~
'P
I
6" to 7" I
(L.H. S
ide)
DEPTH
GAUGE
-
WHEEL
FIG
.5
OPERATION:
Plow
Adjustments
WIDTH
OF
PLOW
CUT -
Af
ter
p
low
has bee n p
rop
erly
assembled
and
ad
juste
d
accord
ing
to instructions, w idth of
p
low
cut
shou
ld be
approx
ima
te ly 11 inches to 12 inches
w
hen
R.H. rear
whe
el is r
unning
aga ins t fu rrow w all. W idth
of cut is co
ntr
oll
ed by loos
enin
g
"U
" bo lts and mov in g
beam
alo ng mas t. To reduce w idth of cut.
move
beam to
righ
t. To incr ease w
idth
of cut,
move
beam
to l
eft.
See
FIG.
7 . NOTE:
When
extreme or
heavy
plowi
ng conditi ons are
encountered,
it
may
be
desirable
to reduce
plow
c
ut
w
idth
rather
than
plow
depth
, in
order
to reduce
tractor
loading.
To f
ind
best
width
of cut,
move
beam
to right
along
mast
bar
one
inch at a ti me
unt
il
opt
imum
cut w
idth
is
obt
ained.