Quick Setup Guide
Read the Product Safety Guide first, then read this guide for the correct installation procedure.
Keep this guide next to your machine for quick reference.
CHN-ENG
Version 0
Remove the protective tape and the film covering the machine.
1
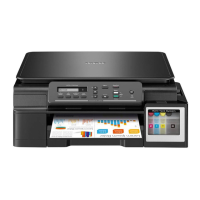
Unpack the machine and check the components
DCP-T520W / DCP-T720DW
DCP-T725DW / DCP-T820DW
NOTE
• The illustrations in this Quick Setup Guide show the DCP-T720DW.
• Save all packing materials and the box in case you must ship your
machine.
• We recommend using a USB 2.0 cable (Type A/B) that is no more than
2 meters long.
• Use a straight-through Category 5 (or greater) twisted-pair cable for
10BASE-T or 100BASE-TX Fast Ethernet Network (not included).
(DCP-T820DW)
4
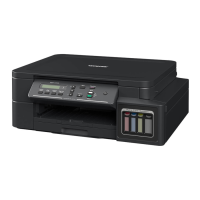
Fill the ink tanks with inbox ink
1
2
3
Open the ink tank cover a,
remove the cap b, and place
it on the back of the cover c.
Remove the film and tighten the cap firmly.
The bottle is self-standing and
the ink fills automatically until
the bottle is empty. To fill the
ink tank faster, squeeze the
bottle on both sides.
Remove the nozzle cap and insert the bottle nozzle firmly into the ink tank so that
the ink does not spill.
Connect the power cord. The machine powers on automatically.
3
Connect the power cord
IMPORTANT
Check the ink bottle model name on the label.
Using the incorrect ink may cause damage to the
machine.
BTD60BK
BT5009CMY
2
Load plain A4 paper in the paper tray
Fan the paper well.
You must follow steps
1
to
7
to complete the setup.
Operation Videos
www.95105369.com
Installation
& Using
Videos
Inbox Ink Bottles*4