EasyManua.ls Logo

Brother T-8722B - User Manual

Brother T-8722B
61 pages
Print Icon
To Next Page IconTo Next Page
Loading...
T-8421B
TWIN NEEDLE DIRECT DRIVE LOCK STITCHER
T-8422B
TWIN NEEDLE DIRECT DRIVE LOCK STITCHER
WITH THREAD TRIMMER
T-8452B
TWIN NEEDLE DIRECT DRIVE SPLIT NEEDLE BAR
LOCK STITCHER WITH THREAD TRIMMER
T-8722B
TWIN NEEDLE DIRECT DRIVE LOCK STITCHER
WITH LARGE HOOK AND THREAD TRIMMER
T-8752B
TWIN NEEDLE DIRECT DRIVE SPLIT NEEDLE BAR
LOCK STITCHER WITH LARGE HOOK
AND THREAD TRIMMER

Table of Contents

Other manuals for Brother T-8722B

Questions and Answers

  • N
    Nicole SmithAug 15, 2025
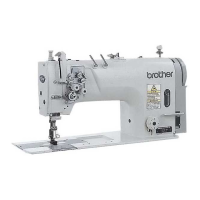
    Why does my Brother T-8722B Sewing Machine skip stitches and unravel thread at the start?
    • V
      vedwardsAug 15, 2025
      To address skipped stitches or thread unravelling at the start of sewing with your Brother Sewing Machine, reduce the tension of the thread take-up spring and raise the position of the stopper. Adjust the pretension if the trailing lengths of the upper threads are too short after thread trimming. Sharpen the fixed knives, or replace them along with the movable knives if the threads aren't being trimmed cleanly. Try using a needle with a count that is one lower if the needle is too wide. Use the slow start feature if the sewing speed is too fast at the start. Adjust the needle up stop position if it's too high. If sewing light or medium-weight materials, use a presser foot without slots and a feed dog without grooves.
  • M
    Maria EverettAug 18, 2025
    Why are the upper and lower threads breaking on my Brother T-8722B Sewing Machine?
    • A
      Allison MendozaAug 18, 2025
      If the upper and lower threads are breaking, several factors could be at play. First, check the needle: if it's bent or broken, replace it. Ensure the needle is correctly installed and the machine is properly threaded. Verify that the oil tank is adequately filled with lubricating oil. Adjust the upper or lower thread tension if it's too weak or strong. Clean the rotary hook if it's blocked with dust or thread scraps. Adjust the stopper position if the thread take-up spring operating range is too small. If the rotary hook, feed dog, or other parts are damaged, smooth them or replace them. Smooth any damage to the thread path or replace the damaged part. Finally, ensure the thread take-up amount is correct by adjusting it.
  • J
    Joel HamiltonAug 21, 2025
    How to fix skipped stitches on my Brother T-8722B Sewing Machine?
    • S
      Sarah HerreraAug 21, 2025
      If your Brother Sewing Machine is skipping stitches, start by checking the needle. Replace it if the tip is bent or broken, and make sure it's correctly installed. Ensure the machine is properly threaded. Adjust the presser foot pressure if it's too weak. If the needle is too thin, replace it with a slightly thicker one. Also, adjust the height of the presser foot if it's too high. Adjust the tension of the thread take-up spring if it is too weak and adjust the thread take-up amount if it is too large.
  • V
    Victoria ColeAug 25, 2025
    What to do if the upper and lower thread is not tight on my Brother T-8722B?
    • J
      Jillian RichAug 25, 2025
      If the upper or lower thread on your Brother Sewing Machine isn't tight enough, first ensure the thread is correctly threaded. Adjust the upper or lower thread tension if it's too weak. If the thread take-up spring operating range is too small, lower the position of the stopper. If using a sewing machine with medium-weight material specifications, and poor thread tightening occurs, replace the presser foot with one that has slots on the underside, or replace the feed dog with a grooved feed dog.
  • N
    nreidAug 27, 2025
    Why is the lower thread tangled when starting to sew with my Brother T-8722B?
    • M
      Michael RiceAug 27, 2025
      If the lower thread is tangling at the start or the bobbin is spinning during thread trimming on your Brother Sewing Machine, ensure the bobbin spins in the opposite direction to the rotary hook when the lower thread is pulled. Make sure the bobbin winding amount is not more than 80%. Attach the anti-spin spring. If the bobbin isn't turning smoothly, replace it. Use only bobbins specified by Brother.
  • D
    deborah35Aug 30, 2025
    Why are loops appearing in the seam of my Brother T-8722B?
    • C
      cooperbrianAug 30, 2025
      If loops are appearing in the seam of your Brother Sewing Machine, first ensure the thread path is smooth by polishing it with a fine grain file or sandpaper. Check that the bobbin is turning smoothly; pull out the lower thread to check for slackness in the thread tension, or replace the bobbin or bobbin case. Finally, adjust the thread take-up amount if it's too large.
  • H
    Heather FlowersSep 2, 2025
    How to fix uneven seams on my Brother T-8722B Sewing Machine?
    • P
      Patricia SmithSep 2, 2025
      If you're experiencing an uneven seam with your Brother Sewing Machine, adjust the presser foot pressure and the feed dog height. If the bobbin is scratched, smooth it with an oiled grindstone or replace it.
  • J
    james40Sep 5, 2025
    Why is my Brother Sewing Machine not operating at high speed?
    • R
      Ronald ParksSep 5, 2025
      If your Brother Sewing Machine isn't operating at high speed, use the sewing speed control keys to set the desired high speed. The sewing speed setting or backtack speed setting might be incorrect.
  • J
    Joshua SmithSep 8, 2025
    Why is nothing appearing on the operation panel display of my Brother T-8722B Sewing Machine?
    • C
      Charles HoganSep 9, 2025
      If nothing appears on the operation panel display of your Brother Sewing Machine, ensure the power supply connector is securely connected to the control box. Also, check that the operation panel connector inside the control box is securely connected.
  • A
    Anna StuartSep 12, 2025
    What does “GREASEUP” flashing on my Brother Sewing Machine mean?
    • H
      Henry HillSep 12, 2025
      Apply grease.

Summary

SAFETY INSTRUCTIONS

Safety indications and their meanings

Explains safety indications (DANGER, CAUTION) and symbols used in the manual and on the machine.

Environmental requirements

Details recommended ambient temperature and humidity for safe and correct operation of the sewing machine.

Installation safety

Provides crucial safety precautions and guidelines for the proper installation and handling of the sewing machine.

Sewing safety precautions

Outlines essential safety measures to follow during sewing, including handling moving parts and electrical hazards.

Cleaning safety precautions

Describes safety guidelines for cleaning the machine, emphasizing power off, protective gear, and oil handling.

Warning labels on the machine

Highlights the importance of adhering to instructions on warning labels affixed to the sewing machine for safe operation.

MACHINE SPECIFICATIONS

NAMES OF MAJOR PARTS

INSTALLATION

Table processing diagram

Illustrates required table dimensions and hole placements for preparing the sewing machine installation.

Initial machine installation

Guides through the physical mounting and connection of the sewing machine components to the table.

Power switch installation

Details the procedure for installing the power switch onto the sewing machine table.

Oil pan and rubber cushion installation

Explains the installation of the oil pan and rubber cushions for machine stability and lubrication.

Knee lifter complying bar installation

Describes the installation of the knee lifter complying bar for machine operation.

Machine head and operation panel installation

Covers the mounting of the machine head and the connection of the operation panel to the sewing unit.

Cotton stand installation

Describes the process of securely installing the cotton stand for thread spool placement.

Knee lifter plate adjustment

Details the adjustment of the knee lifter plate for optimal user operation and comfort.

Machine lubrication procedures

Provides instructions on how to properly lubricate the sewing machine for optimal performance and longevity.

Connecting power and control cords

Guides on how to correctly connect the various power and control cords to the sewing machine and its control box.

Connecting other electrical cords

Explains how to connect additional electrical cords, including power and motor connectors for different specifications.

Ground wire connection

Emphasizes the importance and procedure for correctly connecting the ground wire for electrical safety.

Test operation of the treadle

Details steps for performing a test operation using the treadle to ensure the machine functions correctly.

PREPARATION BEFORE SEWING

Installing the sewing machine needle

Provides step-by-step instructions for correctly installing the needle into the sewing machine.

Removing the bobbin

Guides on how to safely remove the bobbin from the sewing machine's bobbin case or rotary hook.

Winding the lower thread onto the bobbin

Explains winding thread onto the lower bobbin, including tension and capacity checks.

Installing the bobbin into the rotary hook

Details the correct method for inserting the wound bobbin into the sewing machine's rotary hook.

Threading the upper thread

Describes the procedure for threading the upper thread through the sewing machine's guides and tension discs.

Adjusting stitch length

Covers how to adjust the stitch length for desired sewing results.

Using the knee lifter

Explains how to utilize the knee lifter for operational control and ease.

Using the thread wiper

Explains the function and operation of the thread wiper, typically used with thread trimming.

Corner sewing method

Provides guidance on techniques for sewing neat corners, including needle stop adjustments.

USING THE OPERATION PANEL (BASIC OPERATIONS)

Operation panel: names and functions

Identifies and explains the various keys and displays on the basic operation panel of the sewing machine.

Setting start and end backtack stitches

Guides on how to configure and use the start and end backtack stitch functions for reinforcing seams.

Sewing fixed stitches

Explains how to set and perform sewing operations using a specific number of fixed stitches.

Using the lower thread counter

Details how to use the lower thread counter to monitor remaining thread and receive warnings.

USING THE OPERATION PANEL (ADVANCED OPERATIONS)

Adjusting needle stop position

Describes how to set the needle's final position (up or down) after sewing stops.

LOCK key function

Explains the purpose and operation of the LOCK key to prevent accidental changes to settings.

Resetting operation panel settings

Guides on how to restore the operation panel settings to their original factory defaults.

SEWING

Basic sewing operation

Outlines the fundamental steps required to begin and perform a sewing operation on the machine.

Backtacking procedure

Details how to perform backtacking, which reverses the sewing direction to secure stitches.

Sewing condensed stitches

Explains how to sew stitches with shorter lengths to create condensed stitch effects.

THREAD TENSION

Adjusting upper and lower thread tension

Provides methods for adjusting thread tension to achieve balanced and even stitches.

Adjusting presser foot pressure

Guides on setting the appropriate pressure for the presser foot to handle different materials without slippage.

Adjusting presser foot floating amount

Explains how to fine-tune the presser foot's floating amount for sewing delicate or bulky materials.

Adjusting trailing thread length

Details how to set the length of the thread trailing from the needle after thread trimming.

Adjusting thread take-up amount

Guides on modifying the thread take-up amount to prevent looping or thread breakages.

CLEANING

Daily cleaning procedures

Outlines the essential daily cleaning tasks to maintain the sewing machine's performance and lifespan.

Lubricating the oil cover

Provides instructions for lubricating the machine via the oil cover at specified intervals.

Applying grease (Semi dry specifications)

Details the procedure for applying grease when the "GREASEUP" notification appears on the display.

Resetting grease consumption count

Guides on resetting the grease consumption indicator after applying new grease to the machine.

ADJUSTING THE ROTARY HOOK LUBRICATION AMOUNT

TROUBLESHOOTING

Sewing problems and solutions

Lists common sewing issues such as uneven seams or skipped stitches and their potential causes and solutions.

Error code displays and meanings

Explains various error codes that may appear on the operation panel and their corresponding troubleshooting steps.

Brother T-8722B Specifications

General IconGeneral
BrandBrother
ModelT-8722B
CategorySewing Machine
LanguageEnglish

Related product manuals