—14—
Install Motormaster V Controls
The Motormaster V control is a motor speed control device
which adjusts condenser fan motor speed in response to
declining liquid refrigerant pressure. A properly applied
Motormaster V control extends the operating range of air-
conditioning systems and permits operation at lower outdoor
ambient temperatures.
The minimum ambient temperatures at which the unit will
operate are:
To operate down to the ambient temperatures listed,
Motormaster V controls (Fig. 23) must be added. Field-
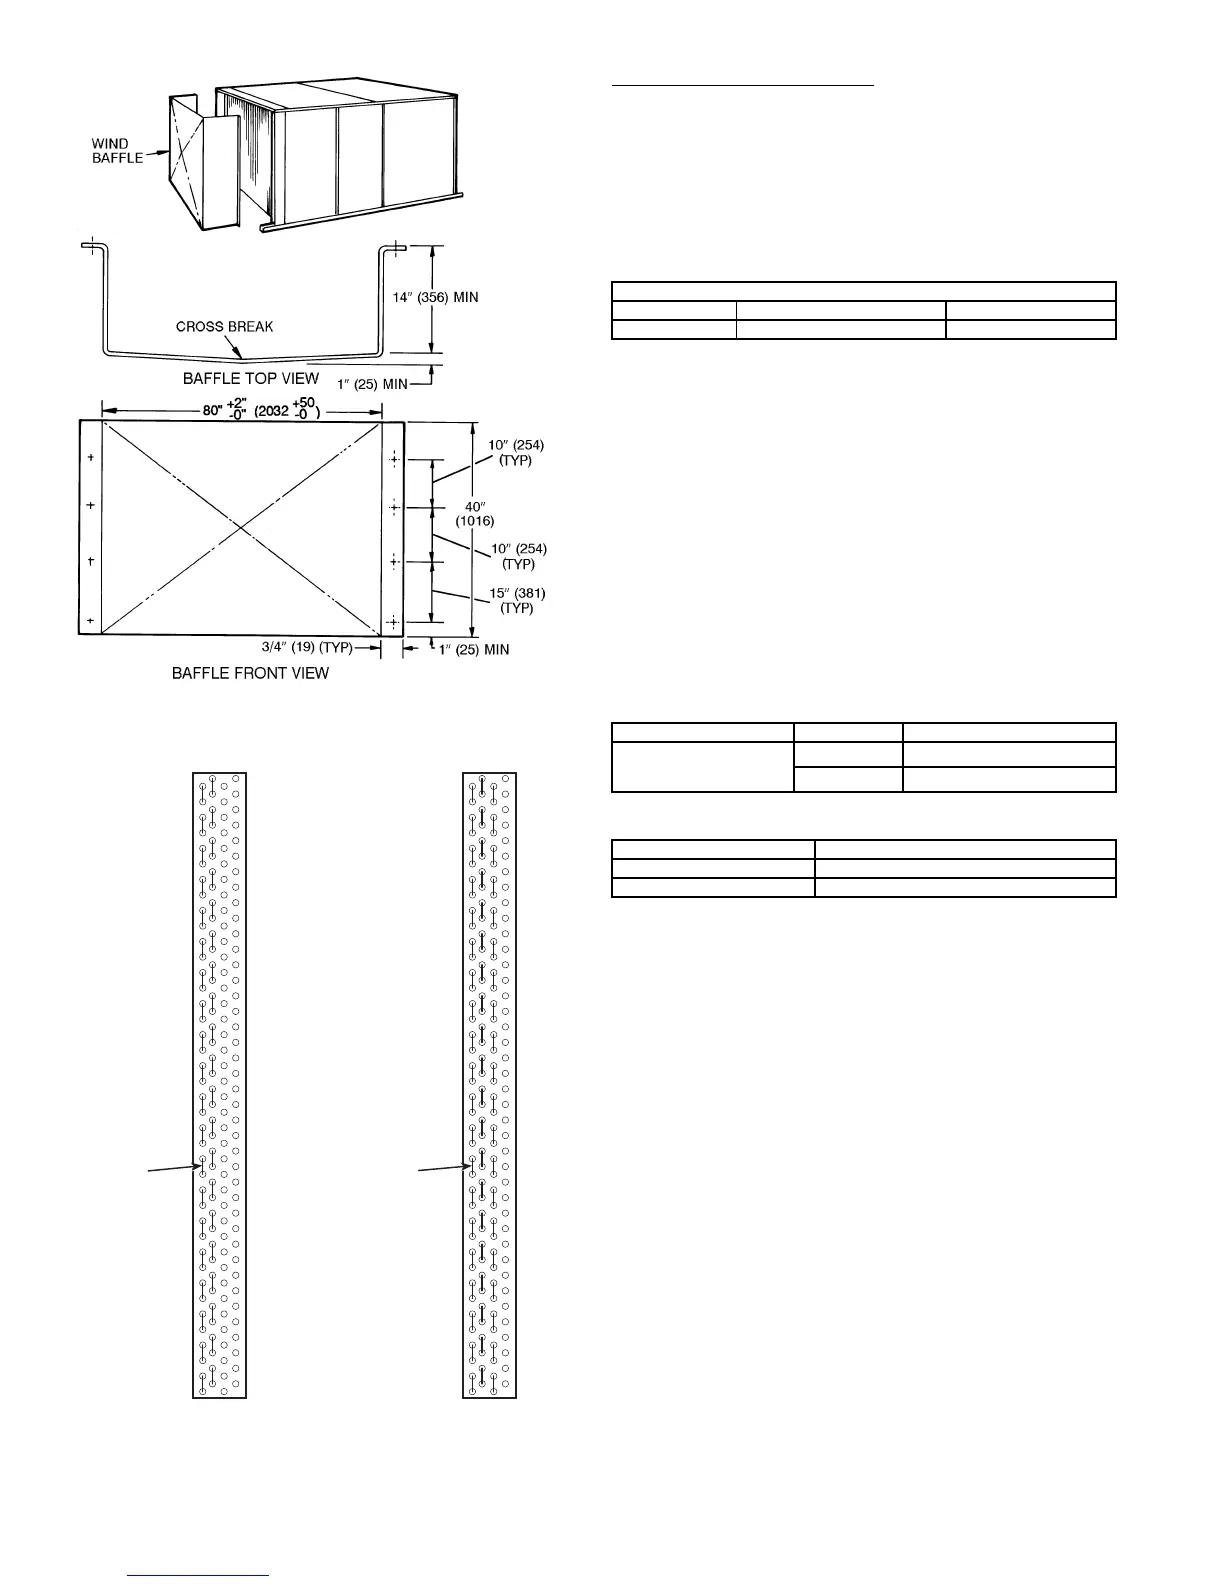
fabricated and installed wind baffles are also required for all
units (see Fig. 21). The Motormaster V control permits opera-
tion of the unit to an ambient temperature of –20 F. The control
regulates the speed of 3-phase fan motors that are compatible
with the control. These motors are factory installed.
See Table 6 for the Motormaster V control accessory package
usage. Table 7 shows applicable voltages and motors.
Replacement of a motor IS NOT REQUIRED ON CUR-
RENT PRODUCTION UNITS since the control is compati-
ble with the factory-installed fan motors. Only field wiring
control is required.
Install the Motormaster V control per instructions supplied
with accessory.
Table 6 — Motormaster V Control Package Usage
Table 7 — Applicable Voltages and Motors
XIII. STEP 13 — ADJUST FACTORY-INSTALLED OPTIONS
A. Optional EconoMi$erIV
See Fig. 24 and 25 for EconoMi$erIV component locations.
NOTE: These instructions are for installing the optional
EconoMi$erIV only. Refer to the accessory EconoMi$erIV
installation instructions when field installing an EconoMi$erIV
accessory.
To complete installation of the optional EconoMi$erIV, per-
form the following procedure.
1. Remove the EconoMi$erIV hood. Refer to Step 11 —
Install Outdoor-Air Hood on page 11 for information
on removing and installing the outdoor-air hood.
2. Relocate outdoor air temperature sensor from ship-
ping position to operation position on EconoMi$erIV.
See Fig. 24.
IMPORTANT: Failure to relocate the sensor will result in the
EconoMi$erIV not operating properly.
3. Re-install economizer hood.
4. Install all EconoMi$erIV accessories. EconoMi$erIV
wiring is shown in Fig. 26.
Outdoor air leakage is shown in Table 8. Return air pressure
drop is shown in Table 9.
TEMPERATURE OPERATING LIMITS — F°
Standard Unit Unit with Low Ambient Kit Unit with MMV Control
40 25 –20
UNIT VOLTAGE ITEM DESCRIPTION
579F180-300
208/230 CRLOWAMB015A00
460 CRLOWAMB016A00
VOLTAGE COMPATIBLE MOTOR
208/230-3-60 HD52AK654
460-3-60 HD52AK654
SENSOR
LOCATION
HAIRPIN END
SENSOR
LOCATION
HAIRPIN END
NOTE: Dimensions in ( ) are in mm.
Fig. 21 — Wind Baffle Details
579F180 579F216
NOTE: All sensors are located on the eighth hairpin up from the
bottom.
Fig. 22 — Motormaster® I Sensor Locations



 To Next Page