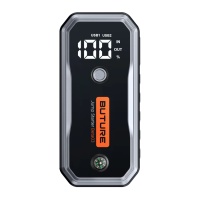
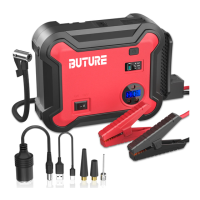
The BUTURE Beta03 Jump Starter is a portable device designed to jump-start vehicles, charge other devices, and provide LED lighting.
Function Description:
The primary function of the Beta03 is to jump-start car engines. It achieves this by providing a powerful electrical boost to a vehicle's battery. The device also serves as a power bank, capable of charging other electronic devices via its USB output ports. Additionally, it incorporates an LED lighting system with multiple modes for emergency situations or general illumination.
Important Technical Specifications:
While specific numerical specifications like battery capacity (mAh), peak current (A), or input/output voltages are not explicitly listed in the provided pages, the manual highlights several operational and safety parameters:
- Power Requirement for Jump Start: The jump starter needs to have at least 20% power to initiate a jump start.
- Operating Temperature: The product's operation temperature range is -20°C to 60°C.
- Storage Temperature: The storage temperature should not exceed 50°C (122°F).
- Smart Clamp Protections: The device features a "smart clamp" with various built-in protections, indicated by different LED light patterns and beeps:
- Flashing red and green: Standby status.
- Solid green: Ready to start.
- Solid red: Indicates several issues:
- Low voltage protection (requires recharging the product).
- Over-heating protection (requires removing clamps and letting it cool).
- Timeout protection (connection timed out; start engine within 60 seconds or remove clip within 30 seconds after a successful start).
- Solid red with discontinuous beep: Indicates:
- Reverse polarity protection (requires reversing the clips for correct connection).
- Sticking fault (requires contacting support for replacement parts).
- Solid red with long beep: Indicates short-circuit protection (do not connect clips together or to the same metal).
- Force Start Function: This function can be used if three jump-start attempts fail. It bypasses some auto-detection and safety features temporarily, requiring the product's battery to be above 20% and the clamps to be correctly connected.
Usage Features:
Jump Starting Your Car:
- Connect Jumper Cable: Insert the jumper cable into the jump starter, ensuring the device has at least 20% power.
- Connect Clamps: Attach the red clamp to the car battery's positive (+) terminal and the black clamp to the negative (-) terminal.
- Start Engine: Start your car engine.
Force Start Function:
If standard jump-start attempts fail:
- Check Connections & Power: Verify clamps are correctly connected and the jump starter's battery is above 20%.
- Activate Force Start: Press the Force Start Button for 3 seconds.
- Initiate Ignition: The indicator will turn green, signaling readiness to start the engine.
- Caution: Using this function temporarily disables auto-detection and safety features.
Charging Other Devices:
- Plug in Cable: Insert a charging cable into any of the USB output ports (USB1 or USB2).
- Press Power Button: Press the power button on the jump starter to initiate charging.
LED Lighting:
The device offers multiple lighting modes:
- Lighting: Press the switch button for 3 seconds to activate standard lighting.
- Strobe: Press the switch button shortly from the "Lighting" mode to switch to Strobe.
- SOS: Press the switch button shortly from the "Strobe" mode to switch to SOS.
- OFF: Press the switch button shortly from the "SOS" mode to turn off the LED light.
Maintenance Features:
The manual provides important safety warnings that also imply maintenance guidelines:
- Storage: Store in a cool, well-ventilated place, out of reach of children and pets.
- Cleaning: Do not use detergent to clean the product.
- Handling: Avoid heavy dropping or repeatedly hitting the device.
- Environmental Considerations:
- Do not operate in explosive environments (flammable liquids, gases, dusts).
- Do not immerse in water.
- Do not incinerate or expose to high temperatures, as it may explode.
- Recycle safely.
- Component Integrity:
- Only use the smart jumper cable supplied by the manufacturer.
- Do not use the product if the clamp or cable is damaged.
- Do not connect the red and black clamps together when the product is outputting.
- Do not connect the red and black clamps to the same piece of metal.
- Do not disassemble or modify the product.
- Only use replacement parts or accessories provided or recommended by the manufacturer.
- Troubleshooting: The smart clamp's indicator lights and beeps provide diagnostic information for various issues, guiding the user on how to resolve problems like low voltage, overheating, reverse polarity, or short circuits. For "sticking fault" or other issues, users are advised to contact
support@ibuture.com.