Transfer Printer A6+, A8+, Hermes+6 and
Print Module PX6
Printhead Replacement
Safety Precautions
Disconnect the power plug from the electrical
power supply before starting!
Protect printhead against damage by electrostatic
Put the printer on to a grounded conductive
Ground yourself during printhead replacement
for example using a grounded wrist-strap!
Do not touch the connector pins of the print
Make sure that the glass surface on the
printhead is not touched by sharp and hard
objects or your hand!
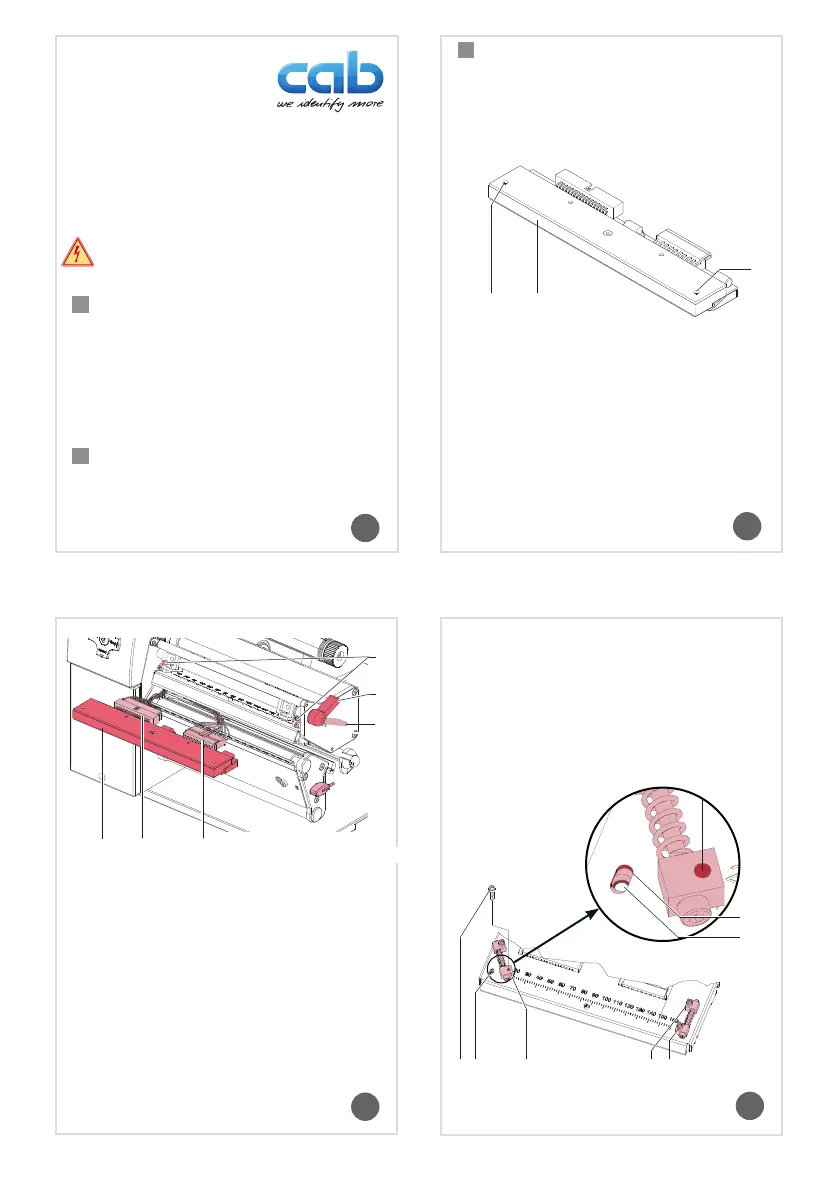
1. Remove the media from the printer.
2. Swing lever (4) in the in picture 2 printed posi-
tion (4b). The printhead assembly is locked in
this position.
3. Loosen the printhead locking screws (3). Use
the provided allen key.
4. Swing the lever (4) counterclockwise until
it stops. (4a) So you can unlock and lift the
printhead assembly.
English
Fig. 1
Fig. 2
Part.-No. 9008567 Edition 05/14
Fig. 3
5.
1) from the printhead
carriage.
6.
Unplug careful the printhead (
nectors of the printhead cables (
Connect the new printhead to the cables.
Swing the adjustment elements (
in picture 3 that you can see the slots in the
printhead carriage.
Put in the printhead into the printhead
carriage and swing the printhead assembly
down by hand and in such a way hold.
Don‘t lock it!
10. Move the printhead under the printhead car-
riage that you can see the drillings (2) of the
printhead centered into the slots (7).
11. Move the adjustment elements (8) back in the
home position.
12. Put in and tighten the locking screw (5)
completely.
The printhead assembly is ready for use!
Attention !
If it will be a wrong print quality after printhead
replacement it’s necessary to make a printhead
adjustment.
Service Manual of the printer
Replacement
1
2
4
3
3
4a
1
5
6
4b
1
2
2
5 8 582
2
7
Transfer Printer A6+, A8+, Hermes+6 and
Print Module PX6
Printhead Replacement
Safety Precautions
Danger !
► Disconnect the power plug from the electrical
power supply before starting!
Attention !
Protect printhead against damage by electrostatic
discharge!
► Put the printer on to a grounded conductive
surface!
► Ground yourself during printhead replacement
for example using a grounded wrist-strap!
► Do not touch the connector pins of the print-
head by ngers!
Attention !
► Make sure that the glass surface on the
printhead is not touched by sharp and hard
objects or your hand!
1. Remove the media from the printer.
2. Swing lever (4) in the in picture 2 printed posi-
tion (4b). The printhead assembly is locked in
this position.
3. Loosen the printhead locking screws (3). Use
the provided allen key.
4. Swing the lever (4) counterclockwise until
it stops. (4a) So you can unlock and lift the
printhead assembly.
English
Fig. 1
Fig. 2
Part.-No. 9008567 Edition 05/14
Fig. 3
5. Remove the printhead (1) from the printhead
carriage.
6. Unplug careful the printhead (1) from the con-
nectors of the printhead cables (5 and 6).
7. Connect the new printhead to the cables.
8. Swing the adjustment elements (8) printed
in picture 3 that you can see the slots in the
printhead carriage.
9. Put in the printhead into the printhead
carriage and swing the printhead assembly
down by hand and in such a way hold.
Don‘t lock it!
10. Move the printhead under the printhead car-
riage that you can see the drillings (2) of the
printhead centered into the slots (7).
11. Move the adjustment elements (8) back in the
home position.
12. Put in and tighten the locking screw (5)
completely.
The printhead assembly is ready for use!
Attention !
If it will be a wrong print quality after printhead
replacement it’s necessary to make a printhead
adjustment.
Service Manual of the printer
Replacement
 Loading...