This document is the owner's manual for a California Air Tools 10020CHAD Ultra Quiet & Oil Free Air Compressor. It provides comprehensive instructions for safe operation, maintenance, and troubleshooting, ensuring users can maximize the lifespan and performance of their air compressor.
Function Description
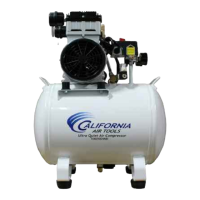
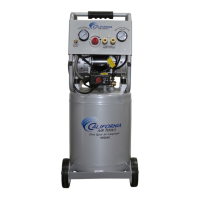
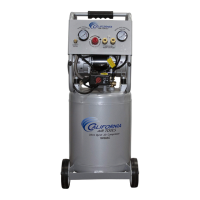
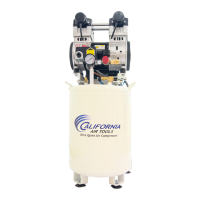
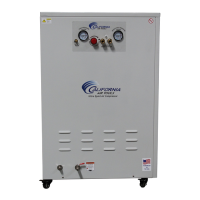
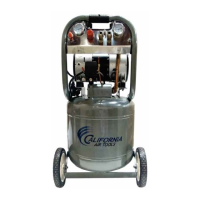
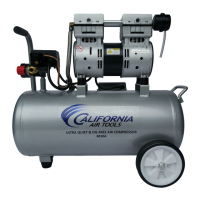
The California Air Tools 10020CHAD is a 2.0 HP, 10.0-gallon steel horizontal air compressor designed for a variety of applications requiring compressed air. Its primary function is to compress ambient air and store it in the tank for later use by air-powered tools and equipment. A key feature of this model is its "Ultra Quiet & Oil Free" design, which means it operates at a lower noise level compared to traditional compressors and does not require oil for lubrication, resulting in cleaner air output. The motor directly drives the pistons, allowing for extended operation without lubrication. This oil-free characteristic makes it suitable for situations where oil in the airflow is a concern, such as painting, dental work, or other sensitive applications. The compressor is equipped with a pressure switch that automatically turns the motor on and off to maintain pressure within a pre-set range (120-125 PSI shut-off, 90-95 PSI re-start), ensuring consistent air supply and energy efficiency.
Usage Features
The manual emphasizes several key usage features to ensure safe and effective operation:
- Pre-Operation Checklist: Before initial use, users are instructed to perform a pre-operation checklist, which includes inspecting the package contents, checking for any damage to the compressor, and properly installing the air filters. The air filters attach to the top back side of the motor head and should be hand-tightened into the motor head ports.
- Compressor Location: For optimal performance and longevity, the compressor must be placed on a flat surface with an incline no greater than 15 degrees. It also requires adequate airflow, with at least 2 feet of obstacle-free space surrounding and above the unit. The compressor should be used in well-ventilated areas, away from flammable items, and in areas with clean air to prevent damage to the motor from dust or particulates.
- Electrical Power: The compressor requires a dedicated 110-volt, 15-amp outlet. Users are warned against using excessively long or thin-wired extension cords (recommended: no more than 25 feet long and at least 14 gauge, 3-wire grounding plug) as this can cause voltage drop, loss of power, and motor overheating. The product must be properly grounded to reduce the risk of electric shock.
- Starting and Shutting Down: To start, the power switch should be in the OFF position before plugging in the power cord. An air hose can then be attached to the 1/4" male industrial quick connect coupler. Once plugged in, turning the power switch to ON will start the compressor, which will fill the tank until the motor automatically turns off at the pre-set pressure. Airflow can then be regulated using the regulator knob. For shutdown, the power switch is turned OFF, the power cord unplugged, and pressure released from the tank via the air supply hose.
- Safety Precautions: Throughout the manual, numerous safety warnings are highlighted. These include warnings about the risk of cutting from moving parts, electric shock, breathing harmful particulates, flying objects, hot surfaces, fire, and explosion. Users are advised to wear approved safety equipment, keep hands and feet away from rotating parts, never breathe air directly from the compressor, avoid touching hot surfaces, and operate the compressor a safe distance from flammable materials. The air tank should never be moved when under pressure, and air hoses should not be used to pull or move the compressor.
Maintenance Features
Regular maintenance is crucial for the longevity and performance of the air compressor:
- Draining the Air Tank: The compressor is equipped with an EZ-1 Auto Drain Valve that automatically drains the air tank at the beginning of each cycle. This prevents moisture buildup, which can lead to rust and weaken the tank. Users can also manually drain the tank to remove any excess moisture. The frequency of draining depends on environmental conditions and operating time.
- Cleaning or Changing the Air Filter: The air filter reduces noise and prevents particulates from entering and damaging the compressor. Over time, the filter can become clogged, reducing air intake capabilities. Users should regularly open the lid, remove the filter element, and clean it by blowing off or brushing off dirt and dust. If clogged, the filter should be replaced.
- Testing for Leaks: Users are advised to periodically check all connections for tightness. Small leaks can reduce performance. A simple test involves spraying soapy water on suspected leak areas; bubbles indicate a leak, and the broken part should be replaced.
- Cleaning the Compressor: The exterior of the compressor should be cleaned with a soft brush or a moistened cloth using a biodegradable solvent. Flammable liquids like gasoline or alcohol should not be used. Keeping parts clean from dirt and dust ensures better performance.
- Storage: Before prolonged storage, the compressor should be turned off, unplugged, and the power cord wrapped around the handle. All pressure and water should be released from the air tank by opening the drain valve. The unit should be cleaned, covered to protect it from dust and moisture, and stored indoors. No items should be stacked on or around the compressor to prevent damage.