IMPORTANT SAFEGUARDS
When using electrical appliances, basic safety precautions should always be followed, including the following:
READ AND SAVE THESE INSTRUCTIONS
• READ ALL INSTRUCTIONS, PRODUCT LABELS AND WARNINGS BEFORE USING THE PRECISION CONTROL COFFEE MAKER.
• Do not touch hot surfaces. Use handles or knobs.
• To protect against electric shock, do not place or immerse cord, plugs, or appliance in water or other liquid.
• This appliance is not to be used by children or by persons with reduced physical, sensory or mental capabilities.
• Close supervision is necessary when any appliance is used near children. Children should not play with the appliance.
• Unplug from outlet when either the appliance or display clock is not in use, and before cleaning. Allow to cool before putting on or taking o parts,
and before cleaning the appliance.
• Do not operate any appliance with a damaged cord or plug or after the appliance malfunctions, or has been damaged in any manner.
Return appliance to an Authorized Service Center for examination, repair or adjustment. Do not attempt to replace or splice a damaged cord.
• The use of an accessory not recommended by the appliance manufacturer for use with this appliance may result in fire, electric shock or injury to persons.
• Do not use outdoors.
• Do not let cord hang over edge of table or counter, or touch hot surfaces.
• Do not place on or near a hot gas or electric burner, or in a heated oven.
• To disconnect, turn any control to the o position, then remove plug from wall outlet.
• Do not use appliance for other than intended use.
• All lids should be closed during use.
• Scalding may occur if the lid is removed or brew basket door is opened during or immediately after the brewing cycles. Contents may be hot.
Allow to cool before opening the lid.
For appliances with glass containers:
• The container is designed for use with this appliance. It must never be used on a range top.
• Do not set a hot container on a wet or cold surface.
• Avoid sudden temperature changes, such as rinsing, washing, filling, or immersing a hot container with cold liquids.
• Do not use a cracked or chipped container or a container having a loose or weakened handle.
• Do not clean container with cleansers, steel wool pads, or other abrasive material.
ADDING WATER AND COFFEE
• Once coeemaker is plugged in and clock is set, open the Brew Basket by swinging it all the way to the left.
Place disposable #4 cone-shaped filter into the Removable Cone Style Filter Basket and swing Brew Basket all
the way to the right to secure in place. (See the Suggested Coee Measurement Chart.)
• Fill the Glass Carafe with cold fresh water to the desired capacity. For easy and accurate filling, the water
markings on the Glass Carafe and on the Water Window show the amount of water needed to make the
corresponding desired number of cups.
• Do not fill past the “10 cup line” or water will flow out of the overfill hole in the back of the coeemaker.
• Place the Glass Carafe on the Warming Plate.
• The amount of coee brewed will always be slightly less than the amount of water poured in the Water Reservoir.
This is due to the minimum absorption of water by the coee grounds.
NOTE: Make sure the Glass Carafe is fully placed on the Warming Plate or the water and the grounds will overflow
from the Filter Basket. An overflow may cause personal injury or damage to property.
CAUTION! To reduce the risk of damaging the Glass Carafe and/or the risk of personal injury, do not add cold water
to the Carafe if it is hot. Allow it to cool before using.
BREWING COFFEE
• After addition of water and coee and the Glass Carafe and the filter basket securely in place, turn the
coeemaker on by pressing the BREW/OFF Button once. The LED light will illuminate signaling that the
coeemaker is on and brewing.
• When brewing begins the LCD Screen will continue to show real time. Press the HOUR button once and the
LCD screen will show the time the coee is being kept warm. In this way, you can keep track of the coee
keep-warm time.
• You can go back to real time on the LCD Screen by simply pressing the HOUR button.
• To enjoy a fuller and stronger cup of coee, press the STRONG Button. If brewing to the SCA guidelines for Golden
Cup Standard, do not use the STRONG setting.
• When the coee has finished brewing, the Coee Maker will continue to warm coee for 4 hours, before
automatically shutting o.
• Once you are finished, allow Coee Maker to cool before cleaning.
• To turn the coeemaker o, press the BREW/OFF button once. Be sure to turn your coeemaker o when
no longer using it.
NOTE: For further details on product
features and usage instructions, please
visit www.calphalon.com
Water Ground Coee
10 Cups 17 Tbsp.*
8 Cups 13 Tbsp.
6 Cups 10 Tbsp.
4 Cups 6.5 Tbsp.
1 level tablespoon (tbsp) = 5gr./0.17 oz.
1 cup = 5 fl. oz. of brewed coee
Use more or less coee to suit your taste
SUGGESTED
COFFEE MEASUREMENT
NOTE: For best results, use a level tablespoon
for ground coee measurement. Make sure you
use medium grind coee for a perfect brew.
*May cause overflow if using fine coee
or decaf coee
11
2
1
3
10
9
4
5
6
8
7
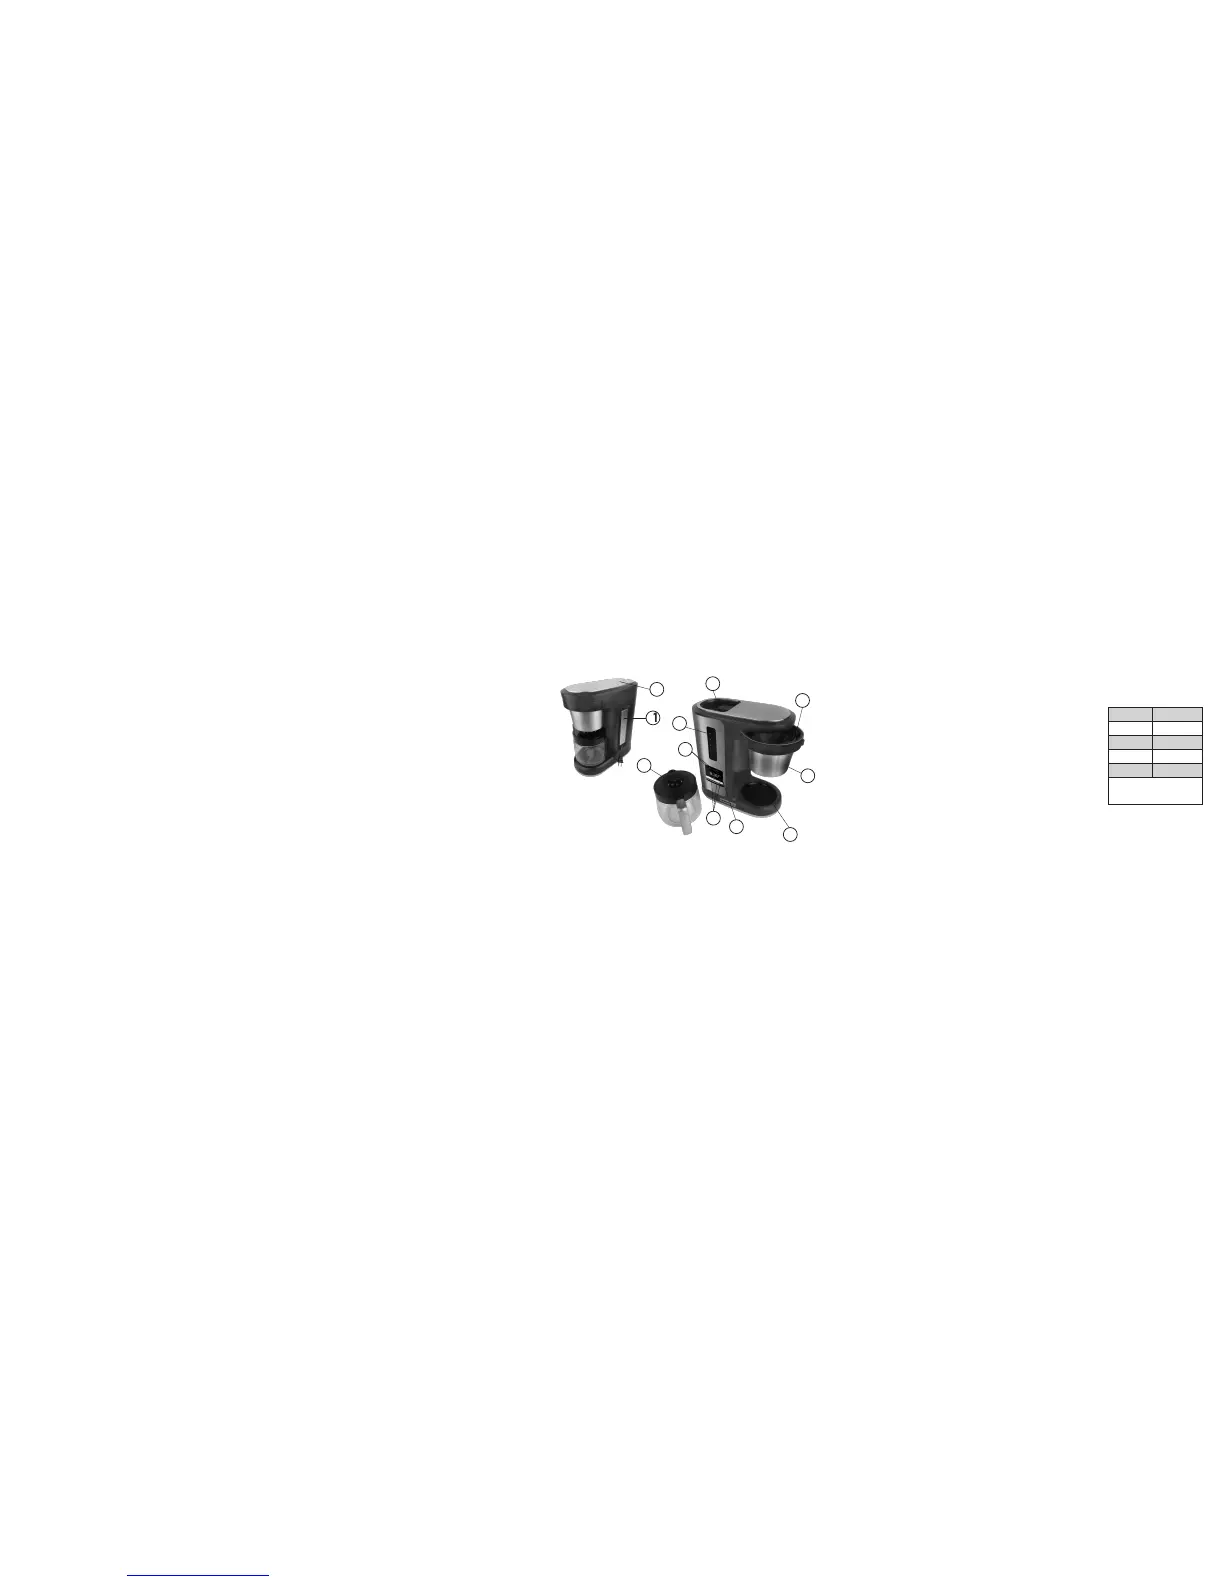
PRODUCT DIAGRAM
1. Water Reservoir Lid
2. Water Reservoir
3. Water Window
4. Removable Cone Style Filter Basket *
5. Brew Basket
6. 10 Cup Glass Carafe
7. LCD Screen Display
8. BREW LATER, STRONG, and BREW/OFF Button
9. HR/Warming timer and MIN Selector Buttons
10. Warming Plate
11. Cord Storage
*These parts can be replaced on calphalon.com or at 1-800-809-7267
PREPARING YOUR USE
Cleaning your coeemaker before using the first time
• Wash the Glass Carafe, Carafe Lid and the Removable Cone Style Filter Basket as per
cleaning instructions in this manual. Rinse each thoroughly (please refer to the parts diagram).
• Replace all the parts and close the lid. Then, run a brew cycle with water only,
without adding coee and coee filter.
• When brewing is complete, turn your coeemaker o, discard the water in the Glass Carafe and rinse
the
Glass Carafe, Carafe Lid and the Removable Cone Style Filter Basket
.
SETTING THE CLOCK AND DELAY BREW TIME
• Plug the power cord into a standard electrical outlet.
The clock will flash on indicating that the time has not yet been set.
• Press the HR and MIN Buttons, until you reach the current time.
NOTE: Pressing any button before setting the clock will cause the clock
to start keeping time from 12:00 a.m. You must set the clock if you want
to use the Delay Brew feature.
• To set Delay Brew, press the BREW LATER Button. Using the HR and MIN Buttons select the
desired delay brew time.
• To activate the BREW LATER cycle, press the BREW LATER Button once delay brew time is set.
• To check the programmed time for delay brew, press the BREW LATER Button, the programmed
time will appear on the LCD Screen.
• To switch back to clock, you can press the Brew/O Button and the screen will switch back.
 Loading...