7
DMX
DEUTSCHFRANCAIS
ESPAÑOL
ENGLISH
ITALIANO POLSKI
9
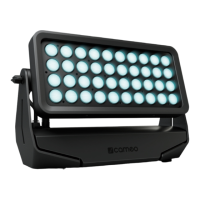
PRESSURE EQUALISATION ELEMENT
Pressure equalisation element to prevent condensation inside the housing. In order to ensure its proper function, the element must be
protected from contamination.
10
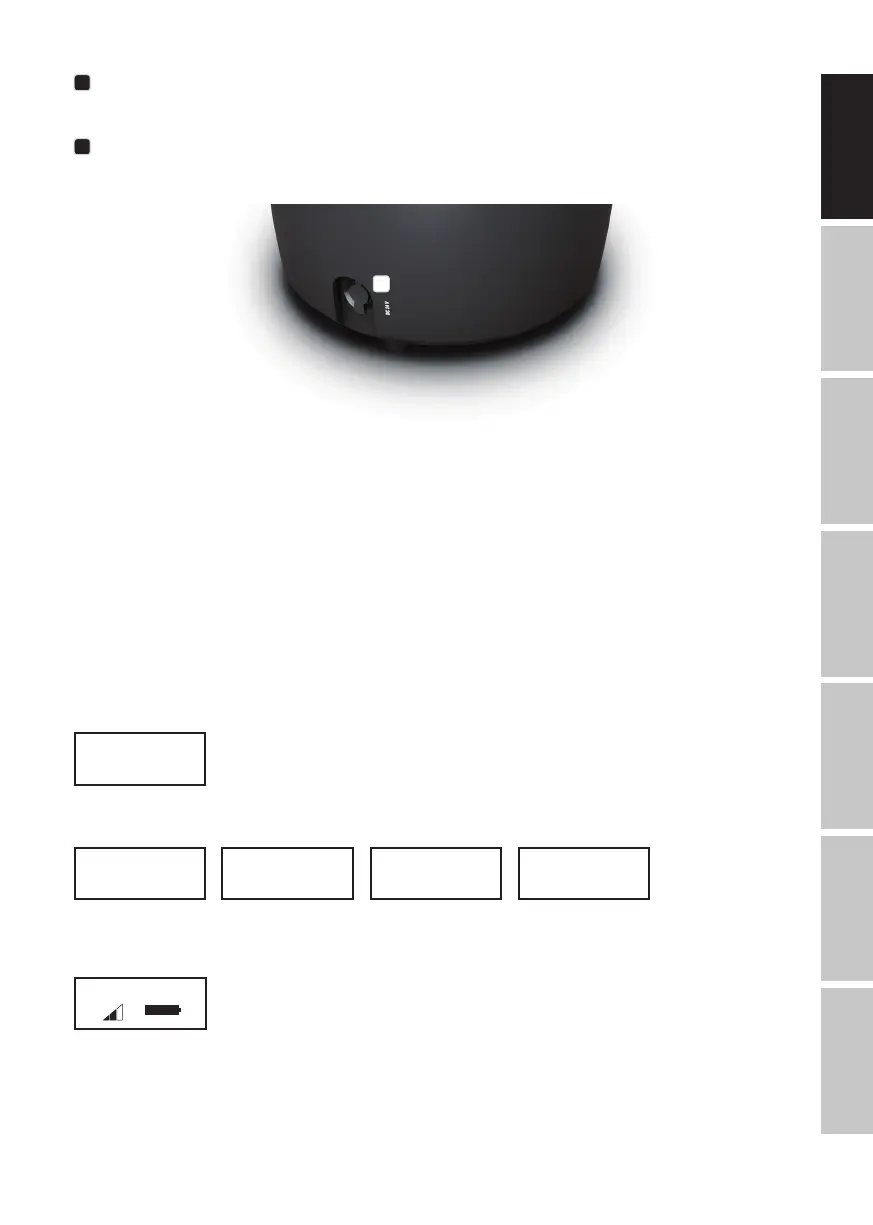
CHARGING SOCKET
Charging socket for charging the internal battery. Charging the battery is permitted only in dry interior areas. Only charge with the optionally
available CLDROPB4PS6 charging device.
10
INFRARED SENSOR
The infrared sensor for control via IR remote control (optionally available) is found on the front of the spotlight.
OPERATION
PLEASE NOTE
• When the spotlight is switched on, the following is displayed in succession during the start-up process: “Software Update Please Wait...”
(for service purposes only), “Welcome to Cameo”, the model name and the software version. After this process, the spotlight is ready for
operation and the previously activated operating mode is launched.
• Main display 1 is activated automatically after approximately one minute of no input. To navigate one level up in the submenus, briefly
press MENU.
• Briefly pressing UP in the control panel when in the main display rotates the display by 180°.
• To quickly change a value, such as the DMX start address, press and hold the control UP or DOWN.
• To reset and ready the W-DMX module for pairing directly from main display 1, press and hold control DOWN for around 3 seconds.
MAIN DISPLAY 1 DMX OPERATING MODE
The display shows the DMX address and current DMX start address (in the example: 001).
DMX Address
001
Mode
Auto
Mode
Static
Mode
Color Macro
Mode
User Color
Menu
DMX Address
DMX Mode
DMX Delay
Stand Alone
Settings
System Info
Menu
DMX Address
DMX Mode
DMX Delay
Stand Alone
Settings
System Info
DMX Mode
3 CH
4 CH
6 CH
7 CH
13CH01
13CH02
20 CH
Static
Dimmer
Strobe
Red
Green
Blue
White
Amber
UV
Color x
Dimmer
Strobe
Red
Green
Blue
White
Amber
UV
DMX Address
001 - 510
Fixture Status
Stand Alone
Static
Color Macro
User Color
Auto
Color Macro
Color O
Red
Amber
Yellow W
Yellow
Green
Turquoise
Cyan
Blue
Lavender
Mauve
Magenta
Pink
Warm White
White
Cold White
Stand Alone
Static
Color Macro
User Color
Auto
User Color
Color 1
|
Color 8
Stand Alone
Static
Color Macro
User Color
Auto
Program x
Dimmer
Speed
Auto
Program 1
|
Program 6
Stand Alone
Static
Color Macro
User Color
Auto
-------- Menu --------
DMX Address
DMX Mode
DMX Delay
Stand Alone
Settings
System Info
DMX Delay ------
Group 0
by DMX? No/Yes
Delay 0.0s
------
DMX Delay ------
Group 0
by DMX? No
Delay 0.0s
------
DMX Delay ------
Group 0
by DMX? No
Delay 0.0s - 2.0s
------
By DMX? -------
--------
Warning! Delay
is controllable
by DMX now!
-------- Menu --------
DMX Address
DMX Mode
DMX Delay
Stand Alone
Settings
System Info
DMX Delay ------
Group 0
by DMX? Yes
Delay 0.0s
------
DMX Delay ------
Group 0
by DMX? Yes
------
-------- Menu --------
DMX Address
DMX Mode
DMX Delay
Stand Alone
Settings
System Info
-------- Menu --------
DMX Address
DMX Mode
DMX Delay
Stand Alone
Settings
System Info
-------- Menu --------
DMX Address
DMX Mode
DMX Delay
Stand Alone
Settings
System Info
-------- Menu --------
DMX Address
DMX Mode
DMX Delay
Stand Alone
Settings
System Info
-------- Menu --------
DMX Address
DMX Mode
DMX Delay
Stand Alone
Settings
System Info
MAIN DISPLAY 1 STANDALONE MODE
The display shows the currently activated standalone mode (Mode Static, Mode Auto, Mode User Colour, Mode Colour Macro).
Mode
Auto
Mode
Static
Mode
Color Macro
Mode
User Color
Menu
DMX Address
DMX Mode
DMX Delay
Stand Alone
Settings
System Info
Menu
DMX Address
DMX Mode
DMX Delay
Stand Alone
Settings
System Info
DMX Mode
3 CH
4 CH
6 CH
7 CH
13CH01
13CH02
20 CH
Static
Dimmer
Strobe
Red
Green
Blue
White
Amber
UV
Color x
Dimmer
Strobe
Red
Green
Blue
White
Amber
UV
DMX Address
001 - 510
Fixture Status
Stand Alone
Static
Color Macro
User Color
Auto
Color Macro
Color O
Red
Amber
Yellow W
Yellow
Green
Turquoise
Cyan
Blue
Lavender
Mauve
Magenta
Pink
Warm White
White
Cold White
Stand Alone
Static
Color Macro
User Color
Auto
User Color
Color 1
|
Color 8
Stand Alone
Static
Color Macro
User Color
Auto
Program x
Dimmer
Speed
Auto
Program 1
|
Program 6
Stand Alone
Static
Color Macro
User Color
Auto
-------- Menu --------
DMX Address
DMX Mode
DMX Delay
Stand Alone
Settings
System Info
DMX Delay ------
Group 0
by DMX? No/Yes
Delay 0.0s
------
DMX Delay ------
Group 0
by DMX? No
Delay 0.0s
------
DMX Delay ------
Group 0
by DMX? No
Delay 0.0s - 2.0s
------
By DMX? -------
--------
Warning! Delay
is controllable
by DMX now!
-------- Menu --------
DMX Address
DMX Mode
DMX Delay
Stand Alone
Settings
System Info
DMX Delay ------
Group 0
by DMX? Yes
Delay 0.0s
------
DMX Delay ------
Group 0
by DMX? Yes
------
-------- Menu --------
DMX Address
DMX Mode
DMX Delay
Stand Alone
Settings
System Info
-------- Menu --------
DMX Address
DMX Mode
DMX Delay
Stand Alone
Settings
System Info
-------- Menu --------
DMX Address
DMX Mode
DMX Delay
Stand Alone
Settings
System Info
-------- Menu --------
DMX Address
DMX Mode
DMX Delay
Stand Alone
Settings
System Info
-------- Menu --------
DMX Address
DMX Mode
DMX Delay
Stand Alone
Settings
System Info
MAIN DISPLAY 2 FIXTURE STATUS
The display shows the W-DMX and battery status. Switch between both main displays by briefly pressing ENTER and DOWN at the same
time. Main display 1 is automatically shown again after around one minute.
DMX Address
001
Mode
Auto
Mode
Static
Mode
Color Macro
Mode
User Color
Menu
DMX Address
DMX Mode
DMX Delay
Stand Alone
Settings
System Info
Menu
DMX Address
DMX Mode
DMX Delay
Stand Alone
Settings
System Info
DMX Mode
3 CH
4 CH
6 CH
7 CH
13CH01
13CH02
20 CH
Static
Dimmer
Strobe
Red
Green
Blue
White
Amber
UV
Color x
Dimmer
Strobe
Red
Green
Blue
White
Amber
UV
DMX Address
001 - 510
Fixture Status
Stand Alone
Static
Color Macro
User Color
Auto
Color Macro
Color O
Red
Amber
Yellow W
Yellow
Green
Turquoise
Cyan
Blue
Lavender
Mauve
Magenta
Pink
Warm White
White
Cold White
Stand Alone
Static
Color Macro
User Color
Auto
User Color
Color 1
|
Color 8
Stand Alone
Static
Color Macro
User Color
Auto
Program x
Dimmer
Speed
Auto
Program 1
|
Program 6
Stand Alone
Static
Color Macro
User Color
Auto
-------- Menu --------
DMX Address
DMX Mode
DMX Delay
Stand Alone
Settings
System Info
DMX Delay ------
Group 0
by DMX? No/Yes
Delay 0.0s
------
DMX Delay ------
Group 0
by DMX? No
Delay 0.0s
------
DMX Delay ------
Group 0
by DMX? No
Delay 0.0s - 2.0s
------
By DMX? -------
--------
Warning! Delay
is controllable
by DMX now!
-------- Menu --------
DMX Address
DMX Mode
DMX Delay
Stand Alone
Settings
System Info
DMX Delay ------
Group 0
by DMX? Yes
Delay 0.0s
------
DMX Delay ------
Group 0
by DMX? Yes
------
-------- Menu --------
DMX Address
DMX Mode
DMX Delay
Stand Alone
Settings
System Info
-------- Menu --------
DMX Address
DMX Mode
DMX Delay
Stand Alone
Settings
System Info
-------- Menu --------
DMX Address
DMX Mode
DMX Delay
Stand Alone
Settings
System Info
-------- Menu --------
DMX Address
DMX Mode
DMX Delay
Stand Alone
Settings
System Info
-------- Menu --------
DMX Address
DMX Mode
DMX Delay
Stand Alone
Settings
System Info
W-DMX™
To pair the W-DMX receiver with a W-DMX compatible transmitter, W-DMX must be activated (W-DMX On) in the receiver’s menu under
Wireless Settings. The Reset command must be also executed under the same menu item (select Reset and confirm with ENTER). The
receiver is now in pairing standby and waiting for a pairing request from a transmitter. Start the pairing by selecting Link in the menu of the
transmitter and then confirm; the pairing now takes place automatically. In the same way, several receivers can be paired to a transmitter
either simultaneously or one after the other. A W-DMX connection is always maintained until the connection is disconnected by means of the
 Loading...