3
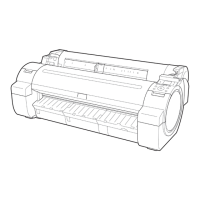
Remove the Packaging Material
Remove the tape used to secure the printer, Roll
Holder, and so on.
1.
Open the Top Cover.
2.
Push the Release Lever back and remove the
protective sheet (a) from the Platen. Pull the Release
Lever forward again.
3.
After removing the tape and tag used to secure the
Belt Stopper, lift the Belt Stopper at an angle to pull
it out of the hole inside the printer and remove it from
the belt.
4.
You will need the Belt Stopper in case you
move the printer to another location. Keep the
removed Belt Stopper for future use.
•
Install the Printhead
At this point, Open top cover. is displayed on the
control panel. Follow the instructions and open the
Top Cover.
2.
Lift the Carriage Cover to open it fully.3.
Pull the Printhead Fixer Lever fully forward.4.
Lift the Printhead Fixer Cover to open it fully.5.
Holding the Printhead by the grips (a), remove it
from the case.
6.
When handling the
Printhead, always hold
it by the grips (a). Never
touch the nozzles (b)
or metal contacts (c).
This may damage the
Printhead and affect
printing quality.
•
Never touch printer parts other than those
mentioned in the instructions. This may stain
your hands and damage the printer.
•
Close the Top Cover.5.
Press the Power button to turn on the printer.1.
Instructions are now shown on the Display Screen
regarding Printhead installation.
Push down the Printhead Fixer Lever toward the
back completely.
10.
Pull the Printhead Fixer Cover down toward the
front to lock the Printhead in place.
9.
Push the Carriage Cover forward until it clicks.11.
Remove the orange Safety Cap 1 (a). While pushing
the grips (c) of Safety Cap 2 (b), pull the cap down to
remove it.
7.
With the nozzles facing down and the metal contacts
toward the back, insert the Printhead into the
Carriage. Carefully push the printhead rmly into the
Carriage, ensuring that the nozzles and the metal
contacts do not touch the carriage.
8.
The inside surface of Safety Cap 2 is coated
with ink to protect the nozzles. Handle it
carefully to avoid touching the nozzles or spilling
ink. Spilled ink may cause stains.
•
We recommend removing the Safety Cap 2 (b)
on top of the Printhead package. Wipe off any
spilled ink with a dry cloth. This ink is non-toxic.
•
Do not reattach the Safety Cap or protective
material. Dispose of these materials in
accordance with local regulations.
•
Close the Top Cover.12.
000_AB7-5374-V1_J531QSG_E.indd 3 2006/05/26 13:40:52

 Loading...