Instruction manual CM111, CM111SS & CM111GM18
Please keep this instruction manual for future reference
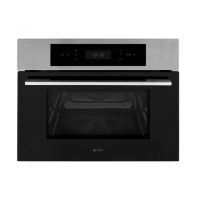
THE SIDE SHELF SUPPORTS (FIG.3)
2 hook-on shelf supports allow you to use the accessories on three levels.
Three cooking levels are available, depending on the method used and the
type of food. With the Grill setting, the accessories (shelf or tray) are place
on the first level for thick foods like roasts and on the third level for thinner
foods like sausages. In normal cooking modes, the shelf or tray should be
used on the first or second levels depending on the item(s) being cooked.
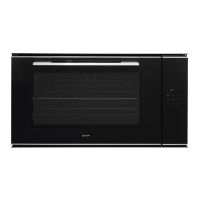
GLASS BASE PLATE (FIG.4)
When microwaving, foods and beverages can be placed on the Glass
base plate. The Glass base plate protects the bottom of the microwave
cavity from any scratches, marks or spillages. It can also be easily removed
for cleaning by either hand or in the dishwasher.
NOTE:
Always remove the wire shelf when using microwave functions,
as this could damage the oven.
ACCESSORIES
Wireshelf (Fig.1)
The wire shelf allows you to brown or grill food. The shelf should not, under any
circumstances, be used with other metal cookware when using any microwave
function. However, you can heat food in an aluminum tray providing it is separated
from the shelf by a plate.
Enameledtray (Fig.2)
The enameled tray allows you to cook foods on normal fan heat, conventional
cooking, and grilling functions.
WARNING: Do not use the enameled tray with any microwave function. This could
damage the enamel tray or even your microwave oven. The enameled tray is for
normal convection/Fan cooking or grilling only.
Thesideshelfsupports(Fig.3)
2 hook-on shelf supports allow you to use the accessories on three levels.
Three cooking levels are available, depending on the method used and the type of
food.
With the Grill or Grill +Microwave setting, theaccessories (shelf or tray) are placed
on the first level for thick foods like roasts and on the third level for thinner foods
like sausages.
In normal cooking modes, or microwave functions, the shelf should be used on the
first or second levels depending on the item(s) being cooked.
NO
TE: Always remove the enameled tray when using microwave functions, as this
could damage the oven.
Fig.2
Fig.3
ACCESSORIES
Wireshelf(Fig.1)
The wire shelf allows you to brown or grill food. The shelf should not, under any
circumstances, be used with other metal cookware when using any microwave
function. However, you can heat food in an aluminum tray providing it is separated
from the shelf by a plate.
Enameledtray (Fig.2)
The enameled tray allows you to cook foods on normal fan heat, conventional
cooking, and grilling functions.
WARNING: Do not use the enameled tray with any microwave function. This could
damage the enamel tray or even your microwave oven. The enameled tray is for
normal convection/Fan cooking or grilling only.
Thesideshelf supports(Fig.3)
2 hook-on shelf supports allow you to use the accessories on three levels.
Three cooking levels are available, depending on the method used and the type of
food.
With the Grill or Grill + Microwave setting, the accessories (shelf or tray) are placed
on the first level for thick foods like roasts and on the third level for thinner foods
like sausages.
In normal cooking modes, or microwave functions, the shelf should be used on the
first or second levels depending on the item(s) being cooked.
NO
TE: Always remove the enameled tray when using microwave functions, as this
could damage the oven.
Fig.1
Fig.2
Fig.3
Turbo grill - Default temperature 200°C (Temperature range 50-220°C).
To adjust the temperature press °C/W/g followed by / . Press SELECT
to confirm.
The default time is 1.00hr. To Adjust the time, press the button followed by
the / and SELECT to confirm.
Finally press to start the programme.
Microwave & Fan heat
Microwave default power P50 (Power range P10-P50).
Fan heat default temperature 200°C (Temperature range 50-220°C).
Press °C/W/g once to enter the Microwave power mode, and then again to
enter the fan heat temperature mode. These can both then be adjusted using the
/ keys followed by SELECT to confirm.
The default time is 1.00hr. To Adjust the time, press the button followed
by the / and SELECT to confirm.
Finally press to start the programme.
MICROWAVE OVEN FUNCTIONS
Press PROG to select the following functions:
Symbol Description
Display
Microwave & Turbo grill
Microwave default power P50 (Power range P10-P50).
Turbo grill default temperature 200°C (Temperature range 50-220°C).
Press °C/W/g once to enter the Microwave power mode, and then again to
enter the Turbo grill temperature mode. These can both then be adjusted using
the / keys followed by SELECT to confirm.
The default time is 1.00hr. To Adjust the time, press the button followed
by the / and SELECT to confirm.
Finally press to start the programme.
Microwave & Turbo conventional heat
Microwave default power P50 (Power range P10-P50).
Turbo grill default temperature 200°C (Temperature range 50-220°C).
Press °C/W/g once to enter the Microwave power mode, and then again to
enter the Turbo conventional temperature mode. These can both then be
adjusted using the / keys followed by SELECT to confirm.
The default time is 1.00hr. To Adjust the time, press the button followed by
the / and SELECT to confirm.
Finally press to start the programme.
Microwave – Default power P100 (power range P10-P100).
To adjust the power, press /until the correct power is reached followed by
SELECT.
Default time is 1 minute. To Adjust the time, press the button followed by
the / and SELECT to confirm.
Finally press to start the programme.
Defrost - Default weight 1000g (weight range 100-2000g).
To adjust the weight press the °C/W/g button followed by the / and
SELECT to confirm.
Finally press to start the programme. The default time will be adjusted
according to the set weight (See the 'Defrost time table' for more info).
Fan heat - Default temperature 200°C
To adjust the temperature press °C/W/g followed by / . Press SELECT to
confirm.
The default time is 1.00hr. To Adjust the time, press the button followed by
the / and SELECT to confirm.
Finally press to start the programme.
Turbo conventional - Default temperature 200°C (Temperature range 50-220°C).
To adjust the temperature press °C/W/g followed by / . Press SELECT to
confirm.
The default time is 1.00hr. To Adjust the time, press the button followed by
the / and SELECT to confirm.
Finally press to start the programme.
THE SIDE SHELF SUPPORTS (FIG.3)
2 hook-on shelf supports allow you to use the accessories on three levels.
Three cooking levels are available, depending on the method used and the
type of food. With the Grill or Grill + Microwave setting, the accessories
(shelf or tray) are placed on the first level for thick foods like roasts and on
the third level for thinner foods like sausages. In normal cooking modes,
or microwave functions, the shelf or tray should be used on the first or
second levels depending on the item(s) being cooked.
ACCESSORIES
Wireshelf(Fig.1)
The
wire shelf allows you to brown or grill food. The shelf should not, under any
circumstances, be used with other metal cookware when using any microwave
function. However, you can heat food in an aluminum tray providing it is separated
from the shelf by a plate.
Enameled tray (Fig.2)
The enameled tray allows you to cook foods on normal fan heat, conventional
cooking, and grilling functions.
WARNING: Do not use the enameled tray with any microwave function. This could
damage the enamel tray or even your microwave oven. The enameled tray is for
normal convection/Fan cooking or grilling only.
Thesideshelfsupports(Fig.3)
2 hook-on shelf supports allow you to use the accessories on three levels.
Three cooking levels are available, depending on the method used and the type of
food.
With the Grill or Grill +Microwave setting, theaccessories (shelf or tray) are placed
on the first level for thick foods like roasts and on the third level for thinner foods
like sausages.
In normal cooking modes, or microwave functions, the shelf should be used on the
first or second levels depending on the item(s) being cooked.
NO
TE: Always remove the enameled tray when using microwave functions, as this
could damage the oven.
Fig.1
Fig.2
Fig. 3
Fig. 4
 Loading...