INVISI
™
SERIES II
1 2
1 2 3
Preparation for Fitout
OR
1 2 3
OR
OR
1 2
3
OR
1
2
Cement or fibro sheet Plywood Tile
12
PneumaticTubeConnections
Direct Panel Mounting
Remote Panel Mounting
Remote Button Mounting
Options for Finishing Around the Flush Pipe
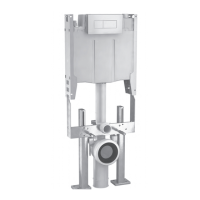
Bowl Bracket
EnsuretheWallHungBowlMountingBolts,FlushPipeandWastePipe
areallsettothecorrectheightandspacingtosuittheselectedbowl.
Whennishingthewallcladandtilerightuptotheedgeoftheseparts.
TheCaromaCubeandWalvitaretheonlybowlscurrentlyapprovedtobe
usedwiththeInvisibracket
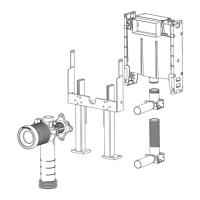
Attachthetubestothetankasshownabove.BreakouttabintheTop
PanelorDustCoverPaneltoallowtheTubestoprotrudeandclipback
intoposition.FeedPneumaticTubesthroughtheframeworkandout
throughtheDrilledHoles.Applytapeoverendoftubestopreventany
dirtfromgettinginsideandtuckneatlybackinsideholes.
Attachthetubestothetankasshownabove.BreakouttabintheTop
PanelorDustCoverPaneltoallowtheTubestoprotrudeandclipback
intoposition.Feedthe4mlengthsofPneumaticTubethroughtheframe-
workandoutthroughtheMountingBox.Applytapeoverendoftubes
topreventanydirtfromgettinginsideandtuckneatlybackinsidethe
MountingBox.Whennishingthewallcladandtilerightuptotheedge
of the Access Window and or Remote Mounting Box.
CutPneumaticTubeinhalfsoyouhave2x9.8"(0.25m)lengths(ensureastraight
cleancuttotube).Attachthetubestothetankasshownabove.Tuckneatlyback
insidetheAccessWindowandclipthedustcoverpanelbackintoposition.When
nishingthewall,cladandtilerightuptotheedgeoftheAccessWindow.
Firmlyconnectthepneumatictubeintothehalfandfullushpositions.
Eachtubeshouldbeinsertedapprox.0.6"(16mm)untilithitsastop.
NOTE:
• 4.8/3LTanksaresuppliedwith19.7"(0.5m)
lengthpneumatictube.
• RemoteMountingBoxKitissuppliedwith2x4m
lengthsofpneumatictube.
• 4mlengthsofpneumatictubecanbepurchased
separately.PartNo.237702.
Forinstructionalvideos,pleasevisitwww.caromausa.com
 Loading...