Do you have a question about the Caroma INVISI II Series and is the answer not in the manual?
| Water Efficiency | High |
|---|---|
| Installation Type | In-wall |
| Flush Volume | 4.5/3L |
| WELS rating | 4 star |
| Button styles | Dual flush |
| Rim Type | Rimless |
| Dimensions | Varies depending on the specific model and installation. Refer to technical drawings. |
| Warranty | 10 years |
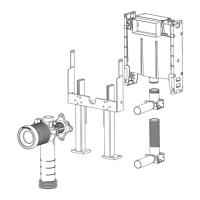
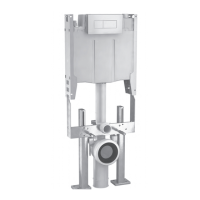
Lists necessary dimensions and connections for installation.
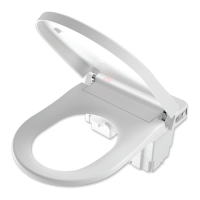
Access via button panel window. Standard installation requires no change.
Access to the whole cistern via remote mounting box.
Access to cistern or internals through panel window.
Access to the whole cistern. Standard installation requires no change.
Access to cistern or internals via panel window.
Suitable for any button panel kit, up to 45mm cladding.
Access to button rear for servicing, up to 55mm panels.
Used with Round Remote Buttons for whole cistern access.
For any button panel kit, 5-45mm cladding thickness.
Addresses issues with urinal flushing duration and potential run-on.
Cistern configured for single stall, connecting pneumatic tube to full flush.
Adjusting water level via float screw for single stall flush volumes.
Outlet valve configuration and water level setting for two stalls.
Setting water level to the "WL" mark for two stall urinals.
Outlet valve configuration and water level setting for three stalls.
Setting water level to the "1.8L" mark for three stall urinals.
Step-by-step guide for installing cistern into a stud wall.
Step-by-step guide for installing cistern into a masonry wall.
Guide for installing the cistern in a service duct.
Steps for installing the cistern in a ceiling void.
Guidelines for custom panel integration and access requirements.
Procedure to convert from standard front access to top access.
Instructions for installing the remote mounting box for button assembly.
How to firmly connect the pneumatic tube to the cistern.
Securing the tube and dust cover for blanking panel installations.
Attaching the tube for remote button panel installations.
Connecting the tube for remote button mounting.
Connecting the tube for large button panel installations.
Initial steps for removing components before installation.
Removing components with a button panel installed.
Removing components with a blanking panel.
Steps to disconnect and remove the ball and inlet valves.
How to remove the bridge assembly from the tank.
Steps to disengage and remove the outlet valve.
How to slide and remove the inlet valve bracket.
Periodic cleaning of the inlet valve seal may be required.
Common issues with the inlet valve and their solutions.
Lists compatible spare part kits for the inlet valve.
Detailed steps for cleaning and replacing the inlet valve seal.
Servicing is only needed if the outlet valve operation is faulty.
Addresses issues like long flushes, leaks, and short flushing.
Lists compatible spare part kits for the outlet valve.
Steps for washing and replacing the outlet valve seal.
Specifies minimum and maximum water supply pressure requirements.
Provides contact details for Australia, New Zealand, and USA.