Installing the Cistern - 237 002
Inwall Access - masonry wall
Datum
400mm – 420mm
45mm -
Water Supply Connection
NOTE:
90mm Min.
Cavity Depth
720mm
Min.
470mm
(ref)
55mm
(ref)
50mm
335mm to
access panel
centre line
Refer to
specifications
of the selected
urinal.
Service Access Panel
Centre Line (standard mounting)
10
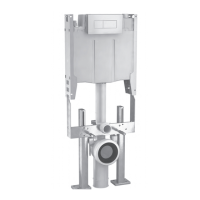
1. Make sure the hole for the ush
pipe is at the correct height. Calculate
the nished oor height (allowing for
oor gradings and tile thickness, etc.)
and add this to the known height of the
selected urinal’s inlet. Mark this
resulting height on the wall - This
is your datum and ush pipe
centre line.
2. Conrm size and positioning of
opening as shown is relative to your
datum.
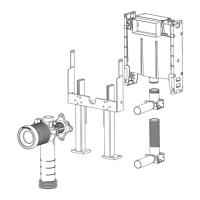
3. Screw cistern to wall via the 2
front, top and bottom holes in each
mounting bracket making sure the
water connection tting is on the left
hand side of cistern.
4. Fabricate ush pipe using the
Copper Adaptor provided.
5. Lubricate ‘O’Ring on cistern tail using
soapy water and slide ush pipe on.
6. Connect the water supply.
7. Remove Dust Cover, turn Isolating
Tap ON, ll tank & set water level using
Adjusting Screw on the inlet valve.
8. Check cistern and all joints for leaks.
9. Turn Isolating Tap OFF. Continue
with Preparation for Fitout on page 15.
Water Supply Connection
OFF
ON
Dust Cover
 Loading...