EasyManua.ls Logo

Carrier 40QNB - User Manual

Carrier 40QNB
28 pages
To Next Page IconTo Next Page
Loading...
Installation, Start-Up
and Service Instructions
CONTENTS
Page
SAFETY CONSIDERATIONS
.....................1
GENERAL ....................................1,2
INSTALLATION ..............................2-14
Step 1 Complete Pre-Installation Checks .......2
UNPACK UNIT
INSPECT SHIPMENT
Step 2 Select Location
.......................2
Step 3 Mount Mounting Bracket on Wall ........5
Step 4 Connect Refrigerant Piping .............5
Step 5 Connect Condensate Drain Line ........11
Step 6 Make Electrical Connections ...........12
Step 7 Make Connections to Outdoor Unit .....13
COOLING-ONLY SYSTEMS
HEAT PUMP SYSTEMS
Step 8 Install Fan Coil Unit Onto Mounting
Bracket
....................................13
START-UP .................................14-17
40QN Control System .........................14
After Extended Shutdowns .....................15
Seasonal Changeovers ........................15
To Turn The Unit On and Off ...................15
Adjusting Airflow .............................15
Operating Mode Memory .......................15
Automatic Operation (Auto) Mode ...............15
Operating Fault Diagnosis .....................15
Microprocessor Control Operation ..............15
CLEANING AND MAINTENANCE ...............18,19
Lubrication ..................................18
To Install or Replace Remote Controller
Batteries ...................................18
To Set the Current Time .......................19
To Remove and Clean or Replace Air Filters ......19
TO REMOVE AIR FILTERS
TO CLEAN OR REPLACE FILTERS
To Clean Indoor Unit Front Panel
...............19
To Clean Indoor Coil ..........................19
To Clean Outdoor Coil (Outdoor Unit) ...........19
Cleaning Condensate Drains ...................19
SERVICE ....................................20
Diagnostic Codes .............................20
System Tests ................................20
THERMISTOR TESTS
THERMISTORS
COMPRESSOR FAILURE
REVERSING VALVE FAILURE (38BK Only)
System Safeties and Interlocks
.................20
INDOOR FAN FAILURE
COMPRESSOR SHORT-CYCLING PROTECTION
INDOOR COIL FREEZE PROTECTION
(Cooling or Dehumidification Mode Only)
INDOOR COIL HIGH-TEMPERATURE
PROTECTION (Heat Pump Systems Only)
TROUBLESHOOTING
........................20-26
START-UP CHECKLIST ..................CL-1,CL-2
SAFETY CONSIDERATIONS
Installing and servicing air-conditioning equipment can be
hazardous due to system pressure and electrical compo-
nents. Only trained and qualified service personnel should
install or service air-conditioning equipment.
Untrained personnel can perform basic maintenance, such
as cleaning and replacing filters. All other operations should
be performed by trained service personnel. When working
on air conditioning equipment, observe precautions in lit-
erature and on tags and labels attached to unit.
Follow all safety codes. Wear safety glasses and work gloves.
Use quenching cloth for brazing operations. Have fire ex-
tinguisher available. Read these instructions thoroughly. Con-
sult local building codes and National Electrical Code (NEC)
for special installation requirements.
Before installing or servicing system, always turn off
main power to system. There may be more than one dis-
connect switch. Turn off indoor fan coil power if ap-
plicable. Electrical shock can cause personal injury.
GENERAL
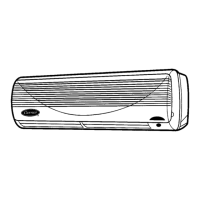
The Carrier 40QNH heat pump high wall fan coil units
(Fig. 1) come with supplemental electric heat. If your ap-
plication requires heating, heat pump units must be used, both
outdoors and indoors. See Table 1 for recommended system
combinations.
Fig.1—Typical 40QNH High Wall Fan Coil Unit
40QNB,QNH
018,024
High Wall Fan Coil Units
Manufacturer reserves the right to discontinue, or change at any time, specifications or designs without notice and without incurring obligations.
Book 1 4
Tab 3e 2f
PC 111 Catalog No. 534-003 Printed in U.S.A. Form 40QN-4SI Pg 1 5-99 Replaces: 40QN-1SI

Questions and Answers:

Carrier 40QNB Specifications

General IconGeneral
BrandCarrier
Model40QNB
CategoryComputer Hardware
LanguageEnglish

Summary

Safety Considerations

General Safety Precautions

Safety precautions for installing and servicing air-conditioning equipment, emphasizing trained personnel and safety codes.

Electrical Shock Hazard Warning

Warning about turning off all power before installation/service to prevent electrical shock.

General Unit Information

Unit Description

Description of Carrier 40QNH high wall fan coil units with supplemental electric heat.

Installation Steps

Step 1: Pre-Installation Checks

Checks to perform before installing the unit, including unpacking and inspecting for damage.

Step 2: Location Selection

Guidelines for selecting the optimal mounting location based on codes, clearance, and accessibility.

Step 3: Mount Mounting Bracket

Instructions for securely mounting the unit's bracket to the wall, ensuring level installation.

Step 4: Connect Refrigerant Piping

Procedures for connecting refrigerant piping, including insulation and routing for optimal performance.

Step 5: Connect Condensate Drain Line

Steps for connecting the condensate drain line, ensuring proper slope and insulation to prevent water damage.

Step 6: Make Electrical Connections

Detailed instructions for making electrical connections, emphasizing safety and compliance with codes.

Step 7: Connect to Outdoor Unit

Connecting the indoor fan coil unit to the outdoor condensing unit for cooling-only and heat pump systems.

Step 8: Install Fan Coil Unit Onto Bracket

Final step of securing the fan coil unit onto the pre-mounted bracket.

Start-Up Procedures

Preliminary Checks

Essential checks before system start-up, including drainage, wiring, filters, and valve positions.

40 QN Control System Overview

Overview of the microprocessor control system and its operation via wireless remote.

Wireless Remote Controller Usage

Information on using and installing the wireless remote controller for system operation.

After Extended Shutdowns

Procedures for starting the system after it has been turned off for more than 12 hours.

Seasonal Changeovers

Steps for switching between cooling and heating modes or preparing for seasonal use.

Adjusting Airflow

How to adjust the airflow direction using the remote controller for optimal comfort.

Operating Mode Memory

How the system retains the last selected operating mode after power loss.

Automatic Operation (Auto) Mode

How the unit automatically switches between cooling and heating based on room temperature.

Operating Fault Diagnosis

How the system identifies and reports operational faults via LED indicators.

Microprocessor Control Operation

Explanation of the microprocessor's role in optimizing comfort and efficiency.

Cleaning and Maintenance

Lubrication Requirements

Note that the indoor and outdoor fan motors are factory lubricated and require no oiling.

Replace Remote Controller Batteries

Step-by-step guide for replacing the batteries in the wireless remote controller.

Set Current Time

Instructions for setting the current time on the remote controller.

Remove and Clean Air Filters

Procedures for removing, cleaning, or replacing the air filters for optimal performance.

Clean Indoor Unit Front Panel

How to clean the front panel of the indoor unit safely.

Clean Indoor Coil

Instructions for cleaning the fins of the indoor coil.

Clean Outdoor Coil

How to clean the outdoor unit's coil, emphasizing safety precautions.

Clean Condensate Drains

How to clean condensate drains and pans at the start of the cooling season.

Service and Diagnostics

Diagnostic Codes

How to interpret LED flashes on the control board to diagnose system faults.

System Tests Overview

Overview of system tests performed by the microprocessor and fault indications.

Thermistor Tests

How thermistors are tested for high/low limits and proper operation.

Thermistor Properties

Importance of thermistor location, sensing, and cable integrity for unit operation.

Compressor Failure

Conditions under which a compressor failure is indicated.

Reversing Valve Failure (38 BK Only)

Conditions indicating a reversing valve failure in heat pump systems.

System Safeties and Interlocks

Description of safety features like indoor fan failure, compressor short-cycling, and freeze protection.

Indoor Fan Failure Detection

How the system detects an indoor fan failure based on RPM.

Compressor Short-Cycling Protection

The 3-minute time delay to prevent compressor short-cycling.

Indoor Coil Freeze Protection

How the system protects the indoor coil from freezing by cycling the compressor.

Indoor Coil High-Temperature Protection

How the system protects the indoor coil from high temperatures by shutting down the outdoor fan.

Troubleshooting Guide

Troubleshooting Table

A table listing common problems, potential sources, and corrective actions for troubleshooting.

Start-Up Checklist

Step 7: Outdoor Unit Connections

Connecting the indoor fan coil unit to the outdoor condensing unit for cooling-only and heat pump systems.

Step 8: Install Fan Coil Onto Bracket

Final step of securing the fan coil unit onto the pre-mounted bracket.

Preliminary Information

Section to record outdoor and indoor unit model and serial numbers, and system accessories.

Pre-Start-Up Procedures

Pre-start-up checks covering shipping damage, power supply, wiring, condensate drain, air filter, and piston installation.

Piping Checks

Checks related to piping, including solenoids, filter driers, leak tests, and evacuation.

Start-Up Measurements

Final start-up checks involving crankcase heater operation and measurement of operating pressures and temperatures.

Related product manuals