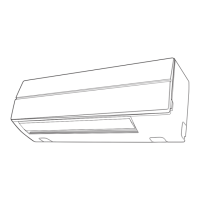
Installation of Return-Air Diffusers and Dummy Diffusers
— Install one-piece mounting brackets onto diffuser ends
using screws provided. See Fig. 15. (For 37HS 3-slot direc-
tor diffuser, use 2-piece mounting bracket.) Raise unit to ceil-
ing and set in position with the tabs of the mounting bracket
placed securely over the T-bar upright.
Wire-Hung Installations(With T-Bar Mounting Brackets Used
for Alignment) — Install accessory hanger mounting brack-
ets, 2 on each end of the 37HS unit, and attach eyebolts as
illustrated in Fig. 16. Install T-bar mounting brackets in end
of diffuser; then raise units above ceiling and lower to pre-
viously installed hanger wires. Be sure to engage tabs of T-bar
mounting brackets over T-bar.Adjust eyebolts to permit T-bar
mounting brackets to just sit on the ceiling T-bars. All unit
weight must be supported by the hanger wires on the unit.
Continuous Run Installations— Continuous run units have
diffuser lengths equal to the full length of the ceiling mod-
ule; for 2-, 4- and 5-ft modules, the diffusers measure 24, 48
and 60 in., respectively.
Units are wire-hung as described in Wire-Hung Installa-
tions section, except that no T-bar mounting brackets are used,
not even for alignment. Instead, accessory alignment chan-
nels are used in the side diffusers of adjoining units to en-
sure alignment of the diffuser assemblies from unit to unit.
As shown in Fig. 17 and 18, the channel is inserted first into
a unit that has already been installed, and then into the next
unit as the unit is being positioned in the ceiling structure.
After alignment channel is installed, filler trim piece can be
snapped into place.
T-BAR SUPPORT WIRE
(MAIN T-BAR MEMBER)
WEDGE
MOUNT BRACKET
WEDGE
Fig. 14 — T-Bar Mounting Details
Fig. 15 — One-Piece Mounting Bracket Installed
on Diffuser End
Fig. 16 — Installed Hanger Mounting Brackets
Fig. 17 — Inserting Alignment Channel into Unit
FILLER
TRIM PIECE
ALIGNMENT
CHANNEL
Fig. 18 — Installed Alignment Channel
and Filler Trim Piece
9
 Loading...