TOSELECT
1.Enterconfigurationmodeifnotalreadythere.SeeStep4
"ToEnterConfigurationMode."Useup anddown
buttonstomakesmall(nowflashing)displayindicate15.
2.PressSETTIME/TEMPbuttononcetoflashlargedisplay.
3.UseupanddownbuttonstomovebetweenOF(off)and
ONonlargedisplay.Factorydefaultis ON(AUTO
enabled).
4.PressSETTIME/TEMPbuttonagaintoflashuppersmall
displayforselectionofanotheroption,orpressENDto
exitconfigurationmode.
Option16--Enable Super Comfort Heat Mode
This option requires prior ON selection of heat pump (DIP switch
no. 1) and Configuration Option No. 5 (Select Variable-Speed
Blower). Super Comfort Heat mode is part of the Comfort Heat
Pump system, which comprises a selected combination of
Thermidistat Control. variable speed Fan Coil, and 3-stage
electric heater to provide superior heat pump leaving air
temperatures under all conditions. This option selection modifies
heat pump blower and auxiliary heat operation to contribute to
comfortable leaving air temperature. Specifically, this selection
provides:
• Reduced heat pump airflow for outdoor temperatures between
12" and 40°F.
• At least 1 stage of electric heat ON for all heating below 12_'F.
While outdoor air temperature is between 12°F and 40"F, the
Thermidistat Control removes the G signal during heat pump
heating. The 40FK. FK4C, or FV4A Variable-Speed Fan Coils
respond by reducing their airflow in the absence of the G signal,
raising leaving air temperature. For any heating demand below
12°F. G and W/W1 are turned ON, assuring at least 1 stage of
electric heat is on, and also increasing leaving air temperature.
As part of the Comfort Heat pump system, Configuration Option
No. 9 (Intelligent Heat Staging) should also be set to ON if the
heat pump is single stage and a 3-stage heater is present.
TO SELECT
1. Enter configuration mode if not already there. See Step 4
"To Enter Configuration Mode." Use up and down
buttons to make small (now flashing) display indicate 16.
2. Press SET TIME/TEMP button once m flash large display.
3. Use up and down buttons to move between OF (off) and
ON on large display. Factory default is OF (off).
4. Press SET TIME/TEMP button again to flash upper small
display for selection of another option, or press END to
exit configuration mode.
Option 17--Enable Non-Programmable Operation
This option converts the programmable Thermidistat Control to a
non-programmable control for those users who do not want
programmability. The clock is retained, but the days of the week
and the daily schedules have been eliminated, making it operate
as if HOLD were permanently ON. Some of the buttons (used in
programming only and now not needed) are redefined to simplify
the non-programmable operation. To match these redefined
buttons, a new keypad label, included with the Thermidistat, must
be placed over the original keypad label. Fig. 2 shows both the
original keypad label and the non-programmable keypad label.
When this option is selected, the new keypad label must be
applied over (or in place of) the original. Because these
adhesive-backed keypad labels are not designed to be removed,
this conversion should be considered permanent. Once the
change to non-programmable operation is done, a procedure is
not provided to easily change it back. Should this change be
needed, it is best to trade the Thermidistat for one which has not
been converted.
Both programmable and non-programmable versions of the
Homeowner's Manual are available. Be sure to leave only the
correct version of the Homeowner's Manual with the homeowner.
Once it has been determined that a particular installation is to be
made non-programmable, the only changes required are
• Attach non-programmable keypad label over original
programmable one.
• Attach non-programmable start-up sticker instructions to back
of door.
• Set Configuration Option No. 17 to ON.
• Leave non-programmable homeowner's manual with
homeowner.
To attach the provided non-programmable keypad label.
carefully peel off its backing and apply it over the original keypad
label.
NOTE: Once the new keypad label makes contact, it will stick
firmly in place and adjustments cannot be made. CAREFULLY
locate an edge of the keypad label, making sure its position and
orientation are correct. Then, from the attached edge, smooth the
rest of the keypad label over the original. Make sure the new keypad
label does not interfere with the motion of the buttons which it
surrounds.
TO SELECT
1. Enter configuration mode if not already there. See Step 4
"To Enter Configuration Mode." Use up and clown
buttons to make small (now flashing) display indicate 17.
2. Press SET TIME/TEMP button once to flash large display.
3. Use up and clown buttons to move between ON and
OF(oft) on large display. Factory default is OF (off).
4. Press SET TIME/TEMP button again to flash upper small
display for selection of another option, or press END to
exit configuration mode.
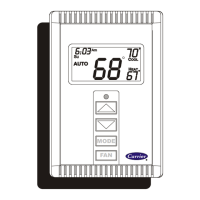
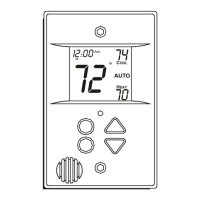
REDEFINITION OF BUTTONS
Fig. 2 shows the original (programmable) button labels on the left
and the redefined (non-programmable) buttons on the right. In
the figure, the buttons are numbered for easy reference. They are
not numbered on the actual product. Six of the buttons (numbers
1 through 5 and 9) have been redefined.
Button 3 originally alternated between time, cool set point, and
heat set point with each press. Now, button 1 selects the cool set
point, button 2 selects the heat set point, and button 3 selects
time. now used only to set the clock. Note that the days of the
week are gone.
Button 5 used to alternate between humidify and dehumidify.
Now button 4 selects dehumidify and button 5 selects humidify.
Button 9 now loses the HOLD label, making it END only. This
button is only used to END the humidity screen and the
configuration mode.
These changes both simplify operation for the homeowner and
find use for the buttons which are no longer needed when
programmability is removed.

 Loading...