An explanation for each of these and how to enter the configura-
tion mode follows.
To enter the configuration mode:
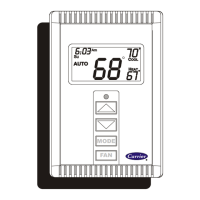
To enter Configuration Mode, hold the FAN button down for
approximately 15 seconds. After the 15 second period, Option
″01″ will appear in the display and the SERVICE icon will be
turned on.
NOTE: If the FAN button is pressed again or if no button is
pressed for 3 minutes, the thermostat will exit the configuration
mode and return to normal operation. To reenter the configuration
mode, the FAN button must be pressed and held for 15 seconds
again.
While in configuration mode:
The display is used to show both the option number and the
selection choice within that option.
OPTION 01—ANTICIPATOR ADJUSTMENT
This adjustment controls the sensitivity and cycle rate of the
thermostat. Higher numbers decrease the sensitivity and slow the
cycle rate. Lower numbers increase sensitivity and increase cycle
rate. However, a limiting feature will not allow more than 6
equipment cycles per hour, regardless of setting. Values can range
from 1 to 9. Factory default setting is 3. This default selection will
provide optimum performance in nearly all installations. Try it
first. Do not change setting unless there is evidence of need to do
so.
Unlike conventional anticipators, this setting is not to be deter-
mined by current draw. There is no need to measure, know, or
compensate for current. There is also no droop with this thermo-
stat, regardless of anticipator setting. This adjustment controls only
sensitivity and cycle rate up to the maximum of 6 cycles per hour.
TO ADJUST:
1. Enter configuration mode (if not already there).
2. Use up and down buttons to display Option 01. The SET icon
should be off.
3. Press MODE button once. The SET icon will come on. The
display now shows Option 01 setting.
4. Use up and down buttons to move between the available
Option 01 values of 1 to 9. Factory default is 3.
5. Press MODE button again to return to Option 01. The SET
icon will now be off.
6. Use up and down buttons to select another Option, or press
FAN button to exit configuration mode.
OPTION 02—CLEAN FILTER TIMER
This option selects the number of hours of blower operation
(heating, cooling, or fan) before SERVICE FILTER icon is
displayed. With OF selected, the icon will never come on,
disabling this feature. Time selection can be from 400 to 3600
hours by selecting numbers 1 through 9. (Time is 400 X number
selected.) Factory default is 2 (800 hours). Recommended selec-
tions are: disposable filter 800 hr, media filter 1200 to 1600 hr, or
electronic air cleaner 1600 to 2400 hr of blower operation.
TO ADJUST:
1. Enter configuration mode (if not already there).
2. Use up and down buttons to display Option 02. The SET icon
should be off.
3. Press MODE button once. The SET icon will come on. The
display now shows Option 02 setting.
4. Use up and down buttons to move between the available
Option 02 values of OF and 1 through 9. Factory default is 2.
5. Press MODE button again to return to Option 02. The SET
icon will now be off.
6. Use up and down buttons to select another Option, or press
FAN button to exit configuration mode.
OPTION 03—FAHRENHEIT/CELSIUS SELECTION
This option selects Fahrenheit or Celsius operation.
TO SELECT:
1. Enter configuration mode (if not already there).
2. Use up and down buttons to display Option 03. The SET icon
should be off.
3. Press MODE button once. The SET icon will come on. The
display now shows Option 03 setting.
4. Use up and down buttons to move between the available
Option 03 choices of F (Fahrenheit) or C (Celsius). Factory
default is F.
5. Press MODE button again to return to Option 03. The SET
icon will now be off.
6. Use up and down buttons to select another Option, or press
FAN button to exit configuration mode.
OPTION 04—G (FAN) ON WITH W/W1 OUTPUT
This selection determines whether the G (fan) output is to be ON
or OFF when any W (furnace or strip heat) output is ON. Most
furnaces and fan coils manage their own blowers and do not
require a separate G signal. For these applications, select OFF.
Some auxiliary heaters require a separate G signal to turn on the
blower. In this case, select On. Factory default is OF (off).
TO SELECT:
1. Enter configuration mode (if not already there).
2. Use up and down buttons to display Option 04. The SET icon
should be off.
3. Press MODE button once. The SET icon will come on. The
display now shows Option 04 setting.
4. Use up and down buttons to move between available Option
04 choices of ON or OF. Factory default is OF.
5. Press MODE button again to return to Option 04. The SET
icon will now be off.
6. Use up and down buttons to select another Option, or press
FAN button to exit configuration mode.
OPTION 05 — HP AND 2S / AC CONFIGURATION
This configuration is available on HP and 2S models only.
Selecting AC allows the installer to use an HP or 2S thermostat in
an air conditioner application.
TO SELECT:
1. Enter configuration mode (if not already there).
2. Use up and down buttons to display Option 05. The SET icon
should be off.
3. Press MODE button once. The SET icon will come on. The
display now shows Option 05 setting.
4. Use up and down buttons to move between available Option
05 choices of AC or HP. Factory default is HP.
5. Press MODE button again to return to Option 05. The SET
icon will now be off.
6. Use up and down buttons to select another Option, or press
FAN button to exit configuration mode.
OPTION 06—COOLING LOCKOUT
An outdoor air sensor is required for this function. In OF mode,
cooling is available regardless of outdoor temperature. In ON
3
 Loading...