16
17
When the lowest note is reached, the entire pattern will be repeated.
The highest and lowest notes in the sequence will be repeated each
time there is a direction change.
- ORDER – The sequence will be played in the same order that the
notes were played into the Arpeggiator on the keyboard.
- RANDOM – The sequence will be played in a random order.
Range
The sequence can be extended into the octaves above the starting
notes by adjusting the range. Holding the SHIFT button and
pressing the RANGE- or RANGE+ keys will adjust the octave
range of the sequence. The default setting is 1, with settings above
1 extending/repeating the sequence notes up to the maximum
setting of 4.
Holding the SHIFT button and pressing the LATCH key will toggle latch
on and off. With latch on, notes played into the Arpeggiator will continue
to play even after they are released. These notes will be played in the
sequence until the next notes are played on the keyboard.
Carry-on Control App
English
English
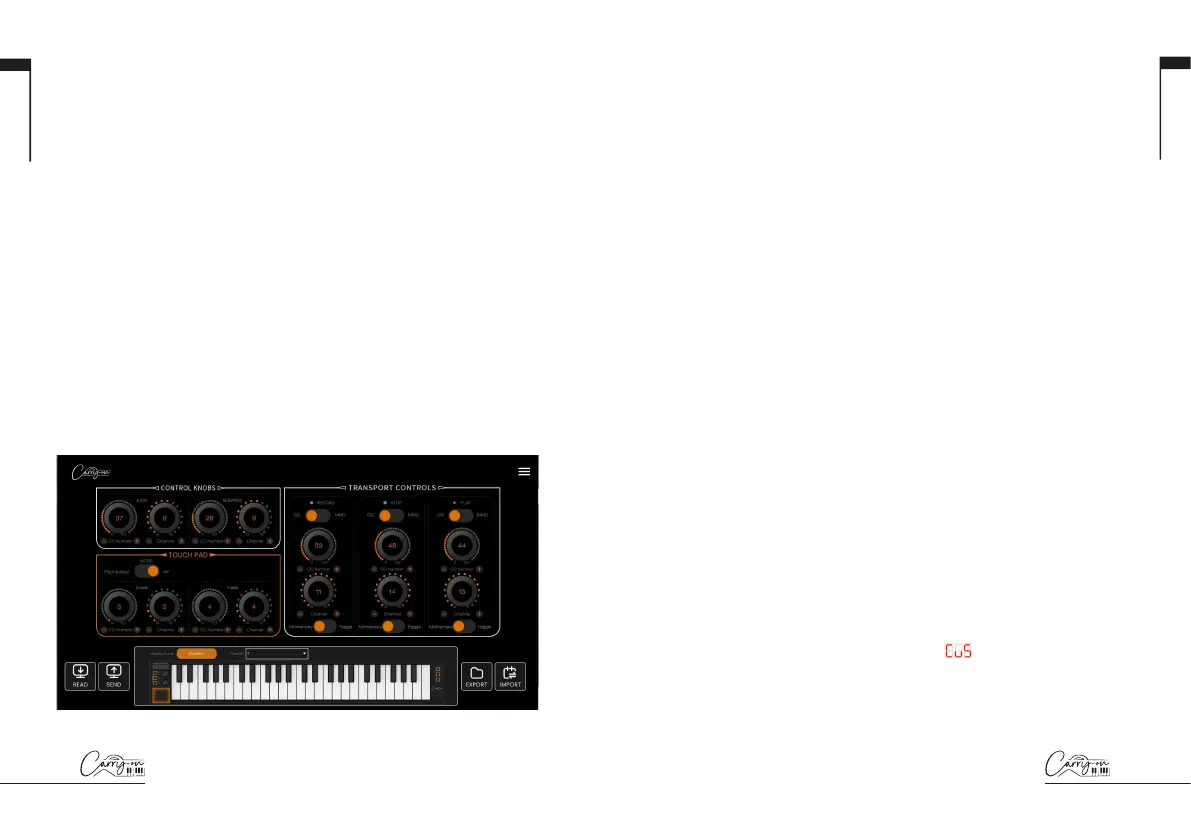
The Carry-on Control app offers full configuration of all the controls
available on your Folding Controller 49. Once you have configured the
perfect control scheme for your needs, the Carry-on Control app allows
easy saving and recalling of the full configuration.
To get the most out of your Carry-on Folding Controller 49, please read
the detailed guide of the Carry-on Control app below.
14. Reading and Sending Data
When your Folding Controller is connected to your PC via USB, the
Carry-on Control app will automatically connect and read the current
settings on your device when it is launched. A pop-up message will appear
to confirm that the settings on your Folding Controller have been read
successfully.
Settings adjusted within the Carry-on Control app will not be automatically
applied to your Folding Controller. To store the current configuration to
your Folding Controller, make sure to click the SEND button in the bottom
left corner of the app.
NOTE: If there is a connectivity issue between your Folding Controller and
your PC , a pop-up message will appear stating that the settings have not
been successfully read or sent. To ensure the best connection, please use
the USB-C cable supplied in the box and avoid using USB hubs.
15. Velocity Curve
As with the VEL. CURVE key (see Front Panel – 8. Keyboard), the velocity
curve applied to the keyboard can be selected within the Carry-on Control
app using the pop-out window, accessed by clicking on the name of the
currently selected velocity curve, for example “Fixed”.
The CUSTOM velocity curve can be customised and saved to your Folding
Controller using this pop-out window. Saving a new custom curve to your
Folding Controller will overwrite the existing custom curve on your device.
NOTE: Once a custom velocity curve is saved to your Folding Controller
it can be accessed using the VEL. CURVE key (see Front Panel – 8.
Keyboard) and cycling through the curves to
. Your Folding Controller
does not need to be connected to the Carry-on Control app.
 Loading...