8
9
English
English
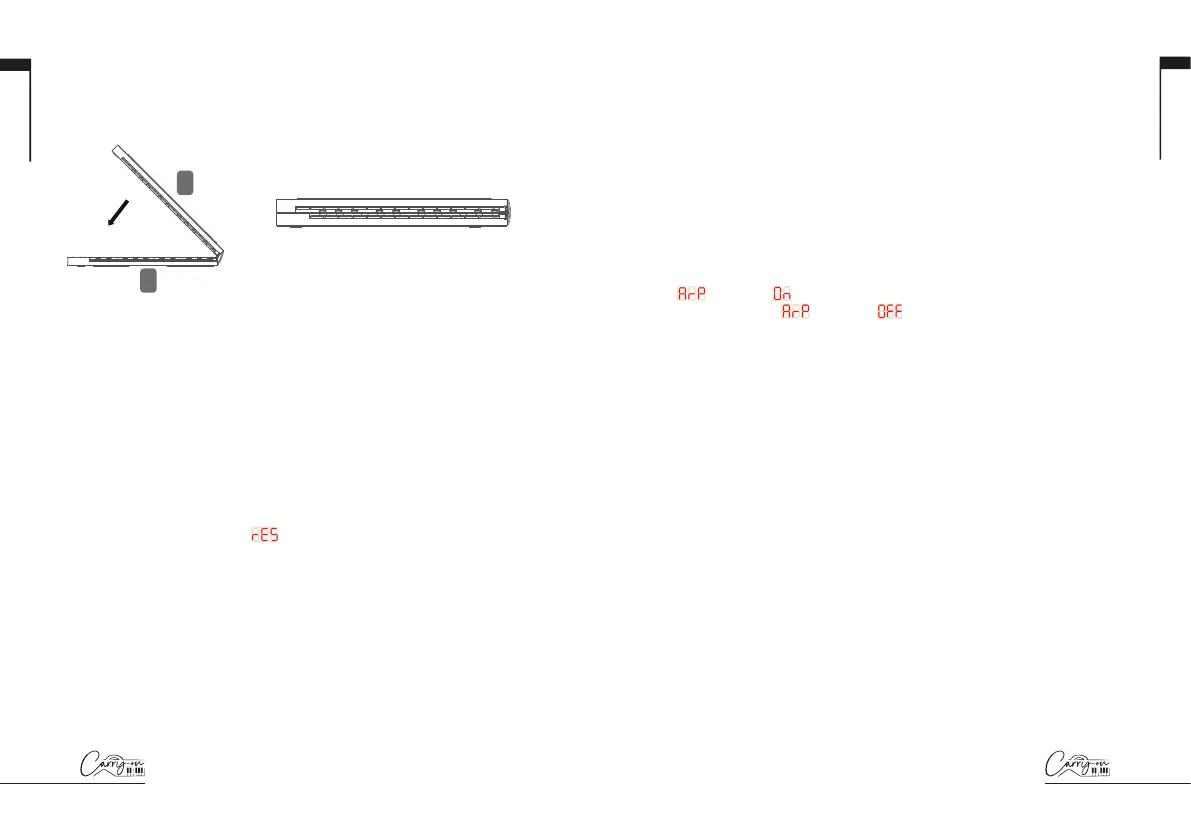
How to fold your Carry-on Folding Controller 49:
STEP 1:
Lift part B and fold on top of part A as shown.
Your piano is now safely folded for transport or storage.
Factory Reset
If required, the default factory configuration can be recalled by performing
a factory reset of your Folding Controller.
To perform a factory reset on your Folding Controller 49:
Ensure your Folding Controller is powered off
Hold the “OCT+” and “OCT-” buttons
Power on your Folding Controller
When the screen displays
release the “OCT+” and
“OCT-” buttons
Volume increase button
Volume decrease button
Metronome select button
Next select button
Previous select button
Tempo button
Demo select button
Accompaniment select button
Voice select button
Octave / Transpose setting button
A
B
TRANSP.
OC TAVE
TRANSP.
OC TAVE
1 2
3
4
1
2
3
4
Sustain pedal socket: Used for connecting
the supplied sustain pedal.
Power switch: Turn the Piano On/Off.
USB-C port: Connect the supplied USB
charging cable to power and charge the device.
Connect to a USB port on your computer to use
as a MIDI controller.
Headphone: Connect headphones or a speaker
with a quality screened cable (not supplied).
wiring
Front panel
1. Display
The screen displays information appropriate to the current mode.
By default, it will show the current octave and in ARP mode it will
show the current tempo. Changes to settings and parameters are also
displayed here.
2. OCT.+/ARP. Button
Pressing the OCT.+/ARP. button will shift the octave range of the keyboard
up in pitch. The octave range is -3 to +4.
While holding the SHIFT button, pressing the OCT.+/ARP. button will
toggle Arpeggiator mode on and off. When the Arpeggiator mode is turned
on,
and then will be shown on the display. When the Arpeggiator
mode is turned off,
and then will be shown on the display.
3. SHIFT Button
The SHIFT button toggles the secondary functions of certain buttons, keys
and knobs while it is being held.
4. TAP/OCT.- Button
Pressing the TAP/OCT.- button will shift the octave range of the keyboard
down in pitch. The octave range is -3 to +4.
While holding the SHIFT button, the TAP/OCT.- button will act as a tap
tempo input for the Arpeggiator. Tap this button at a regular tempo to
set the Arpeggiator BPM. The tapped BPM will be shown on the display.
NOTE: Tap tempo can be set regardless of whether the Arpeggiator
mode is on or off.
5. A/DIV. Knob
Turning the A/DIV. knob will send MIDI CC messages to all MIDI outputs.
By default, the A/DIV. knob is set to MIDI CC number 12. The MIDI CC
number of the A/DIV. knob can be changed using the Carry-on Control app
(see section on Carry-on Control app). Map the appropriate CC number
to a parameter in your DAW or MIDI device to control that parameter with
the A/DIV. knob.
Holding SHIFT and turning the A/DIV. knob will adjust the note division
of the Arpeggiator. Starting from full anti-clockwise, the available note
divisions are:
 Loading...