Installation
Cleaning
To
perform
the
basic
installation
and
set-up
of the
TX-11
b,
you'll need
shielded
signal
leads
(dual
RCA
phono
plug
to
phono plug),
and the
half-wave
dipole
antenna,
loop
antenna,
and
wire that came
in the
box
along
with this
manual.
If
you're
planning
to
install
the
TX-11
b
handles,
a
philips-head
screwdriver will
be
needed.
Placement
Place
the
TX-11
b
near
the
preamp
-
near enough
so the
signal cable
will reach without excessive strain
on the
cable itself,
or on the
connections.
Heat,
at
least normal amounts, shouldn't
be any
problem.
The
tuner
itself
doesn't generate much
and
isn't sensitive
to
small amounts.
But,
you
should never mount
the
TX-11
b
directly
on top of
power
amplifiers. Unless
your
system uses Carver Magnetic Field
Amplifiers, conventionally designed amps can,
and do,
generate
a
lot of
heat. Plus,
the
tuner's chassis could block vents needed
for
proper cooling
of the
amps.
If
your
equipment rack
or
component
cabinet
is
completely enclosed, forced-air cooling with
a
small "rack
fan" will prolong
the
life
of the
electrical devices
in
your stereo
components. These rack fans quietly move between
40 and
120
cubic
feet
of air per
minute, come
in
different sizes,
and may be
obtained
from
electronic supply stores
or
your stereo dealer.
We
also
recommend using
a
filter
with
the
rack
fan to
minimize dust
in the
enclosure.
Be
sure
you
clean
the
filter regularly.
Never
mount
or
locate
the
TX-11
b in
direct sunlight, near forced-air
vents, near motors,
or
other sources
of
dust
and
possible
interference.
It's
a
good idea
to
wipe
the
TX-11
b's
cabinet from time-to-time with
a
soft,
dry
cloth.
If you
have
to get
something off,
use a
mild dish soap
or
detergent: don't
use
alcohol, ammonia,
or
other strong solvents.
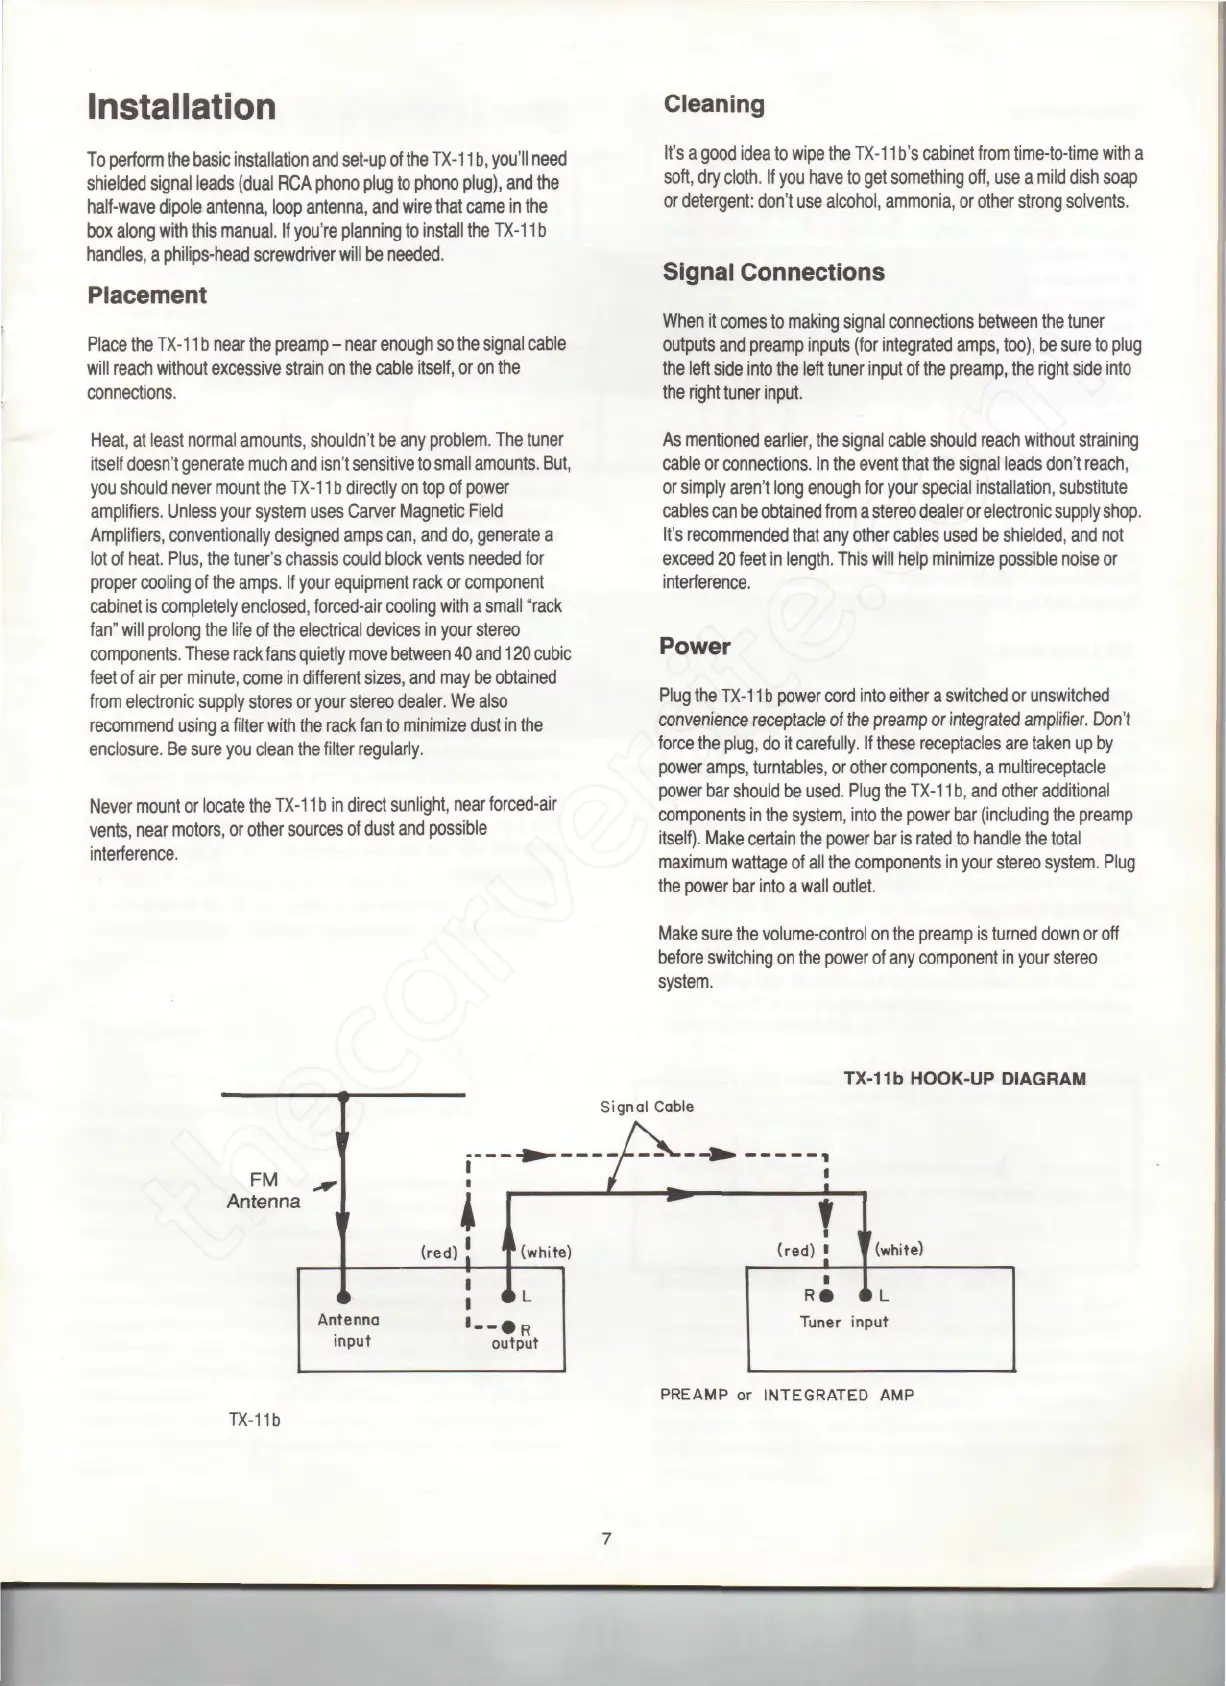
Signal Connections
When
it
comes
to
making signal connections between
the
tuner
outputs
and
preamp inputs (for integrated amps, too),
be
sure
to
plug
the
left side into
the
left
tuner input
of the
preamp,
the
right side into
the
right tuner
input.
As
mentioned earlier,
the
signal cable
should
reach without straining
cable
or
connections.
In the
event that
the
signal leads don't reach,
or
simply aren't long enough
for
your special installation, substitute
cables
can be
obtained from
a
stereo dealer
or
electronic supply shop.
It's recommended that
any
other cables used
be
shielded,
and not
exceed
20
feet
in
length. This will help minimize possible noise
or
interference.
Power
Plug
the
TX-11
b
power cord into either
a
switched
or
unswitched
convenience
receptacle
of the
preamp
or
integrated
amplifier.
Don't
force
the
plug,
do it
carefully.
If
these receptacles
are
taken
up by
power
amps, turntables,
or
other components,
a
multireceptacle
power
bar
should
be
used. Plug
the
TX-11
b, and
other additional
components
in the
system, into
the
power
bar
(including
the
preamp
itself).
Make certain
the
power
bar is
rated
to
handle
the
total
maximum wattage
of all the
components
in
your stereo system. Plug
the
power
bar
into
a
wall outlet.
Make
sure
the
volume-control
on the
preamp
is
turned down
or off
before
switching
on the
power
of any
component
in
your stereo
system.
FM
^
Antenna
Antenna
input
TX-11b
(red)'
T
(white)
I
'--•R
output
TX-11b
HOOK-UP
DIAGRAM
Signal Cable
M
(red)
I
f
(white)
R*
»
L
Tuner
input
PREAMP
or
INTEGRATED
AMP
 Loading...