EasyManua.ls Logo

Casablanca Versa Touch 2 User Manual

Casablanca Versa Touch 2
3 pages
To Next Page IconTo Next Page
Page #1 background imageLoading...
Page #1 background image
Warning: To reduce the risk of electrical shock, this fan must be installed with an
isolating wall control/switch.
SCREW
6-32 X 1”
(2)
SCREW
6-32 X
3
/8
(2)
WOOD
SCREW
1” (2)
DRYWALL
ANCHOR
6-32 (2)
12V BATTERY
W-72
CONTROL
HOLDER
Standard Light Switch
Step A. Remove the two screws holding the switch cover
plate. Do not remove the cover plate.
Step B. Orient the control bracket as shown and line up the
two inner mounting holes with those on the switch.
Step C. Install and tighten screws removed in Step A, by
hand only.
INNER
MOUNTING
HOLES
CONTROL
BRACKET
STANDARD
TOGGLE
SWITCH
SWITCH
COVER
PLATE
Rocker Light Switch
Step A. Break off the two tabs by pushing outward.
Step B. Remove the two screws holding the switch cover
plate. Do not remove the cover plate.
Step C. Orient the control bracket as shown and line up the
two inner mounting holes with those on the switch.
Step D. Install and tighten screws removed in Step B by
hand only.
OUTER
MOUNTING
HOLES
CONTROL
BRACKET
ROCKER
TYPE
LIGHT
SWITCH
SWITCH
COVER
PLATE
Wall Installation
Step A. Locate a 2x4
wall stud in a convenient
location.
Step B. Orient the control
bracket as shown over the
2x4 stud.
Step C. Use the 1” wood
screws in either the inner
or outer mounting holes.
Install and tighten screws
by hand only.
DECOR OVALHEAD SCREW
6-32 X 1”
ANCHOR
PANHEAD
SCREW
DRYWALL ANCHOR
Note: The wall anchors and 6-32 x 1” screws may be
used in situations where mounting to a stud is not pos-
sible. Use the inner mounting holes. After securing the
anchor, discard the anchor’s pointed screws and use the
6-32 decor ovalhead screws supplied.
CAUTION! Do not use with wall dimmer.
Changes or modifications not expressly
approved in writing by Casablanca Fan Co.
may void the user’s authority to operate
this equipment.
This device complies with RSS-210 of Industry Canada. Operation is subject to
the following two conditions: (1) this device may not cause interference, and
(2) this device must accept any interference, including interference that may
cause undesired operation of the device.
WOOD
SCREW 1”
VERSA•TOUCH INSTALLATION
VERSA•TOUCH2 CONTROL BRACKET INSTALLATION
SAFETY FIRST
W-72
CONTROL
P/N W7243001 RL0910
A23 MN21 12V
Question and Answer IconNeed help?

Do you have a question about the Casablanca Versa Touch 2 and is the answer not in the manual?

Casablanca Versa Touch 2 Specifications

General IconGeneral
TypeRemote Control
BrandCasablanca
ModelVersa Touch 2
CompatibilityCasablanca Ceiling Fans
Power SourceBattery
Number of Batteries2
FeaturesFan speed control, light dimming, reverse function
FunctionsFan speed, light dimmer, reverse

Summary

Safety First Warning

Versa Touch Installation Guide

Standard Switch Installation

Install control bracket with standard toggle switch.

Rocker Switch Installation

Install control bracket with rocker light switch.

Versa Touch2 Bracket Installation

Standard Switch Bracket Install

Install Versa Touch2 bracket with standard toggle switch.

Rocker Switch Bracket Install

Install Versa Touch2 bracket with rocker light switch.

Wall Mounting Options

Mounting to Wall Stud

Secure bracket to a 2x4 wall stud.

Mounting with Drywall Anchors

Use anchors when stud mounting is not possible.

Versa Touch2 Remote Operation

Fan Speed and Off Control

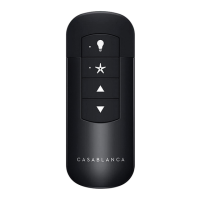
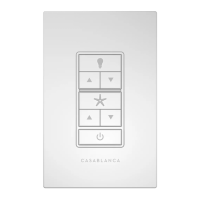
Operate fan speeds (Low, Med, High) and turn off.

Airflow Direction Reversal

Reverse fan airflow direction with REVERSE button.

Light On/Off and Dimming

Control light independently, including brightness adjustment.

Auto Resume Light Feature

Quick light button press recalls last brightness.

Frequency Setting for Multiple Fans

Adjusting Dip Switches

Change dip switch settings to control fans separately.

Initial Fan Operation Troubleshooting

Post-Installation Checks

Verify battery and reset frequency if fan is unresponsive.

Troubleshooting Common Problems

Fan Fails to Start

Check connections, battery, and frequency settings.

Excessive Fan Wobble

Ensure blades, downrod, and mounting are secure.

Fan Noise Issues

Tighten screws for light fixture, canopy, and blades.

Low Speed Not Working

Check for break-in period or replace batteries.

Remote Battery Life

Use alkaline batteries and check connections.

One Year Product Warranty

Related product manuals