Do you have a question about the Casio PT-50 and is the answer not in the manual?
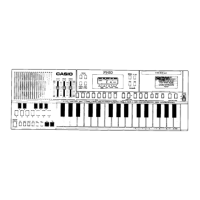
Covers main, chord, and rhythm volume controls, plus sound selection and chord keys.
Details rhythm selection, tempo adjustment, and start/fill-in functions.
Explains buttons for playback, recording, memory management, and one-key play modes.
Includes built-in speaker, display, demo, transpose, power switch, and pack compartment.
Connectors for memory input and output to external devices.
Provides audio output for headphones or external amplifiers.
Port for connecting an AC power adapter.
Protective cover for the interface jacks when not in use.
Lid for accessing the battery compartment.
Button for initial setup after battery changes or AC connection.
Adjusts the musical pitch within a specific range.
Compartment for optional tape recorder interface TA-1.
Details on using dry batteries and car battery adapters.
Instructions for connecting the unit to AC power via an adapter.
Warnings regarding the use of the correct AC adaptor to prevent damage.
Explains the automatic power cut-off feature for power economy.
Notes on how memory contents are protected and potential clearing conditions.
Procedure for pressing the 'P' button after connecting power sources.
Instructions for powering on the unit and observing the initial display.
Guidance on choosing instrument sounds using the selection buttons.
Steps to set the main volume control to an initial position.
How pressing keys affects the display and the instrument's response.
Experimenting with the eight available preset instrument sounds.
Notes on monophonic nature and sound interchange limitations.
Resetting the unit and adjusting main and rhythm volume controls.
Procedure for choosing one of the 16 built-in rhythm patterns.
Using tempo control buttons to adjust rhythm speed in 20 steps.
How to activate fill-in patterns during rhythm playback.
Explanation of root keys and variation keys for chord playing.
Demonstrates playing and shifting common chords like C major and F# maj 7.
Steps to play chords automatically along with selected rhythms.
How to adjust main, chord, and rhythm volumes independently.
Instructions on raising or lowering the keyboard pitch by half-tones.
Details the half-tone shift range and display indicators.
Key behavior, display changes, and limitations when transposing.
Example of transposing to match a singer's vocal range.
Example of playing music written for another instrument.
Details on storing music via ROM pack, manual memory, or RAM pack.
Explains how to play back stored music using Auto Play, One Key Play, or Chord Play.
Covers recording music to cassette tape and loading it back using MT function.
Describes buttons like Play, Reset/Stop, One Key Play, and One Key Chord.
Details buttons for melody/chord channels, record, forward, delete, and clear.
Explains R/MT, Save, Load, and File Assignment keys for data management.
Covers the demonstration music start button and ROM/RAM pack compartment.
Step-by-step guide for inserting a ROM pack into the compartment.
Procedure for installing the ROM pack and powering on the unit.
Steps for selecting memory functions and assigning file numbers.
How music data from the ROM pack is loaded into the PT-50's memory.
Procedure to initiate automatic playback of loaded music.
Options for playing melody or chords automatically during playback.
Describes melody, obbligato, rhythm, tempo, and chord data in ROM packs.
How to interpret the display for melody, chord, tempo, and transpose.
Instructions on how to stop the auto play function and reset the unit.
Step-by-step guide to playing melodies using a single finger.
How to play only the melody using the One Key Play function.
Procedure for recalling and playing stored chords with auto-rhythm.
Methods for playing melody with chord accompaniment using various modes.
How to select and start auto-rhythm, then disable it for manual play.
Overview of the steps for storing melody, chords, and preset sounds.
Details on One Key Memory and Real Time Memory for melody storage.
Details on One Key Memory and Real Time Memory for chord storage.
How to assign preset sounds to stored melodies using the Forward button.
Step-by-step guide for storing the melody 'Little Brown Jug' using One Key method.
How to input melody notes using keyboard keys in the One Key method.
Phrasing the melody in time with rhythm count for duration storage.
Steps for storing chord progressions using Chord Selection keys.
Playing chords with auto-rhythm and using One Key Chord button for duration.
How to store 'Fill-in' patterns while recording chord duration.
Procedure for selecting and storing preset sounds during melody recording.
Storing melody notes and durations simultaneously via Real Time method.
How to change preset sounds while recording melody in Real Time.
Detailed steps for melody recording, including clearing and advancing.
How to select and apply different sounds during melody recording.
Steps for recording chords and their durations in Real Time.
How to store 'Fill-in' patterns during chord recording.
Explains how storage steps are counted for notes, chords, and features.
How to check the available memory capacity during storage operations.
Procedures for clearing all melody, chord, or combined memory contents.
Specific steps to clear only melody or only chord data from memory.
Details on using Forward and Delete buttons for correcting stored entries.
Correcting mistakes immediately after they occur during storage.
Procedure for correcting notes or chords after storage is complete.
Instructions for saving and loading music to/from a RAM Pack.
Details on using the MT function for cassette tape recording/loading.
Operational steps for saving and loading music with the RAM pack.
Important precautions for connecting and handling the Tape Recorder Interface TA-1.
Step-by-step guide for installing the TA-1 into the interface compartment.
Instructions for safely removing the TA-1 from the unit.
Specifies impedance, input level, and output level requirements for tape recorders.
Checks for proper operation, including tape condition and recorder settings.
Procedure for connecting and saving music from PT-50 to a cassette tape.
Details on connecting the PT-50 to the tape recorder's microphone jack.
Steps to initiate saving, assign file numbers, and start recording.
Procedure for connecting the PT-50 to the tape recorder's output jack.
Steps to start loading music, including tape positioning and playback.
Explanation of the 'P' display for skipping unwanted music during loading.
Information on 'E' display indicating saving or loading errors.
Troubleshooting steps for when no sound or no rhythm is produced.
Resolving issues with shifting sounds or playing chords.
Addressing problems with erratic memory contents or unsynchronized playback.
Resolving problems with memory clearance and MT function operation.
Troubleshooting distorted sound or no sound with external amplifiers.
Advice on avoiding heat, humidity, shocks, and keeping the unit clean.
Instructions for cleaning the unit and guidance on handling malfunctions.
Key specifications including model, key count, preset sounds, rhythms, and chords.
Details on memory functions, transposing range, and display capabilities.
Specifications for pitch control, built-in speaker, and output jack.
Information on power sources (AC/DC) and power consumption.
Physical characteristics including dimensions, weight, and body finish.
Radio frequency guidelines and compliance information for the USA.
Details on AC/DC power sources, battery type, and battery life.
Information on radio frequency energy generation and interference mitigation.
Note regarding programming chords longer than one bar.
| Brand | Casio |
|---|---|
| Model | PT-50 |
| Category | Synthesizer |
| Language | English |