EasyManua.ls Logo

Cateye VOLT 400 HL-EL461RC - User Manual

Cateye VOLT 400 HL-EL461RC
2 pages
Print Icon
To Next Page IconTo Next Page
Loading...
RECHARGEABLE HEADLIGHT
HL-EL461RC
Manual
1. Connect the light unit to your PC or
a commercial USB battery charger
using the USB cable. (
1
2
)
The switch or the indicator on the
cradle lights up, and charging starts.
Indicator light: On Charging
Indicator light: Off
Charging is completed
* When your PC is in sleep state, the
unit cannot be charged.
* We recommend using 500+mA
(USB2.0) USB battery charger.
2. After charging is completed, remove
the USB cable, and install the charge
jack cover.
* Charging and lighting times are ap-
proximate values, and will vary by en-
vironmental and user conditions.
* The cartridge battery can be fast-
charged by using the optional charging
cradle (about 3 hours of charging time).
Use a 1A or higher USB charging
adapter when charging by the cradle.
Before using the light, please read this manual
and the included separate sheet “LITHIUM-ION /
LITHIUM-ION POLYMER BATTERIES” thoroughly, and
keep them for future reference.
Rubber pad
Bracket
HOW TO CHARGE
1
CAUTION!
Before your trip, please make sure the light is fi rmly mounted
to the bracket, it lights up, and the light is not blocked by
baggage, etc.
Do not place it within children’s reach.
Always attention to the remaining battery power by check-
ing the indicator periodically while using.
In preparation for unexpected battery shutoff, we recom-
mend you carry a spare cartridge battery and light.
Mounting the light unit too close to a wireless computer
may adversely affect the reading of the computer.
This product is water-resistant under normal daily use and
can be used in the rain. However, do not intentionally sub-
merge it in water.
If the light unit or parts become dirty with mud, etc., clean
with a soft cloth which is moistened with mild soap.
Never apply paint thinner, benzine or alcohol; damage will
result.
Dispose of used cartridge batteries appropriately according
to local regulations.
Before Initial Use
This unit is shipped with a small charge to check the light.
Be sure to charge it before use, according to the instructions
“HOW TO CHARGE”.
1. Mount the bracket to the handlebar.
(
1
3
)
2. Insert the light unit into the bracket
until it clicks, and adjust the beam
angle. (
4
)
3. To remove the light unit, pull out it
forward while pressing down on the
release button (
5
).
* To re-adjust the beam angle, loosen
the dial enough to move the bracket,
and fi rmly tighten it after adjustment.
* The light can be mounted under the
handlebar.
CAUTION!:
Be sure to tighten the dial by hand.
When you tighten it too hard with
a tool, the screw thread may be
stripped.
Check the dial and screw (*1) on the
bracket periodically, and use them
without any loosening.
Round off the cut edge of the bracket
strap to prevent injury.
HOW TO MOUNT
2
Standard
charging time
Approx.
6 h
(USB 2.0)
1
2
4
4
5
1
2
3
Strap
Dial
Release
button
Screw
Cradle
USB cable
Charge jack
cover
To PC or USB
battery charger
Charging on the cradle
Cartridge
battery
Indicator
Copyright© 2017 CATEYE Co., Ltd.
EL461RC-170203 2
Cartridge battery
(BA-2.2)
FlexTight™ bracket
(H-34N)
USB cable
(MICRO USB)
Light unit
ENG
*1
Question and Answer IconNeed help?

Do you have a question about the Cateye VOLT 400 HL-EL461RC and is the answer not in the manual?

Summary

1 HOW TO CHARGE

Charging Procedure

Connect the light unit to a PC or USB battery charger using the USB cable to start charging.

Charging Completion

Charging is completed when the indicator light turns off. Remove the USB cable and install the charge jack cover.

Charging Safety and Usage Tips

Includes important cautions regarding charger type, PC sleep mode, and approximate charging times.

2 HOW TO MOUNT

Mounting Steps

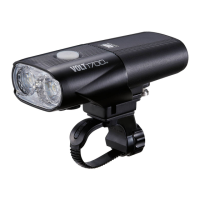
Steps to mount the bracket to the handlebar, insert the light unit, and adjust the beam angle.

Mounting Safety Precautions

Tighten the dial by hand to avoid stripping threads and periodically check dial and screw for looseness.

3 SWITCH OPERATION (SWITCHING THE LIGHTING MODE)

Mode Selection

Use the switch to turn the light ON/OFF and select lighting modes, remembering the last used mode.

Battery Status Indicator

The indicator light shows remaining battery; 20% or less requires charging as soon as possible.

4 HOW TO REPLACE THE CARTRIDGE BATTERY

Battery Replacement Procedure

Turn the cartridge battery counterclockwise to remove and screw it clockwise into the unit until it clicks.

Battery Handling Safety

Notes on battery life decrease and preventing short circuits when storing the battery alone with the cap removed.

LIMITED WARRANTY

Warranty Coverage Details

CatEye products are warranted for 2 years against defects in materials and workmanship for the light unit only.

Overview

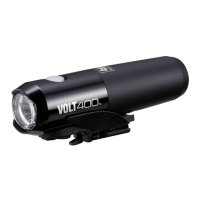
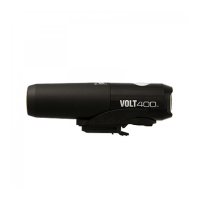
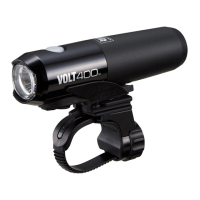
The CatEye Volt400 (HL-EL461RC) is a rechargeable LED headlight designed for bicycles, featuring a high-intensity white LED and powered by a Li-ion 3.6V 2200mAH cartridge battery (BA-2.2). This manual provides comprehensive instructions for its use, maintenance, and specifications.

Function Description:

The Volt400 serves as a primary lighting source for cyclists, offering multiple lighting modes to suit various conditions and preferences. It is equipped with an OptiCube lens technology for optimal beam distribution. The device is designed for easy mounting and removal from a bicycle handlebar using the FlexTight™ bracket (H-34N).

Important Technical Specifications:

  • Light Source: High-intensity white LED x 1
  • Battery: Li-ion 3.6V 2200mAH cartridge battery (BA-2.2)
  • Charging: Micro USB plug
  • Standard Charging Time: Approximately 6 hours (using USB 2.0)
  • Operating Temperature Range:
    • Charging: 41°F ~ 104°F (5°C ~ 40°C)
    • Operating: 14°F ~ 104°F (-10°C ~ 40°C)
  • Recharge/Discharge Cycles: Approximately 300 times (until rated capacity drops to 70%)
  • Dimensions/Weight: 4-3/8" x 1-5/8" x 1-13/64" (111.3 x 41.3 x 30.6 mm) / 4.23 oz (120 g) (including cartridge battery)
  • Water Resistance: Water-resistant for normal daily use; not intended for submersion.

Operating Modes and Approximate Runtimes (at 20°C):

  • Hi: Approximately 3 hours
  • Middle: Approximately 8 hours
  • Low: Approximately 18 hours
  • HyperConstant: Approximately 11 hours (a mode that combines constant light with flashing for enhanced visibility)
  • Flashing: Approximately 60 hours

Usage Features:

  • Mounting: The light unit attaches to the handlebar via the FlexTight™ bracket. The bracket is secured by hand-tightening a dial. The beam angle can be adjusted after mounting. The light can also be mounted under the handlebar.
  • Switch Operation: A single switch controls ON/OFF and mode selection.
    • Press and hold: Turns the light ON or OFF.
    • Click: Cycles through lighting modes (Hi, Middle, Low, HyperConstant, Flashing).
    • Double-click: Directly switches to the Flashing mode from any other mode.
    • Mode Memory Function: The light turns on in the last lighting mode used.
  • Battery Indicator: The switch (indicator) lights up when the remaining battery power is 20% or less, signaling that charging is required.
  • Charging: The light unit is charged by connecting it to a PC or a commercial USB battery charger using the provided Micro USB cable. The indicator light on the cradle illuminates during charging and turns off when charging is complete. For faster charging, an optional fast charging cradle (CRA-001 or CRA-002) can be used, reducing charging time to approximately 3 hours with a 1A or higher USB charging adapter. Charging is not possible when the PC is in sleep state.
  • Battery Replacement: The cartridge battery is easily replaceable. It is removed by turning counterclockwise and installed by screwing it clockwise until it clicks.

Maintenance Features:

  • Cleaning: If the light unit or parts become dirty with mud, clean with a soft cloth moistened with mild soap. Avoid paint thinner, benzine, or alcohol, as these can cause damage.
  • Battery Care:
    • Replace the cartridge battery when operating time decreases significantly, indicating the end of its life.
    • When storing the cartridge battery alone, ensure the cap is installed to prevent short circuits, which could lead to damage or fire.
    • Check the dial and screw on the bracket periodically to ensure they are tightened and prevent loosening.
  • Disposal: Dispose of used cartridge batteries appropriately according to local regulations.

Safety Precautions:

  • Ensure the light is firmly mounted, lights up, and is not blocked by baggage before each trip.
  • Keep the device out of children's reach.
  • Periodically check the remaining battery power.
  • Carry a spare cartridge battery and light for unexpected battery shutoff.
  • Avoid mounting the light unit too close to a wireless computer, as it may interfere with readings.
  • Do not intentionally submerge the light in water.
  • Do not overtighten the bracket dial with a tool, as this may strip the screw thread.
  • Round off the cut edge of the bracket strap to prevent injury.

Optional and Spare Parts:

  • FlexTight™ bracket: 5338827N (H-34N)
  • Helmet mount: 5341831N
  • Center fork bracket: 5342440 (CFB-100)
  • USB cable: 5342730 (MICRO USB)
  • Fast charging cradle: 5342720 (CRA-001) and 5342620 (CRA-002) (both include USB cable)
  • Cartridge battery: 5342710 (Li-ion3.6v 2200mAH : BA-2.2) and 5342680 (Li-ion3.6v 3100mAH : BA-3.1)

Warranty:

The Volt400 light unit comes with a 2-year warranty from the original purchase date, covering defects in materials and workmanship. Deterioration of the cartridge battery is not covered under warranty. Service is provided by CatEye or an authorized retailer.

Cateye VOLT 400 HL-EL461RC Specifications

General IconGeneral
BrandCateye
ModelVOLT 400 HL-EL461RC
CategoryFlashlight
LanguageEnglish

Related product manuals