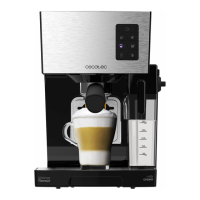
CREMMAET COMPACT STEAMCREMMAET COMPACT STEAM
4342
ENGLISH ENGLISH
c. Once you have pressed the desired button, you have accessed the interface for setting
the amount of coee powder. Press “ ” or ‘” ” to increase or decrease the amount of
coee powder.
d. Then, press the Settings/Exit button “ ” to enter the coee ow setting interface:
press “ ” or “ ” to increase or decrease the Espresso ow rate.
e. When the conguration is nished, press the “Settings/Exit “ ” button to advance to
the next step, and press the button 7 times to return to the standby interface.
2. Temperature settings.Fig. 9
After conguring the quantity and ow rate settings, press the Settings/Exit button “
” to enter the temperature settings interface. Press the button “ ” or “ ” to adjust the
temperature.
3. Automatic shutdown settings.Fig. 10
After conguring the quantity and ow rate settings, press the Settings/Exit button “ ” to
enter the automatic shutdown settings interface. Press “ ” or “ ” to programme the coee
machine to shutdown (0.5 h, 1 h, 2 h... 24 h).
4. Start-up settings.Fig. 11
After conguring the quantity and ow rate settings, press the Settings/Exit button “ ” to
enter the automatic start-up settings interface. This function is for authorised professionals
or after-sales personnel only.
5. Manufacturing information.Fig. 12
After setting the temperature adjustment, press the Settings/Exit button “ ” 4 times to
check both the manufacturing information and the date and batch number.
6. Decalcication. Fig. 13
A. Pour the descaler into a container with clean water and follow the manufacturer’s
instructions.
B. Take out the water tank, pour the descaling product into the tank and add clean water
until the tank is completely full, never exceed the maximum.
C. Place a container under the coee spout.
D. In the standby interface, press and hold the Settings/Exit button “ ” and wait for 2
seconds. Then press the Settings/Exit button “ ” again four times and the descaling
indicator “ “ will light up on the display.
E. Press the Conrm button “ ” to start descaling.
F. Once emptied, remove the water tank and add fresh water until the coee machine
completes the cycle. This process may take a few minutes. When the container is full,
empty it.
G. When descaling is complete, be sure to carry out several Cleaning/Rinse cycles as
indicated in the “Cleaning/Rinse” section.
3. Select the desired amount of coee.
4. During grinding (the control panel display shows “g”), press the “ ” or “ ” buttons to
adjust the amount of coee powder. During coee preparation (“ml” is displayed on the
right-hand side of the control panel display), press “ ” or ” to adjust the amount of
liquid coee.
5. Press the “ ” button to prepare two cups of coee.
6. Press “ ” to stop coee preparation.
Frothing the milk
1. Set the steamer to the desired position and insert it into the milk. Fig. 17
2. Press ‘ ‘ to turn on the steamer.
3. Once the milk is frothed as desired, press the ‘ ’ button on the control panel to stop
frothing milk.
If you consider that the milk is not suciently frothed, press the ‘ ‘ button during the process
to increase the frothing time.
Note:
Immerse the steamer in water after frothing the milk. Clean the steamer following the same
process as for milk frothing. Wipe the steamer with a clean cloth to prevent milk from sticking
to the inside wall or clogging the steamer.
Preparing hot water
1. Adjust the height of the coee spout and place a cup underneath. Fig. 7
2. Press the hot water button “ ” to dispense hot water.
3. Once the desired amount of hot water is obtained, press the “ ” button on the panel
to stop dispensing water.
Cleaning/Rinsing
1. Adjust the height of the coee spout and place a container underneath. Fig. 7
2. Press and hold down the button “ ” for 3 seconds to start cleaning/ushing of the
coee machine. This function uses 60 ml of water and is automatically deactivated.
Settings and conguration
In standby mode, press and hold the settings button “ ” for 3 seconds to access the
conguration interface.
1. Settings for Espresso and Americano coee. Fig. 8
a. Once inside the setting interface, the Espresso and Americano buttons will ash.
b. Press the Espresso button “ ” or the American button “ “ depending on the type of
coee you want to change.