8
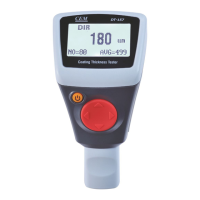
Coating Thickness Tester User Manual
2. Ready to start
2-1. Power Supply
For power on, please press and hold button. If no LCD display:
please check if the battery is correctly installed or it is in low battery.
Display: Please replace battery immediately.
Note that the gauge will make faulty measurements if the voltage
is very low.
Note: When power on, please away from any metal at least 10 cm
above
Before each measurement, zero calibration is recommended.
2-2. Replacing the Battery
• Power off the meter.
• Open the battery cover.
• Remove battery.
• Insert new battery.
• Close the battery cover.
Caution: Make sure the anode and cathode are correctly positioned.
2-3. Menu System and Basic Settings
Press to power on; the gauge will work in measuring mode.
Press left button into MENU mode. See following MENU system
arrangement:
2-3-1. Function and operation instruction
2-3-1-1. Select Working mode
Working mode: There are 51 working modes in this gauge. Measure
data would not be stored in the gauge in Group0 measure mode.
In the other 50 working modes, 50 measured data can be stored
in each mode in cycle.
• Press left button to enter the menu
• Press Up/down button to select working mode
• Press left button to enter working mode
• Press up/down button to select working mode
• Press left button for OK.