39
3. If the free end of the hose is routed into a bathtub or sink, it should be firmly
secured (e.g. with a special bathtub clamp). A loose hose can easily fall off
because of the water pressure and cause spillage.
4. When connecting the hose to the drain pipe, make sure it is not inserted too
deep so as not to obstruct the sewage flow. If the hose is too long – cut it
down to size.
5. In any case please avoid the siphon effect when connecting the machine to the
drain; otherwise the water will not stop running. For this purpose a part of the
hose should always be raised at least 60 cm above the floor.
Besides, the free end of the drain hose should not be submerged in water
(therefore please avoid connecting the hose to the sewage pipes with a
constant water flow).
draining
NOTE: If the free end of the hose is routed into a sink, use a special holding clamp
(bracket) as in the case with a bathtub; secure the clamp with a chain or rope.
CONNECTING TO POWER SUPPLY
1. The washing machine should be connected to a properly installed grounded
electric socket protected by an automatic circuit breaker of 16A rating.
For added safety it is recommended to connect the washing machine to a
dedicated lead (socket) assigned in the switchboard and used exclusively to
connect the washing machine, protected by a dedicated differential current
circuit breaker or a combined automatic circuit breaker and ground fault
circuit breaker (GFCI).
The manufacturer will not accept liability for any damage if the machine is
connected to a power supply circuit without a functioning earthing connection
installed in accordance with local regulations.
2. The electric circuit to which the machine is connected should be located in
a easily visible and accessible place, within 1 m to the left or right of the
appliance. Please prevent situations when the power cable can be jammed,
tugged at or trampled upon.
3. Never use extension cables or cluster type power sockets to connect the
appliance. This is critical to avoid loose contacts or contacts with insufficient
area and thus to prevent fires. Never connect the appliance via an external
timer.
4. If the power cable is damaged it shall only be repaired by a properly qualified
technician at a service center.
5. OPERATING THE WASHING MACHINE
ATTENTION
Before doing your laundry ensure that the washing machine is installed properly
in accordance with our instructions.
The appliance has undergone quality acceptance tests at the factory, therefore it
may contain water and show minor traces of test operation.
ATTENTION
In order to eliminate any unpleasant odor and clean the washing machine before
starting operation we recommend running one washing cycle in “Cotton” mode at
90 °С without clothes and detergents.
Don’t worry if the odour hasnt’t dissappeared completely. It is the odour from
heated rubber and plastic parts.
Either start long washing programm with high temperature (without laundry), or
wait the odour dissappears after couple of next washings.
BEFORE WASHING
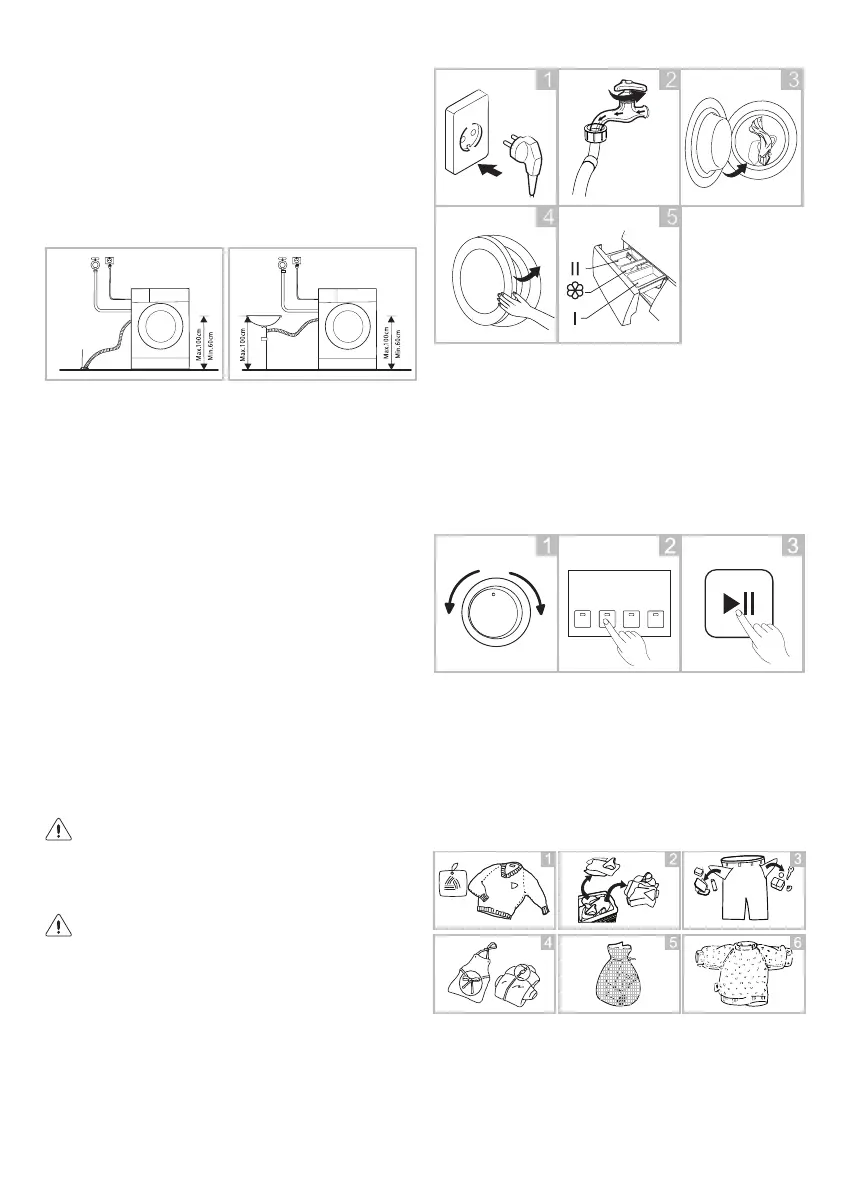
1. Connect to power supply.
2. Open the tap upstream of the water supply tube.
3. Load the clothes in.
4. Firmly close the door.
5. Add detergent into the drawer.
NOTE: If the Pre-Wash function is activated add washing agent into compartment
I of the detergent drawer.
WASHING
1. Select program.
2. Select auxiliary function or leave as it is.
3. Press «Start/Pause» button to start washing program.
AFTER WASHING
The audio signal and either the door lock indicator and the «Start/Pause» button
backlight, or the two dots above the buttons (for models with LCD display) will
signal the completion of the washing cycle.
5.1. PREPARING YOUR LAUNDRY
Sort your clothes to achieve optimal washing results, then prepare them in
accordance with the symbols on the washing instruction labels.
SORTING (Fig. 2)
– For more efficient washing sort your laundry in accordance with the care
instructions, fabric type and recommended washing temperature; wash your
laundry at the proper drum rotation speed.
 Loading...