Do you have a question about the Central Pneumatic 95810 and is the answer not in the manual?
Guidelines for maintaining a clean, well-lit, and distraction-free workspace for safe operation.
Covers staying alert, proper dress, footing, balance, and using appropriate safety equipment.
Guidelines on not forcing the tool, disconnecting air supply, and storing it safely.
Emphasizes qualified repair personnel, identical replacement parts, and specified lubricants.
Details on connecting to a suitable air source, avoiding over-pressurization and incompatible gases.
Covers avoiding people/animals, flames, heat sources, and using correct solvents.
Ensures proper accessory attachment and installing an in-line shutoff valve for emergencies.
Read safety information, remove protective plug, and clean the airbrush before first use.
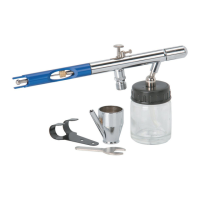
Explains the uses of the Metal Cup and the function of the Metal Hook for hanging.
Recommends filter, regulator, pressure gauge, and ball valve for safe and efficient operation.
Details on connecting air hose, avoiding female couplers on tool, and setting compressor pressure.
Instructions for inspecting connections, checking for leaks, and safely shutting down the air supply.
Guidelines for preparing a clean work area, routing the air hose safely, and masking.
Instructions on thinning paint, straining, filling the jar, and connecting it to the airbrush housing.
Details on using the finger lever, adjusting spray volume, and pattern size based on distance.
Addresses fluid blockage in the nozzle and methods to clear it without damage.
Instructions for flushing with solvent and thoroughly cleaning the airbrush after every use.
Check for loose screws, misalignment, clogged nozzle, damaged hose, or broken parts before operating.
Detach air supply and discharge residual pressure before performing any inspection or maintenance.
Guidance on choosing solvents for latex and oil-based paints, and safety precautions for flammable solvents.
Detailed steps for cleaning the jar, spraying solvent, removing nozzle, and wiping the body.
Instructions for proper disposal of cleaning solution and storing the airbrush in a dry, secure area.
The Central Pneumatic Deluxe Airbrush Kit is a precision tool designed for various spraying applications, from fine detail work to broader coverage. It operates using compressed air and is suitable for hobbyists, artists, and model makers.
The airbrush kit's primary function is to atomize and spray various liquid media, such as paints, inks, and dyes, onto a surface. It allows for controlled application, enabling users to create intricate details, smooth gradients, and uniform coatings. The kit includes a deluxe airbrush, a metal cup for paint, and a metal hanger for storage. The airbrush features a finger lever for controlling airflow and fluid release, an adjustment screw for precise spray volume, and a nozzle for directing the spray. It is designed for gravity-feed operation, where paint is drawn from the attached jar or metal cup.
Setup: Before initial use, the airbrush should be cleaned with a solvent-based thinner to remove any testing or corrosion prevention materials. The metal cup can be used for excess thinned paint or for holding solvent during cleaning. The metal hook can be attached to a secure surface to hang the airbrush for drying or storage.
Air Supply Setup: An air supply system should include a filter, regulator with a pressure gauge, an in-line shutoff valve, and a quick coupler. The air hose must be long enough to allow free movement. The air compressor's output regulator should be adjusted to provide sufficient power without exceeding the airbrush's maximum air pressure of 30 PSI. An in-line shutoff ball valve is crucial for safety, allowing quick control of the air supply. It is important not to use an automatic oiler system or add oil to the airline, as this can contaminate the material being propelled.
Paint Preparation and Filling: Proper paint mixture is essential for good results. Paint should be thinned according to the manufacturer's directions and thoroughly mixed. It should then be strained through a paint strainer or cheesecloth to prevent clogging. The jar should be filled to 3/4 full and securely attached to the airbrush housing.
General Operation:
Troubleshooting:
Cleaning (Immediately After Each Use): Thorough and immediate cleaning is critical to prevent permanent clogging.
Solvent Selection:
Air Supply Maintenance: Perform daily maintenance on the air supply components (filter, regulator, etc.) according to their respective manufacturers' instructions.
Storage: Store the airbrush kit in a dry, secure area, out of reach of children.
Inspection (Before Each Use): Before each use, inspect the airbrush for:
| Brand | Central Pneumatic |
|---|---|
| Model | 95810 |
| Category | Airbrushes |
| Language | English |