Do you have a question about the Chamberlain 248730DM and is the answer not in the manual?
Defines safety signal words WARNING and CAUTION for user guidance.
Lists essential checks before installation, including door balance and safety warnings.
Guidance on identifying door type and height for proper opener installation planning.
Warning about floor-to-door gap affecting safety reversal system effectiveness.
Comprehensive list of tools needed for the garage door opener installation.
Visual guide to all parts included in the garage door opener package.
Details and illustrations of hardware used for assembling the opener components.
Details and illustrations of hardware used for installing the opener.
Detailed instructions for assembling the garage door opener rail sections.
Warning to keep hands and fingers away from joints during rail assembly to prevent pinching.
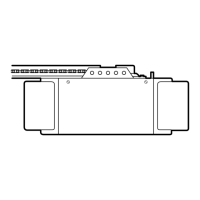
Steps for removing motor unit fasteners and attaching the rail.
Instructions for installing the idler pulley and connecting the chain/cable.
Steps for routing the chain and assembling trolley parts like the threaded shaft.
Final steps for tightening the chain and completing the opener assembly.
Warning to avoid finger injury and to not connect power until instructed.
Critical safety advice and warnings to reduce risk of severe injury or death during installation.
Guidance on proceeding based on whether the garage door is one-piece or sectional.
Steps for marking the garage door center and determining the highest point of travel.
Guidance on adding a 2x4 support for header bracket installation on drywall or studs.
Warning emphasizing the need for a rigidly fastened header bracket for proper safety reversal.
Procedure for marking and drilling pilot holes for the header bracket.
Steps for securely attaching the header bracket to the wall or ceiling.
Instructions for attaching the opener rail to the mounted header bracket.
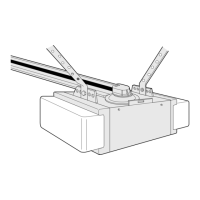
Steps for positioning the motor unit and rail for hanging, noting the typical angle.
Instructions for attaching the motor unit to ceiling hanging brackets.
Warning about securing the opener to structural supports to prevent injury from a falling unit.
Information on reinforcing lightweight doors like fiberglass or steel for opener attachment.
Steps for positioning and securing the door bracket to the garage door.
Caution regarding reinforcing the inside of the door with angle iron.
Instructions for securely attaching the emergency release rope and handle.
Detailed steps for connecting the straight and curved door arms to the trolley and door bracket.
Critical safety warning regarding potential injury from a falling garage door during attachment.
Steps for wiring, routing, and mounting the door control button and wires.
Safety warnings for electrocution and closing door hazards during door control installation.
Guidance on selecting and installing the correct light bulbs for the opener.
Instructions for plugging into an outlet or making permanent wiring connections.
Critical safety warnings regarding electrocution and fire hazards during electrical setup.
Explanation of the sensor's function and its critical role in preventing injury.
Details on mounting the sensors and ensuring they face each other across the door.
Warning emphasizing the necessity of a correctly installed and aligned safety reversing sensor.
Steps for assembling the safety sensors and choosing mounting locations.
Illustrations of preferred track installation and optional wall/floor mounting.
Note stressing correct alignment and height (max 6 inches) for sensor operation.
Instructions for running the sensor wires to the motor unit and securing them.
Detailed steps for connecting the sensor wires to the motor unit's quick connect terminals.
Procedure for setting the points where the door stops when opening or closing.
When and how to adjust travel limits for proper door operation.
Warnings about travel limits affecting safety reversal and vehicle clearance.
Procedure for adjusting the force required to open and close the garage door.
When and how to adjust forces, with warnings against using it to compensate for binding.
Critical warnings about force affecting safety reversal and not exceeding minimum closing force.
Detailed procedure for testing the door's ability to reverse upon encountering an obstruction.
Procedure for testing the safety reversing sensors and identifying issues.
Reiterates critical safety warnings related to reversal system and sensor functionality.
Key safety rules for operating the garage door opener and preventing injury.
How to operate the opener using remotes, door controls, and understanding its behavior.
Details on how opener lights function and how to control the Security+® light feature.
Explanation of the push bar, lock, and light buttons on the door control.
How to adjust the auto-off timer for the opener's light.
Instructions for enabling and disabling the lock feature on the door control.
Schedule for monthly, bi-annual, and annual maintenance tasks.
Instructions for safely disconnecting and reconnecting the trolley for manual door operation.
Warning about potential injury from falling doors during manual operation.
Troubleshooting steps for door closing issues and remote activation failures.
Steps to address doors reversing without apparent cause and motor unit noises.
Interpreting diagnostic flashes related to safety sensor wire problems.
Interpreting diagnostic flashes related to motor or control board failures.
Step-by-step guide to program new or existing remote controls to the opener.
Instructions for programming a remote button to control the opener's lights.
Notes on programming additional buttons on 315 MHz remotes.
Procedure to add or reprogram a PIN for the keyless entry system.
Steps to change a known PIN for the keyless entry system.
How to set a temporary PIN for visitors or service personnel.
Instructions to erase all previously programmed remote and keyless entry codes.
Guidance on replacing the battery in the remote control.
Safety warnings regarding battery handling, swallowing, and disposal.
Detailed list and diagrams of parts for the opener's rail assembly.
Detailed list and diagrams of parts used during the opener installation process.
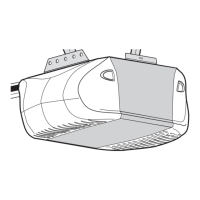
Diagrams and part numbers for components within the motor unit.
Catalog of optional accessories available for purchase, such as remotes and extensions.
Details of the limited warranty covering the opener and its motor for specific models.
Details of the limited warranty covering the opener and its motor for other specific models.
Contact numbers and website for installation, service, and support.
Instructions and necessary information for ordering replacement parts.
| Type | Chain Drive |
|---|---|
| Horsepower | 1/2 HP |
| Battery Backup | No |
| Voltage | 120V |
| Drive Type | Chain |
| Security | Rolling Code |
| Max Door Height | 7 ft |
| Remote Control | Yes |