EasyManua.ls Logo

Chamberlain Power Drive User Manual

Chamberlain Power Drive
36 pages
To Next Page IconTo Next Page
Page #1 background imageLoading...
Page #1 background image
GARAGE DOOR OPENER
ASSEMBLY/INSTALLATION MANUAL
Please read this manual and the enclosed safety materials carefully!
Fasten the manual near the garage door after installation.
The door WILL NOT CLOSE unless the Protector System
®
is connected
and properly aligned.
Periodic checks of the opener are required to ensure safe operation.
The model number label is located under the light lens on the front panel of
your opener.
When you see these Safety Symbols and Signal Words on
the following pages, they will alert you to the possibility of
serious injury or death if you do not comply with the
warnings that accompany them. The hazard may come
from something mechanical or from electric shock. Read
the warnings carefully.
When you see this Signal Word on the following pages, it
will alert you to the possibility of damage to your garage
door and/or the garage door opener if you do not comply
with the cautionary statements that accompany it. Read
them carefully.
Mechanical
Electrical
WARNING
CAUTION
WARNING
WARNING
WARNING
CAUTION
WARNING
WARNING
WARNING
CAUTION
WARNING
WARNING
This garage door opener has been designed and tested to offer safe service provided it is installed, operated,
maintained and tested in strict accordance with the instructions and warnings contained in this manual.
IMPORTANT SAFETY NOTES
PD210D • PD212D
248730
PD610D • PD612D • 7920KD
PD612KLD • 48930D
The Chamberlain Group, Inc.
845 Larch Avenue
Elmhurst, Illinois 60126-1196
www.chamberlain.com
There are two types of garage door openers pictured. Yours may appear slightly different.
Question and Answer IconNeed help?

Do you have a question about the Chamberlain Power Drive and is the answer not in the manual?

Chamberlain Power Drive Specifications

General IconGeneral
TypeChain Drive
Horsepower1/2 HP
SecurityRolling Code
Battery BackupNo
Voltage120V
Lift Capacity7 feet
Remote Controls Included2

Summary

Important Safety Notes

General Safety Precautions

Key safety warnings and guidelines for operating the garage door opener, highlighting potential hazards.

Preparing Your Garage Door

Door Balance and Safety Checks

Procedures to ensure the garage door is balanced, not sticking, and safe before opener installation.

Planning the Installation

Site and Structural Considerations

Evaluating garage door type, ceiling height, and potential reinforcement needs for proper installation.

Floor-to-Door Gap Safety Requirements

Critical gap specifications for the floor and door to ensure safety reversal system functionality.

Tools and Opener Components

Required Tools for Installation

A comprehensive list of tools necessary for the assembly and installation of the garage door opener.

Opener Parts Identification

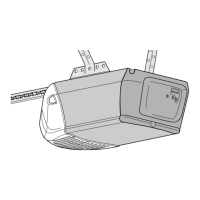
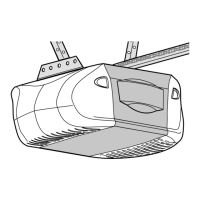
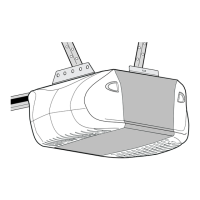
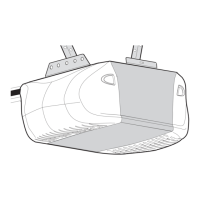
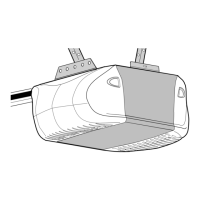
Visual identification of all components included in the garage door opener package.

Hardware for Assembly and Installation

Assembly and Installation Hardware

Detailed listing and illustration of all hardware used in the opener assembly and installation process.

Opener Assembly Procedure

Assembling the Rail and Trolley

Step-by-step instructions for assembling the opener rail, trolley, chain, and related components.

Completing Chain and Trolley Connections

Finalizing the chain and trolley connections, including the idler pulley and chain spreader.

Installation Safety Guidelines

Critical Installation Warnings

Essential safety warnings and instructions to prevent injury or death during the installation process.

Installing the Header Bracket

Mounting the Header Bracket

Instructions for securely fastening the header bracket to the garage wall or ceiling structure.

Mounting the Header Bracket

Ceiling Mount Option Guidance

Specific instructions for installations requiring the header bracket to be mounted to the ceiling.

Attaching Rail to Header Bracket

Connecting the opener rail assembly to the previously mounted header bracket.

Positioning and Hanging the Motor Unit

Hanging Motor Unit to Ceiling

Securing the motor unit to the ceiling using appropriate hanging brackets.

Door Reinforcement and Bracket Installation

Reinforcing Light-Weight Doors

Guidance on reinforcing garage doors made of light materials like fiberglass or steel.

Fastening the Door Bracket

Instructions for attaching the door bracket to the garage door itself, ensuring proper alignment.

Attaching Door to Trolley

Connecting Door Arms to Trolley

Procedures for connecting the straight and curved door arms to the opener trolley.

Installing the Door Control

Wiring and Mounting the Door Control

Steps for preparing wires, connecting them to the control panel, and mounting it securely.

Installing Light Bulbs and Electrical Requirements

Light Bulb Installation

Guidance on selecting and installing appropriate light bulbs for the opener's lighting feature.

Electrical Connection Methods

Instructions for plugging into a grounded outlet or making permanent wiring connections.

Installing the Protector System®

Safety Reversing Sensor Installation

Crucial steps for installing the safety reversing sensors to prevent accidents from closing doors.

Protector System® Mounting Options

Assembling and Mounting Safety Sensors

Various options for assembling and mounting the safety reversing sensors to the garage door track or wall.

Wiring the Safety Reversing Sensor

Connecting Safety Sensor Wires

Instructions for running, stripping, and connecting the safety sensor wires to the motor unit.

Adjustment of Travel Limits

Setting Up and Down Travel Limits

Adjusting the opener to stop the door at the fully open and closed positions.

Adjustment of Door Forces

Adjusting Open and Close Forces

Setting the force required for the door to open and close safely and effectively.

Safety System Testing

Testing Safety Reversal System

Verifying the door reverses upon contact with an obstruction.

Testing the Protector System®

Confirming the safety reversing sensor functions correctly to prevent closing.

Operation Overview

Using Your Garage Door Opener

How to activate the opener using remotes and door controls, and expected door behavior.

Wall Control, Maintenance, and Manual Operation

Operating the Wall-Mounted Door Control

Functions of the multi-function door control, including lock and light features.

Routine Opener Maintenance Schedule

Schedule for manual operation checks, limit/force adjustments, and lubrication.

Manual Door Operation

How to disengage and operate the garage door manually in case of power failure.

Troubleshooting Common Problems

Door Won't Close or Lights Blink

Diagnosing issues with the safety reversing sensor and diagnostic LEDs.

Remote Control and Motor Issues

Solutions for remotes not activating, motor humming, or overheating.

Diagnostic Chart

Interpreting Diagnostic LED Flashes

Guide to understanding error codes indicated by the motor unit's diagnostic LED.

Programming Remote Controls and Keypad

Adding or Reprogramming Remotes

Instructions for programming additional hand-held remote controls to operate the opener.

Programming Keyless Entry PIN

Steps to add, reprogram, or change the PIN for the keyless entry system.

Temporary PIN and Code Erasure

Setting Temporary Access PINs

Creating temporary PINs for visitors or service personnel with time or access limits.

Erasing All Stored Codes

Procedure to clear all previously programmed remotes and keyless entry codes from memory.

Remote Control Battery Replacement

Replacing Remote Batteries

Instructions and safety warnings for replacing batteries in remote controls.

Repair Parts Identification

Rail Assembly Parts List

Identification of parts related to the opener's rail assembly.

Installation Parts List

Identification of various parts used during the installation process.

Motor Unit Assembly Parts

Motor Unit Component Breakdown

Detailed list and diagrams of parts comprising the motor unit.

Available Accessories

Opener Accessory Options

Listing of optional accessories such as remotes, rail extensions, and sensor brackets.

Product Limited Warranties

1-Year / 6-Year Motor Warranty Details

Details of the limited warranty for specific Chamberlain opener models.

1-Year / Lifetime Motor Warranty Details

Details of the limited warranty for other Chamberlain opener models.

Service and Repair Parts Information

Chamberlain Service Contact Information

Information for obtaining installation, parts, and service support from Chamberlain.

Ordering Repair Parts Instructions

Instructions and required information for ordering replacement parts for the opener.

Related product manuals