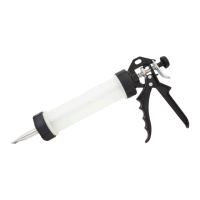
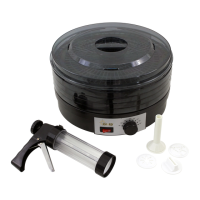
The Chard Jerky Gun is a manual device designed for making jerky strips or sticks from ground meat. It features a durable construction with a die-cast metal frame and a 9-inch semi-transparent poly chamber, allowing users to monitor the meat level. The device is equipped with a smooth-pulling ergonomic handle and a spring-loaded ratchet cam trigger for comfortable and efficient operation.
Technical Specifications:
- Frame: Die-cast metal
- Chamber: 9" semi-transparent poly chamber
- Tips: 3 stainless steel tips (single jerky strips, double strips, or sticks)
Usage Features:
The jerky gun is designed for ease of use, allowing users to prepare homemade jerky with precision.
- Preparation: Before each use, the jerky gun must be thoroughly cleaned. Ground meat should be pre-mixed with seasonings and cure (not included). For optimal consistency, it's suggested to add water gradually to the meat until it resembles peanut butter, ensuring it slides through the nozzle with minimal effort.
- Loading: To load the jerky gun, the plunger (3a) is fully retracted by pressing down on the plunger release button (3b) located on the back of the trigger assembly. The threaded collar (2) is then removed, and the jerky tube (1) is loaded with ground meat. The meat should be packed firmly to release any trapped air, filling the tube approximately 1/2 inch from the top.
- Nozzle Attachment: Users can select from three stainless steel nozzle attachments: single flat (4a), double flat (4b), or single round (4c), depending on the desired jerky shape. The chosen nozzle is attached to the jerky tube (1) using the threaded collar (2), and all parts must be tightened securely.
- Forming Jerky: The jerky gun is used to form strips or sticks directly onto a drying rack or tray. A spacing of 1/4 inch to 1/2 inch between pieces is recommended to ensure even drying.
- Jerky Sticks with Casings: For making jerky sticks with casings, the desired length of casing is slid over the single round nozzle (4c). The trigger is pulled to stuff the casing to the desired length, and then the casing is pinched and twisted to form individual links.
- Curing: After forming, the jerky is cured using a food dehydrator, smoker, or convection oven. A minimum internal temperature of 155°F (68°C) is required for curing.
Important Safeguards:
- Always read all instructions before using the jerky gun.
- Do not clean with abrasive materials.
- Never force parts or brackets into position.
- Keep away from moving parts to avoid pinch points and serious injury.
- Ensure all product parts are assembled correctly before use.
- Use only recommended attachments and for its intended purpose.
- This product is not intended for use by persons with reduced physical, sensory, or mental capabilities, or lack of experience and knowledge, unless supervised or instructed by a responsible person.
- Do not use if the product appears damaged.
- Do not attempt to repair the product yourself; contact Customer Service at 1-800-288-4545.
- Close supervision is required when used near children.
- Keep out of reach of children; children should be supervised to prevent them from playing with the product.
- Cleaning and user maintenance should not be performed by children without supervision.
- This product is for household use only.
Maintenance Features:
Proper cleaning and maintenance are essential for the longevity and safe operation of the Chard Jerky Gun.
- Disassembly: After use, fully retract the plunger from the jerky tube. Unscrew the nozzle and jerky tube counterclockwise from the handle assembly.
- Cleaning: All parts should be hand-washed with hot, soapy water. It is crucial to dry all parts thoroughly before reassembling. The parts are NOT dishwasher safe.
- Storage: To prevent corrosion during storage, it is recommended to coat all metal parts with a food-grade silicone spray.
Tips for Best Results:
- Meat Leanness: For faster drying and less fat drippings, use meat that is as lean as possible, ideally 80% to 95% lean ground meat.
- Meat Temperature: Do not use partially frozen meat, as this will hinder proper flow from the jerky gun.
- Curing: Curing the jerky mixture with sodium nitrate is recommended to prevent bacteria growth when drying at low temperatures.
Recipe Example (Ground Beef Jerky):
- Ingredients: 1 lb. lean ground beef (10% fat or less).
- Marinade: 1 tbsp soy sauce, 1 tbsp Worcestershire sauce, 1/4 tsp curing salt, 1 tsp ground black pepper, 1 tsp ground lemon pepper, 1 tsp curry powder (red), 1 tsp ginger powder, 1/4 tsp cilantro, 1/2 tsp garlic powder, 1/2 tsp onion powder.
- Instructions:
- Combine ground beef with marinade ingredients.
- Mix thoroughly.
- Load the jerky gun, packing firmly to remove air.
- Form strips or sticks on a drying rack/tray, leaving 1/4" to 1/2" spacing.
- Cure in a food dehydrator, smoker, or convection oven (minimum internal temperature of 155°F).
The Chard Jerky Gun is a practical tool for enthusiasts looking to create custom jerky at home, offering a straightforward process from preparation to curing.