25
filmed by the video camera (5) on
the child unit. To go back to the main
menu without changing any settings,
touch
.
Note: if, while navigating in the
sub-menu, no point of the display is
touched for 10 seconds, the display
(4) will automatically go back to dis-
playing the image filmed by the video
camera (5) on the child unit.
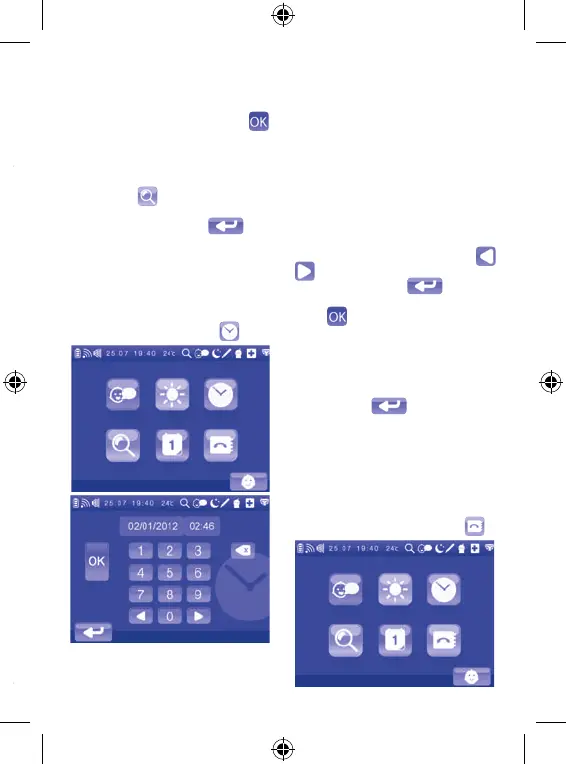
3.2.3 Setting the zoom
To set the digital zoom on the video cam-
era (5) on the child unit, access the corre-
sponding sub-menu by touching its icon
on the main menu.
The display will show the possibility to
choose between “1x” and “2x”. The green
icon indicates the current function setting
(“1x” is green if the function was not acti-
vated previously, “2x” is green if the func-
tion was activated previously). Touch the
blue “1x” or “2x” icon to change the digi-
tal zoom setting and confirm using
.
After selection, the display will automati-
cally switch to displaying the full screen
image filmed by the video camera (5) on
the child unit. When the digital zoom is
set to ‘2x’, the
is shown on the toolbar
(17). To go back to the main menu without
changing any settings, touch
.
Note: if, while navigating in the sub-menu,
no point of the display is touched for 10
seconds, the display (4) will automatically
go back to displaying the image filmed by
the video camera (5) on the child unit.
3.2.4 Date and time setting
When the appliance is switched on for
the first time, the toolbar on the dis-
play shows the date and time set by
the manufacturer. To set the current
date and time, access the correspond-
ing sub-menu by touching its icon on
the main menu. The display will show
the date and time setting screen. To set
the current date, touch the correspond-
ing string and use the keypad to enter
the digits representing the day, month
and year. To set the current time, touch
the corresponding string and use the
keypad to enter the digits representing
the hours and minutes. At any moment,
you can change the entry: touch
until reaching the digit to correct,
delete the digit using and enter
the correct one. To confirm the setting,
touch
: the display will automatical-
ly switch to displaying the image filmed
by the video camera (5) on the child unit
and the updated date and time will be
shown on the toolbar (17). To go back
to the main menu without changing any
settings, touch
.
Note: if, while navigating in the sub-
menu, no point of the display is touched
for 10 seconds, the display (4) will auto-
matically go back to displaying the im-
age filmed by the video camera (5) on
the child unit.
3.2.5 Contact list management
 Loading...