08
Please
follow these steps:
1.
Plug the
power
cord into the adapter.
2. Plug the AC connector of the adapter into the AC outlet socket
3. Plug the DC connector of
the
adapter into
the
DC sock
e
t
on the back
of th
e
charger.
4. Place the radio with
the battery
attach
e
d
, or
the
battery
alone,
in
the
charger.
5.
Make
sure the battery is In good contact with the charging terminals. The charging process initiates
when the
red LED lights.
6. The green LED lights about
4
hours later indicating
th
e
battery is fully charged. Then remov
e
th
e
radio
with the battery attached or th
e
battery alone
from
the charger.
7. -BATTERY INFORMATION:
7.1.-INITIAL
USE
New batteries are shipp
e
d
uncharged fully from
the
factory. Charge a new battery for 5 hours before initial
use. The ma:l.imum battery capacity and
performance
is achieved after
three
full charge/discharge cycles.
Jfyou
notice the battery power ruos low, please recharge the battery.
A
WARNING:
•
T
o reduce the risk oflnjury,
ch
arg
e
only the batteryspeclfied bytbe manufacturer.
Other batteries may bunt, causing bodUy Injury and property damage.
•To
avoid
risk
of
personal
Injury, do not dispose of
batteri
e
s
in a
Ore!
-Dispose of
batteries
according to local regulations (e.g. recycling). Do not dispose as household
wast
e
.
-Never
attempt
to disas1emble
the
battery.
7.
2
.
-BAITERY TIPS:
I. When charging your battery, keep it
at
a temperature among s• - 40•. Temperature
out
of
the
limit
may cause battery leakage or damage.
2. When
charging
a battery attached to a radio, turn the radio off to
ensure
a
full
charge.
3. Do
not cut
off the
power
supply or remove
the
battery
when charging
a battery.
4. Never charg
e
a battery
that is wet Please dry it with a soft cloth
prior
to charge.
S. The battery will eventually wear out.
When
the operating time (talk•time
and
standby time) is noticeably
shorter
than
normal performance,
it
is time to buy a new battery.
7.3.-PROLONG
BATTERY
LIFE:
1. Battery
performance
will be greatly decreased at a temperature below o•.
A
spare battery Is necessary
in
cold
weather. The
cold battery unable to work in this situation
may
work under roo
m
temperature, so
keep it
for later use.
2.
Th
e
dust
on
the batt
e
ry contact may caus
e
th
e
batt
e
ry cannot work or
<:barg
e
. Pl
e
as
e
us
e
a cl
e
an dry
cloth to wipe
it
b
e
fo r
e
attaching th
e
batt
e
ry to th
e
radio.
7.4.-BATIERY STORAGE:
1.
Fully <:barg
e
a
batt
e
ry b
e
fo
r
e
you store it for a long tim
e
,
to avoid batt
e
ry damag
e
du
e
to ov
e
r-
di
scharg
e
.
2. Recharg
e
a batt<:ry aft<:r s
e
v
e
ral months'
storag
e
(Li-loo batt
e
ri
e
s: 6 months), to avoid batt
e
ry capacity
r
e
duction du
e
to ov
e
r
-disc
h
a
rg
e
.
3. Stor
e
your
batt
e
r
y
In
a
cool
and
dry plac
e
und
e
r room
t
e
m
p
e
ra
t
ur
e
, to reduc
e
self-discharg
e
.
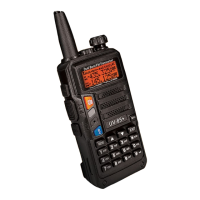
8.1.-RADIO OVERVIEW:
1. antenna
2. flashlight
3. knob (ON/OFF,
v o
l
u
m
e
)
4.
L
C
D
S. SK-side keyl/CALL(radio,alar
m
)
6. SK-side keyl/MONl(flashllgbt,monitor)
7. PTT key(push-to-talk)
8. VFO/MR (frequency
mode/channel
mode)
9. LED indicator
11
13
10. strap buckle
11.accessory jack
10
18
12.A/B key(frequency display swlt<:hes)
13.BAND key(band switch
e
s)
14.keypad
lS.SP.&MJC,
16.battery pack
17.battery contads
18.battery remove button
09