CIRRUS AIRPLANE MAINTENANCE MANUAL MODELS SR22 AND SR22T
22-11
Page 3
All
EFFECTIVITY:
3. MAINTENANCE PRACTICES
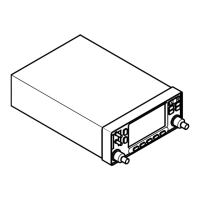
A. Flight Guidance Programmer/Computer (See Figure 22-112)
(1) Removal - Flight Guidance Programmer/Computer
(a) Set BAT 1, BAT 2, and AVIONICS master switches to OFF positions.
(b) Pull AUTOPILOT circuit breaker.
(c) Insert hex wrench into front panel bolt hole and engage locking screw.
(d) Turn locking screw counter-clockwise to loosen locking cam. Cam will move the trans-
ceiver unit out 1/4” and disengage from the electrical connectors.
(e) Pull Flight Guidance Programmer/Computer from mounting tray
(2) Installation - Flight Guidance Programmer/Computer
(a) With light to medium pressure, push Guidance Programmer/Computer into mounting tray
to engage electrical connectors.
(b) Insert hex wrench into front panel bolt hole and engage locking screw.
(c) Turn locking screw clockwise to tighten locking cam.
(d) Reset AUTOPILOT circuit breaker.
(e) Perform the following Functional Test whenever the original Flight Guidance Programmer/
Computer is replaced with a different Flight Guidance Programmer/Computer:
1
Perform Functional Test - Flight Guidance Programmer/Computer. (Refer to 22-11)
(3) Functional Test - Flight Guidance Programmer/Computer
(a) Serials 22-equipped with HSI only; Ensure Flight Guidance Programmer/Computer is con-
figured as a NSD-360 compatible unit.
(b) Serials 22-equipped with PFD only; Ensure Flight Guidance Programmer/Computer is
configured as a KCS-55 compatible unit.
Note: The following steps are to be performed in-flight in VFR smooth air.
(c) Serials 22-equipped with PFD and Serials 22-equipped with HSI: While NAV (without
GPSS) mode is engaged on the System 55X, using a GNS-430 GPS source, insert an
appropriately sized screwdriver into the slotted hole to perform alignment procedures in
accordance with the STEC installation instructions.
Note: The following steps are required for airplanes equipped with PFD only.
(d) Engage the 55x in HDG mode and allow aircraft to “settle on heading bug”. If heading bug
agrees with aircraft heading, the system is calibrated. Otherwise, complete the remaining
calibration steps.
(e) Turn both GNS-430 units off.
(f) Enter the setup mode on the PFD by simultaneously pressing and holding L1 and L3 line
select keys until the count down timer in the lower left corner of the display indicates zero
seconds.
(g) Turn both GNS-430's units back on.
(h) Press R3 line select key “Perform A/P Cal”.
(i) Press L1 line select key "Sync HDG”. Autopilot should immediately command aircraft to
turn toward heading bug.
(j) Press L4 line select key “Back to PFD”.
(k) Verify HDG mode accurately tracks heading bug. If autopilot does not track heading bug
correctly, repeat previous calibration steps.
(l) Engage NAV (without GPSS) mode on autopilot.
(m) Enter flight plan or waypoint and verify NAV mode accurately tracks flight plan. If autopilot
does not track NAV mode correctly, repeat previous calibration steps.
15 Jun 2010
 Loading...