Do you have a question about the Cisco RV260W and is the answer not in the manual?
Place the device on a flat surface on its four rubber feet.
Use the two wall-mount slots on the bottom panel and included screws.
Consider cable limitations and wall structure when choosing a wall location.
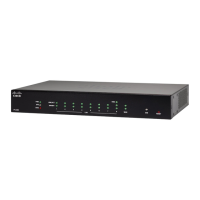
Details the status indicators and controls on the front of the router.
Identifies the various ports and connectors on the rear of the device.
Details the Kensington Lock Slot located on the side of the router.
Procedure to change the default administrator credentials for enhanced security.
Lists common connection issues and their recommended solutions.
| Ethernet WAN | Yes |
|---|---|
| SIM card slot | - |
| WAN connection type | RJ-45 |
| Throughput | 0.8 Gbit/s |
| Cabling technology | 10/100/1000Base-T(X) |
| Networking standards | IEEE 802.1x |
| VPN tunnels quantity | 20 |
| Ethernet LAN data rates | 10, 100, 1000 Mbit/s |
| Ethernet LAN interface type | Gigabit Ethernet |
| USB port | No |
| Combo SFP ports quantity | 1 |
| Ethernet LAN (RJ-45) ports | 8 |
| Mobile network generation | Not supported |
| Security algorithms | IPSec |
| Routing protocols | RIP-1, RIP-2, RIPng |
| Antenna type | External |
| Antennas quantity | 3 |
| Product type | Tabletop router |
| Product color | Black, Grey |
| Country of origin | China |
| Storage temperature (T-T) | -20 - 70 °C |
| Operating temperature (T-T) | 0 - 40 °C |
| Storage relative humidity (H-H) | 5 - 90 % |
| Operating relative humidity (H-H) | 10 - 85 % |
| Top Wi-Fi standard | Wi-Fi 5 (802.11ac) |
| WLAN data transfer rate (max) | - Mbit/s |
| Power source type | DC |
| Quantity per pack | 1 pc(s) |
| Harmonized System (HS) code | 85176990 |
| Package depth | 378.968 mm |
| Package width | 272.034 mm |
| Package height | 130.048 mm |
| Package weight | 1451.5 g |
| Depth | 279.4 mm |
|---|---|
| Width | 170 mm |
| Height | 38.5 mm |
| Weight | 1359.93 g |