WARNING!
Installation is best done with two people.
Never install on a windy day or when your
5th wheel roof is slippery. Please take care
whenever you are on a ladder or the roof.
CAUTION
Installation and removal is safer and easier
when done by two people. Please consult
your RV owners manual.
Tools Needed:
• Scissors
• Matchesorlighter(optional)
• Screwdriver(usuallyPhillipshead)for
roof antennas
Installation
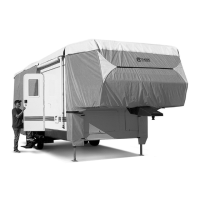
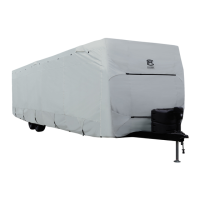
1.Coverortapeanysharpedgesonyour5th
wheelthatcouldwearagainstyourcover.Be
suretoloweranyroofantennas.
2.Unrollthecovernexttoyour5thwheel
withtheClassiclogoonyourcoveratthe
frontofyour5thwheelandfacingthe
outside.Unzipthesideandrearpanels.
3.Onlarger5thwheelsit’seasiesttoinstall
yourcoverfromtheroof.Carefullyclimbup
ontheroofpullingthecoverfrontwithyou.
Lowerthefrontofyourcoverdownoverthe
frontofyour5thwheelthencarefullymove
towardthebackpullingthecoverandletting
itfalldownthesidesofyour5thwheel.
Climbdowntherearladderandlocatethe
laddercap.(Thecaphelpskeepthetop
oftheladderfromstressingthecover).Fit
itovertheladdertopandattachittothe
rungswiththehookandloopstraps.Now
pullthebackendofthecoverdownthe
backofthe5thwheel.
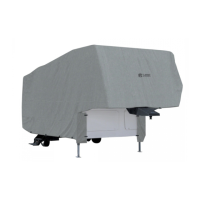
4.Zipallthepanelsclosedonyourcover
andthenpulltheelasticizedcornersdown
overbothbumpersofyour5thwheel.
5.Locatethehookandloopstrapsonthe
upperpartoftheapsthatfoldinunder
thenoseofyour5thwheel.Adjustthem
totyourcovertotheexactlengthofthe
noseofyour5thwheel.
6.Oncethelengthofthenoseofthecover
iscorrectlyadjusted,
locateoneofthe
suppliedropesandthe
D-ringssewninalongthe
apsthatfoldinunder
thenoseofyour5th
wheel.Tightentherope
and tie it off onto the
D-ringslocatedopposite
eachother.Repeatwith
thelowerD-ring.
7.Tieanendofthe
suppliedropeontoone
oftheD-ringsalong
thebottomhem.Putasmallrockinthe
providedtossbag,closethetopandtie
thefreeendoftheropetothebagD-ring.
Nowtossthebagandropeunderyour5th
wheeltotheD-ringontheoppositeside.
Taketheropeoffthebagand,allowing
enoughtomakeaknot,cutitoffandtieit
totheD-ring.RepeatwiththeotherD-rings.
Tokeeptheropeendsfromfrayingyou
cancarefullymelttheendswithamatchor
lighter.
8.Adjustthestraplengthonthewhite
tensionpanelsacrossthefrontandbackto
tyour5thwheel.Don’tovertighten—the
strapsshouldbesnug,notdrumtight.
Toattachthestrapsintotheside-release
bucklesjustinserttheclipintothebuckle.
Toreleasethebucklepressthebuttons
onbothsidesandpulltheclipoutofthe
buckle.
Use and Storage
Yourcovercanbeunzippedforaccessto
thepassengersideandrear.Thepanels
canberolledupandheldinplacewiththe
hookandloopstrapstowardthetopofeach
panel.
Ahandystoragebagisprovided.Totit
inthebagfoldyourcoverandrollthecover
tightlyratherthanstufngit.Neverstore
awetcoverinthestoragebagorconned
areaasthecovercanbedamagedby
mildew.
Care
Spotcleanwithwater,amildsoapanda
sponge.Don’tuseabrasivecleanersor
brushes.
752637536375463755637566375763
ExtraTallModels:75863,75963,75063
Instructions: PolyPRO3
™
5th Wheel Cover
12cR55_12859
do not
pack wet
do not iron
line dry
water
resistant
do not
use soap
CLASSICACCESSORIES,INC.
KENT,WAUSA98032 ©2012
classicaccessories.com