Page / Seite 4 © clearaudio electronic GmbH 2017
Balance +
User manual
Bedienungsanleitung
Getting started
1. Switch off all your hi- system components and connect your
Balance+
phono-preamplier.
2. Follow the set-up adjustment steps described before.
3. Connect the
Balance+
with 15-pole Sub-D connector to the power supply unit.
4. Connect the power supply to the mains supply and switch the unit on.
5. Now you may switch on your ampliers.
Please note:
To prevent overheating of electronic parts never cover or put anything on top of the
Balance+
preamplier or the power supply. Clearaudio recycles your used equipment free of charge.
Don’t dispose the unit through the domestic waste.
Main plug phase polarity:
Ex factory the mains plug ‘live’ pin is marked with a red spot.
If applicable in your area (US and EU connectors will permit this, UK 3-pin plugs will not) and
where no mains phase testing equipment is available, try to nd the correct mains phase by
alternately turning the plug and listening. You will hear the difference!
Please note:
Phonostages are devices designed to provide a very high level of amplication. This is necessary
because the electrical signal generated by a phono cartridge is extremely low (usually less than
one-thousandth of a volt). The job of the phonostage is therefore to accurately equalise the phono
signal and boost it to line level (measured in volts).
However, phonostages are by nature extremely sensitive, which leads to the potential problem
that high-frequency interference may also be amplied to a point at which it becomes noticeable.
Unfortunately it is not possible to completely protect the sensitive phonostage circuitry from this
interference without degrading its high delity performance. Therefore care must be taken to
position the phonostage away from sources of high frequency interference such as mobile phones,
modems and powerline communication systems (PLC) in which data is sent over the mains power
network.
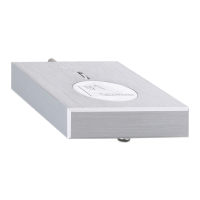
Please note:
IftheBalance+isnotinuseforanextendedperiod,
switchitoffattherearpanel
Pic. 1: Switch off at the rear panel