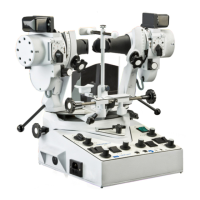
5
Synoptophore Instructions
T
he following instructions are intended to assist the user
to become rapidly familiar with the various controls of the
Synoptophore. Although some brief references to the
orthoptic usage of the instrument have been given, it is
obviously beyond the scope of this manual to detail the
precise methods of examination and treatment of which
the Synoptophore is capable.
The figures in brackets on this description refer to the
illustrations of the particular model 2001, 2002 or 2003
pages 12, 13 & 14.
Please Note:
The HB Motor should not be run continuously.
Please switch off between patients.
4. To remove the instrument from the
packing case and subsequent handling.
Lift Synoptophore by handles (101),
NOT by the optical tubes.
5. Connection to electricity supply
(a.c. only).
Check the voltage of your electrical supply and
ensure that the voltage selector (126, p12)
corresponds to this.
Switch the instrument on at (124, rocker switch) and
check that the green indicator lamp is working.
6. Adjusting the Synoptophore to the
patient.
(a) Free the optical tubes by releasing the central lock
(122) and the two tube locks (121) which should be
turned inwards.
(b) Set the selector switch (131) to ‘NORMAL’.
(c) Measure the patient’s interpupillary distance and
and set the pointer on the scale (103) accordingly,
by means of the controls (102).
(d) Adjust the height of the chinrest (105) by
means of control (104).
(e) Adjust the projection of the chinrest, by sliding it
toward or away from the patient, so that the
patient’s eyes are as close as possible to the
eye pieces.
(f) Adjust the projection of the forehead rest (106, p12)
to accord with (e) above.
(g) Set all the pointers at zero:-
Pointers on horizontal deviation scales (109, p12) by
means of handles (108, p12). Pointers on vertical
deviation scales (111) by means of controls (110).
Pointers on torsional deviation scales (112) by
means of controls (113). Pointers on elevation
and depression scales (114) by means of
controls (115).
7. Measuring the angle alpha.
T
he angle alpha is the angle between the optic axis
of the eye and the visual axis. Often this can be
large enough to give the appearance of a squint or
to mask a squint and therefore it should be
assessed. In fact it cannot be measured, but a
close approximation can be made by using the
special slide A15 which is available. Place the slide
i
n either one of the slide carriers (116) and
instruct the patient to look at the zero mark.
Observe the reflection of the light on the patient’s
cornea and if this is not in the centre of the pupil the
patient is told to look at successive numbers, or
letters, until the reflection is in the centre. Adjoining
letters and numbers are separated by one degree,
thus if the patient is fixing on ‘E’ when the corneal
reflex is central, the angle alpha can be recorded
as 5˚. It is positive when nasal, and negative when
temporal, and the sign, too, must be recorded.
Having measured one eye, then the same procedure
should be carried out with the other eye fixing.
8. Measuring the objective angle.
If possible, the objective angle of deviation should
be measured with each eye in turn fixing. A pair of
slides from the simultaneous perception range is
used of a size large enough to be seen clearly but
small enough to ensure fixation on a central
point. The patient is instructed to look at the slides
and the tubes are then converged or diverged by
the operator until the corneal reflections are seen
to be central. One light is extinguished by
depressing one of the two flashing switches (129)
and the patient is told to concentrate on the
picture still illuminated. On being satisfied that
fixation is accurate the light for that eye is
extinguished at the same time as the light before
the other eye is turned on. The non-fixing eye is
then observed and any movement to take up
fixation is compensated for by converging or
diverging the tube. Vertical movements will also
be noted and the tube moved correspondingly by
the appropriate vertical deviation control (110).
The patient is then told to fix the picture as before
and the procedure is repeated until there is no
further movement of the non-fixing eye when it
takes up fixation. The angle obtained is the
objective angle. The examination is now repeated
with the other eye fixing. Similar measurements
will be made with the patient looking 15˚ to the
left, 15˚ to the right, 15˚ up and 15˚ down (the last
two by using the elevation and depression
controls (115)). In cases where there is poor
fixation in one eye the measurements will be
made with the good eye fixing only, and the tubes
will be moved until the corneal reflections are in
the centre of the pupils.
!
!
 Loading...