EasyManua.ls Logo

ClosetMaid 5-8 FIXED MOUNT CLOSET ORGANIZER User Manual

ClosetMaid 5-8 FIXED MOUNT CLOSET ORGANIZER
20 pages
To Next Page IconTo Next Page
Page #1 background imageLoading...
Page #1 background image
1© ClosetMaid Corporation 2015 | Ocala, FL 34471 | 1-800-874-0008 | www.closetmaid.com | www.closetmaid.ca
5037 REV 8.15
01-80262
5’-8’ FIXED MOUNT CLOSET ORGANIZER
ORGANISATEUR POUR GARDE-ROBE DE 1,52 À 2,44 M
ORGANIZADOR PARA CLÓSET 1,52 A 2,44 M
INSTALLATION INSTRUCTIONS DIRECTIVES D’INSTALLATION INSTRUCCIONES DE INSTALACIÓN
What you will need:
Vous aurez besoin de:
Va a necesitar:
KIT CAPACITY:
Max System Load: 400 lbs
(Primary configuration only)
Max Combined Load: 40 lbs/ft
BEFORE BEGINNING
Please read all instructions carefully.
Familiarize yourself with all parts (see “PARTS”)
and check quantities.
Follow all safety precautions
(see “SAFETY PRECAUTIONS”).
Follow all manufacturer installation requirements in order to
comply with the advertised weight load specifications.
CAPACITÉ DE CHARGE:
Charge maximale du système:181,43kg
(Configuration primaire seulement)
Charge maximale combinée: 59,53kg/m
AVANT DE COMMENCER
Prière de lire avec soin toutes les directives fournies.
Se familiariser avec les pièces nécessaires à l’installation
(voir « PIÈCES ») et vérifier les quantités présentes.
Respecter toutes les consignes de sécurité
(voir « COSIGNES DE SÉCURITÉ »).
Suivez toutes les exigences d’installation du fabricant, afin de se
conformer aux spécifications de charge de poids annoncés.
PESO QUE SOPORTA:
Carga máxima del sistema: 181,43kg
(Configuración básica solamente)
Carga máxima combinada: 59,53kg/m
ANTES DE EMPEZAR
Lea todas las instrucciones cuidadosamente.
Familiarícese con todas las piezas (vea “PIEZAS”)
y verifique las cantidades.
Siga todas las precauciones de seguridad
(vea “PRECAUCIONES DE SEGURIDAD”).
Siga todos los requisitos de instalación del fabricante con el fin
de cumplir con las especificaciones de carga de peso anunciados.
Question and Answer IconNeed help?

Do you have a question about the ClosetMaid 5-8 FIXED MOUNT CLOSET ORGANIZER and is the answer not in the manual?
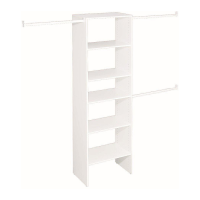
ClosetMaid 5-8 FIXED MOUNT CLOSET ORGANIZER Specifications

General IconGeneral
Product TypeCloset Organizer
BrandClosetMaid
Adjustable WidthNo
MaterialSteel
ColorWhite
Adjustable ShelvesNo
Model5-8 FIXED MOUNT
Closet Width5-8 feet
Weight Capacity100 lbs
Installation TypeWall Mounted
Included ComponentsShelves
Mount TypeFixed

Summary

ClosetMaid Installation Guide

Pre-Installation Checklist

Read all instructions, check parts, and follow safety precautions before starting.

System Load Capacity

Details maximum system load and combined load per foot.

Tools and Materials Needed

Lists items needed for installation and assembly.

Product Warranty Details

Important Safety Precautions

Maximum Load and Wall Requirements

Specifies system load limits and requirements for drywall thickness.

Included Parts List

Prepare and Assemble Hardware Components

Wall Measurement and Marking

Marking Center Wall Line

Measure wall width, divide by two, and mark the exact center.

Positioning Support Post

Place assembled support post on floor against the center line.

Marking Hole Locations on Wall

Mark hole locations on the wall based on the support post's position.

Cutting Shelves and Hanger Rods

Installing Shelf Caps

Place shelf caps onto exposed shelf rods after cutting.

Measuring and Fitting Wall Clips

Mark Wall Clip Locations

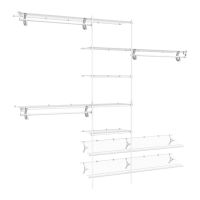
Mark all wall clip locations with an 'X' as shown in diagrams.

Install Wall Clips Based on Wall Type

Install clips at marked locations according to the specified wall type.

Fitting Wall Clips for Custom Shelves

Adjust Wall Clips for Cut Shelves

Reposition wall clips in even increments to accommodate cut shelf size.

Closet Design Configuration Examples

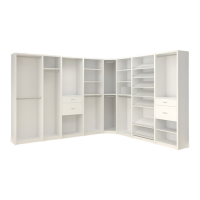
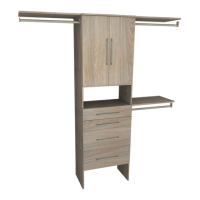
Illustrates different closet layout possibilities and reversed designs.

Attaching Clips to Drywall and Plaster

Drilling and Inserting Clips/Pins

Drill 1/4" holes and use supplied wall clips and pins for installation.

Attaching Clips to Non-Drywall Walls

Clip Installation for Various Wall Types

Specific instructions for drywall, paneling, wood, and concrete wall installations.

Installing Closet Shelves

Securing Shelves to Wall Clips

Firmly push shelf rear rod into wall clips, short shelves in center, long shelves to sides.

Installing Wall Mounting Brackets

Marking Bracket Alignment Lines

Draw lines on side walls extending from back wall lines for bracket placement.

Using Template to Mark Bracket Holes

Cut template, place against wall, mark and drill 1/4" holes for brackets.

Installing Wall Mounting Brackets (Continued)

Securing Shelves to Installed Brackets

Lift shelf, push anchors into holes, place pins, and gently lower shelf into brackets.

Installing Vertical Support Posts

Attaching Support Posts to Shelves

Slide post clip through shelf wires, push onto shelf, and secure with screw.

Installing Superslide® Rod Hardware

Attaching Rod Supports to Closet Rod

Push rod support up from under shelf, tilt back, and snap onto horizontal rod.

Positioning Rod Support Brackets

Place rod supports at ends of closet rod, spaced no more than 36" apart.

Installing Superslide® Rod Hardware (Continued)

Installing Rod Caps and Rod into Supports

Place caps on rod ends and snap rod into closet rod supports.

Installing Shoe Shelves

Marking Shoe Shelf Placement on Wall

Measure from floor, mark 12" up, and draw a level line for shelf placement.

Marking Wall Clip Positions for Shoe Shelves

Mark wall clip locations as shown for shoe shelves only.

Installing Shoe Shelves (Continued)

Attaching Shoe Supports and Securing Shelves

Attach shoe support to shelf wires, secure shelf to wall clips, and lower shelf.

Optional ClosetMaid Accessories

View Available Organizational Accessories

Lists various optional accessories like tie racks, baskets, and extra shelves.

Related product manuals